Similar to one of my previous posts:
Moving Central Management Server from Lync Server 2010 enterprise front end pool to 2013 enterprise front end pool
https://blog.terenceluk.com/moving-central-management-server-from/
… this post serves to demonstrate the process of moving the Central Management Server from a Lync Server 2010 Standard server to a Lync Server 2013 Standard Server:
Documentation on how to do this can be found at the following URL:
https://technet.microsoft.com/en-us/library/jj688013.aspx
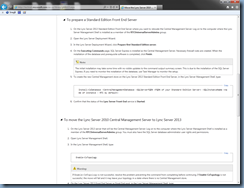
Prepare Standard Edition Front End Server
Begin by logging onto the Lync Server 2013 Standard front end server that you will be moving the CMS to and launch the Deployment Wizard:
Proceed through the wizard:
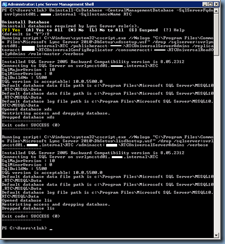
Now open up the Lync Server Management Shell and execute the following:
Install-CsDatabase -CentralManagementDatabase -SQLServerFQDN <FQDN of your Standard Edition Server> -SQLInstanceName <name of instance – RTC by default>
Since I’m using the Default RTC instance, the cmdlet I will be executing will look like the following:
Install-CsDatabase -CentralManagementDatabase -SQLServerFQDN svrlyncstd02.domain.internal -SQLInstanceName RTC
Once completed, confirm that the Lync Server Front-End service is Started.
——————————————————————————————————————————————————————-
Note that prior to running the Install-CsDatabase cmdlet above, the databases on the RTC instance are as follows:
- cpsdyn
- rgsconfig
- rgsdyn
- rtcab
- rtcshared
- rtcxds
… now that the Install-CsDatabase cmdlet has been successfully executed, you should see the following databases on the RTC instance:
- cpsdyn
- lis
- rgsconfig
- rgsdyn
- rtcab
- rtcshared
- rtcxds
- xds
lis and xds are the databases that were additionally installed.
——————————————————————————————————————————————————————-
Move CMS from Lync Server 2010 to 2013
With the new CMS installed on the destination server, proceed by publishing the topology with Enable-CsTopology:
Once Enable-CsTopology has successfully executed, proceed with moving the CMS with Move-CsManagementServer:
Once the Move-CsManagementServer completes, open up the Deployment Wizard on the new CMS server (Lync Server 2013) and click on Install or Update Lync Server System:
Run the Setup or Remove Lync Server Components:
Open up the Deployment Wizard on the old CMS server (Lync Server 2010) and click on Install or Update Lync Server System:
Run the Setup or Remove Lync Server Components:
From here, it’s important to confirm that replication with the new Central Management store is occurring so proceed by using the cmdlet:
Get-CsManagementStoreReplicationStatus
… to confirm that replication is in good health:
Note that the replication process shouldn’t take long (usually no longer than 5 minutes) and there were situations where I’ve noticed that the Lync Server File Transfer Agent service wasn’t running:
… so if you’ve been waiting for 10 minutes or more, check to make sure that the Lync Server File Transfer Agent service is running.
Remove Lync Server 2010 Central Management store files
With the CMS moved and replication confirmed to be in working order, proceed with removing the CMS files from the old Lync Server 2010 by using the following cmdlet:
Uninstall-CsDatabase -CentralManagementDatabase -SqlServerFqdn <FQDN of SQL Server> -SqlInstanceName <Name of source server>
Since this is a Standard server, the server hosting the CMS will be the Standard itself and cmdlet to execute will be as follows:
Uninstall-CsDatabase -CentralManagementDatabase -SqlServerFqdn svrlyncstd01.domain.internal -SqlInstanceName RTC
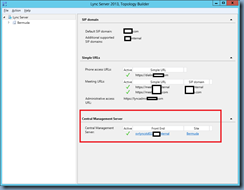
Once the cmdlet successfully executes, we will now have the CMS completely moved to the new Lync Server 2013 pool and removed from the old Lync Server 2010 pool.


![clip_image001[4] clip_image001[4]](https://lh4.ggpht.com/-ROolCzqT4kE/URD1xl9Bl2I/AAAAAAAAXvI/IHO36s7UGR8/clip_image0014_thumb.png?imgmax=800)
![clip_image001[6] clip_image001[6]](https://lh6.ggpht.com/-eRzIRTYkYpw/URD1y8aiOhI/AAAAAAAAXvY/69BmVoS2XTY/clip_image0016_thumb.png?imgmax=800)
![clip_image001[8] clip_image001[8]](https://lh3.ggpht.com/-xOb3MQ0WfEo/URD11RWBsbI/AAAAAAAAXvo/gAMc3nHSDf8/clip_image0018_thumb.png?imgmax=800)
![clip_image001[10] clip_image001[10]](https://lh6.ggpht.com/-dt6D5YNcDbU/URD12Q-40uI/AAAAAAAAXv4/ndYG-ab6ig8/clip_image00110_thumb.png?imgmax=800)


![clip_image001[14] clip_image001[14]](https://lh6.ggpht.com/-Gzckie1mVKY/URD1-9wOFMI/AAAAAAAAXw4/xxgte15Y_zU/clip_image00114_thumb.png?imgmax=800)
![clip_image001[12] clip_image001[12]](https://lh6.ggpht.com/-p8L1EE1QS6w/URD1_ujbVxI/AAAAAAAAXxI/jyvO60PMlN4/clip_image00112_thumb.png?imgmax=800)


![clip_image001[16] clip_image001[16]](https://lh4.ggpht.com/-Zc32hE3w1ag/URD2F6vYI5I/AAAAAAAAXyI/oDQURGXSKlE/clip_image00116_thumb.png?imgmax=800)
![clip_image001[18] clip_image001[18]](https://lh6.ggpht.com/-Qga4fVIZD6M/URD2HMw5cTI/AAAAAAAAXyY/agzD4mtg4IU/clip_image00118_thumb.png?imgmax=800)
![clip_image001[20] clip_image001[20]](https://lh5.ggpht.com/-IfJ41dV6jJk/URD2IV77nSI/AAAAAAAAXyo/zuNLhFM37cI/clip_image00120_thumb.png?imgmax=800)

![clip_image001[22] clip_image001[22]](https://lh3.ggpht.com/-_jctVj3gJc4/URD2LLAyefI/AAAAAAAAXzI/1sBf20PNnUQ/clip_image00122_thumb.png?imgmax=800)
![clip_image001[24] clip_image001[24]](https://lh4.ggpht.com/-BXowZSLnrVw/URD2MFJz2aI/AAAAAAAAXzY/gaBiJ2IbIGA/clip_image00124_thumb.png?imgmax=800)
![clip_image001[26] clip_image001[26]](https://lh6.ggpht.com/-8wgGKf7QSeg/URD2Nvtve3I/AAAAAAAAXzo/hWdcLDWYZTw/clip_image00126_thumb.png?imgmax=800)
![clip_image001[28] clip_image001[28]](https://lh4.ggpht.com/-qTFJfAOi8ss/URD2PASL4XI/AAAAAAAAXz4/0NAStEi-UCU/clip_image00128_thumb.png?imgmax=800)
![clip_image001[30] clip_image001[30]](https://lh6.ggpht.com/-PQw8aAk7Jdg/URD2QOw1GRI/AAAAAAAAX0I/Y6URu9ZY53Y/clip_image00130_thumb.png?imgmax=800)

![clip_image001[32] clip_image001[32]](https://lh6.ggpht.com/-iKm5WUP59eE/URD2S7DyZ7I/AAAAAAAAX0o/XUunRSh1iDc/clip_image00132_thumb.png?imgmax=800)


![clip_image001[34] clip_image001[34]](https://lh6.ggpht.com/-9QF7Y-4DULY/URD2Wyhe5wI/AAAAAAAAX1Y/FAUOAo2U620/clip_image00134_thumb.png?imgmax=800)


2 Responses
Thanks for sharing this Post..it is really interesting and Knowledgeable.
Server Management
Will this cause any downtime with the 2013 FE server and will there need to be any reboots of the servers in the pool?