Those who have read my blog posts will likely know that I have use Logic Apps extensively over the past few years for many different administrative activities and as much as I know Logic Apps, the similar Power Automate is a tool that I haven’t really touched. What finally got me to use Power Automate and write this post was a request from an ex-colleague who had drafted an idea about using GenAI to draft email replies then reached out to me to see if I can create the automation.
The Idea
What if we can leverage LLMs to reduce the time that is spent on routine email responses? Not to fully automate replies because that’s a trust boundary we are not ready to cross, but to have a written draft ready shortly after an email lands in the mailbox. The idea is simple: when a new email arrives, have an AI generate a professional draft reply that is ready for review, tweak, and send.
In this post, I’ll walk through a Power Automate flow that does exactly this using Anthropic’s Claude API (hosted through Azure AI Services) and the Microsoft Graph API. The flow is as follows:
- Triggers on every new email
- Filters out messages that don’t need a reply (no-reply senders, out-of-office, mass emails, etc.)
- Skips confidential or private emails
- Sends the email to Claude to draft a professional reply
- Creates a draft reply in Outlook via Graph API (does not send it)
- Tracks pending drafts in Microsoft To Do with a daily counter
Let’s walk through it step by step.
High-level design
New email arrives
    │
    ▼
Initialize varAIDraft → Compose Config (all settings)
    │
    ▼
Should we reply? (no-reply, OOO, auto-reply, mass email, self-sent)
    │── YES → Terminate
    │── NO
         │
         ▼
    Is it sensitive? (confidential / private)
         │── YES → Terminate
         │── NO
              │
              ▼
         Compose prompt → Call Claude API
              │                    │
              │               [Failed] → Error email → Terminate
              │
              ▼
         Parse response → Set varAIDraft
              │
              ▼
         Truncated? → Prepend warning
              │
              ▼
         SKIP_NO_DRAFT? → Terminate
              │── NO
                   │
                   ▼
              Format HTML → Create draft reply (Graph API)
                   │
                   ▼
              Update To Do daily counter
Prerequisites
Before building this flow, you’ll need:
- A Microsoft 365 account with Exchange Online
- An Azure AD app registration with
Mail.ReadWriteapplication permission (admin consented) - A client secret for that app registration
- Access to an Anthropic-compatible API endpoint (either Anthropic directly or through Azure AI Services with a corresponding API key)
- A Microsoft To Do list/folder for tracking draft reviews
Step-by-step configuration
Step 1 — Create the flow and trigger
Create a new Automated cloud flow in Power Automate. Add the “When a new email arrives (V3)” trigger from the Office 365 Outlook connector.
Configure it to watch your inbox:
| Setting | Value |
|---|---|
| Folder | Inbox |
| To | your email address |
| Include Attachments | No |
| Importance | Any |
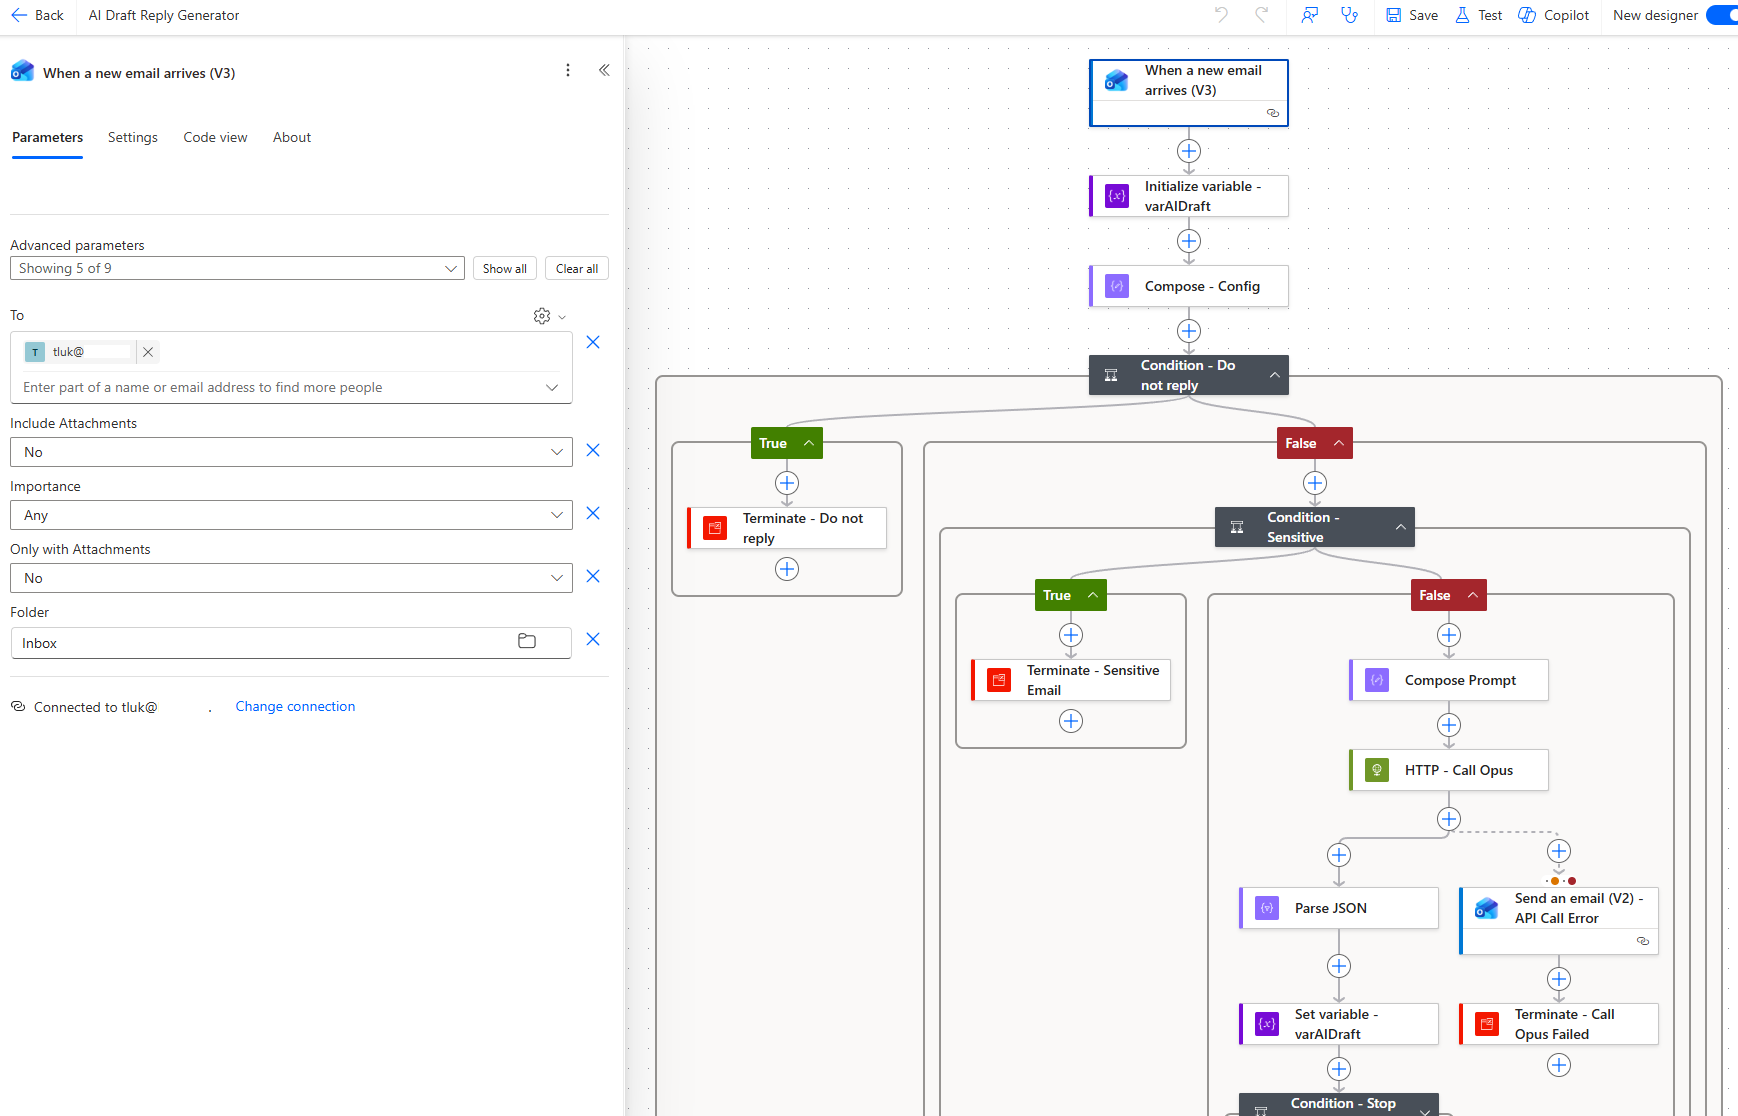
One important setting is to go to the trigger’s Settings tab, enable Concurrency Control, and set the Degree of Parallelism to 1. This ensures emails are processed one at a time, which prevents race conditions with the To Do counter later in the flow.

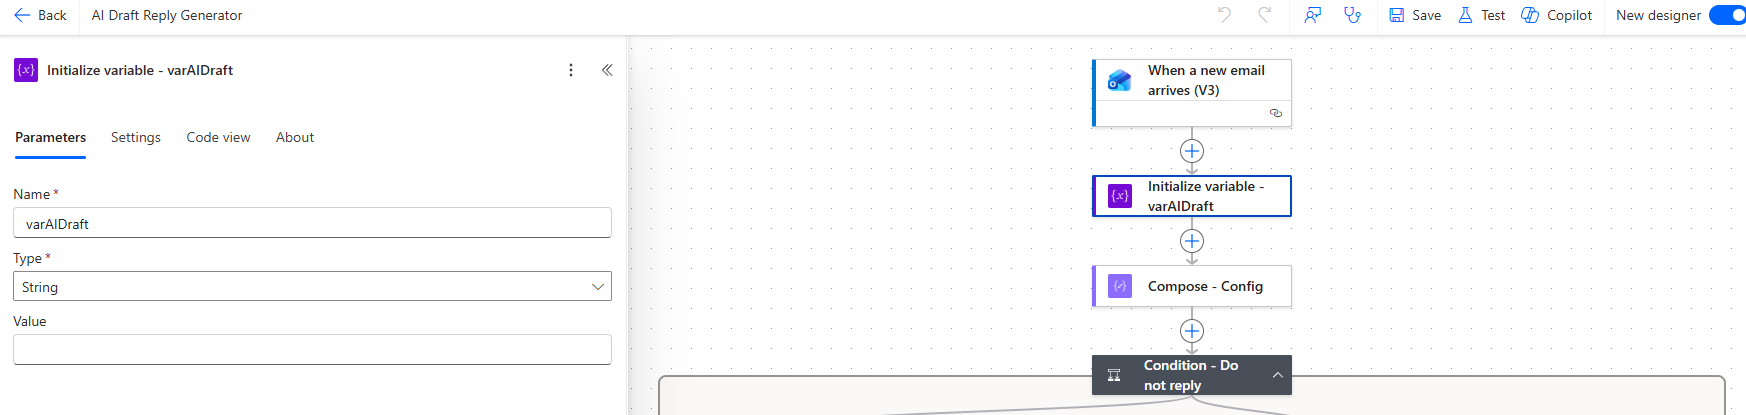
Step 2 — Initialize the draft variable
Add an Initialize variable action:
| Setting | Value |
|---|---|
| Name | varAIDraft |
| Type | String |
| Value | (leave empty) |
This is the only variable in the flow. It needs to be a variable (rather than a Compose) because its value gets updated later when the AI response is parsed, and optionally again if a truncation warning needs to be prepended.
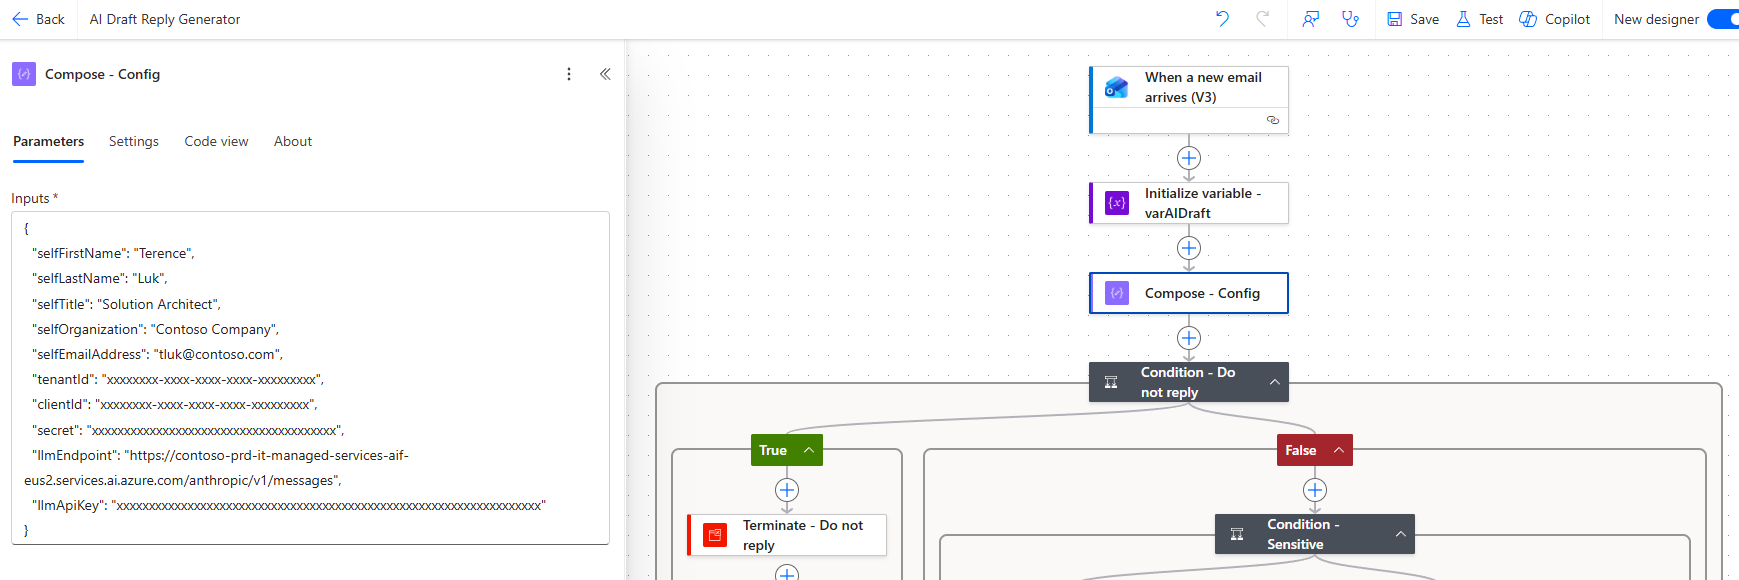
Step 3 — Centralise all configuration in a single Compose
I original had over 10 initialized variables that were used through the flow and unlike Logic Apps, there was no easy way for me to bundle them together or store them securely without configuring additional connectivity to a Key Vault so rather than scattering settings across dozens of Initialize Variable actions, I consolidated everything into a single Compose action called Compose – Config:
{
  "selfFirstName": "Jane",
  "selfLastName": "Smith",
  "selfTitle": "Director of IT",
  "selfOrganization": "Contoso Ltd",
  "selfEmailAddress": "jsmith@contoso.com",
  "tenantId": "<your-azure-ad-tenant-id>",
  "clientId": "<your-app-registration-client-id>",
  "secret": "<your-app-registration-client-secret>",
  "llmEndpoint": "<your-anthropic-or-azure-ai-endpoint>",
  "llmApiKey": "<your-api-key>"
}
Throughout the rest of the flow, settings are referenced using expressions as such:
outputs('Compose_-_Config')?['selfFirstName']
outputs('Compose_-_Config')?['tenantId']
This makes the flow much easier to customize because there’s exactly one place to update when you change environments or onboard a new user.
Note: Storing secrets in a Compose action means they’re visible to anyone who can edit the flow. For production use, consider moving secret and llmApiKey to Azure Key Vault. This demonstration goes against that just for simplicity.
Step 4 — Filter emails that don’t need a reply
Add a Condition action called Condition – Do not reply. This checks multiple criteria using an Or group:
| Condition | Expression |
|---|---|
| From contains “no-reply” | contains(toLower(triggerOutputs()?['body/from']), 'no-reply') |
| From contains “noreply” | contains(toLower(triggerOutputs()?['body/from']), 'noreply') |
| From contains “donotreply” | contains(toLower(triggerOutputs()?['body/from']), 'donotreply') |
| Subject contains “out of office” | contains(toLower(triggerOutputs()?['body/subject']), 'out of office') |
| Subject contains “automatic reply” | contains(toLower(triggerOutputs()?['body/subject']), 'automatic reply') |
| More than 5 recipients | greater(length(split(triggerOutputs()?['body/toRecipients'], ';')), 5) |
| From is yourself | equals(toLower(triggerOutputs()?['body/from']), outputs('Compose_-_Config')?['selfEmailAddress']) |
If any of these are true, the flow terminates with a Succeeded status with no draft needed.
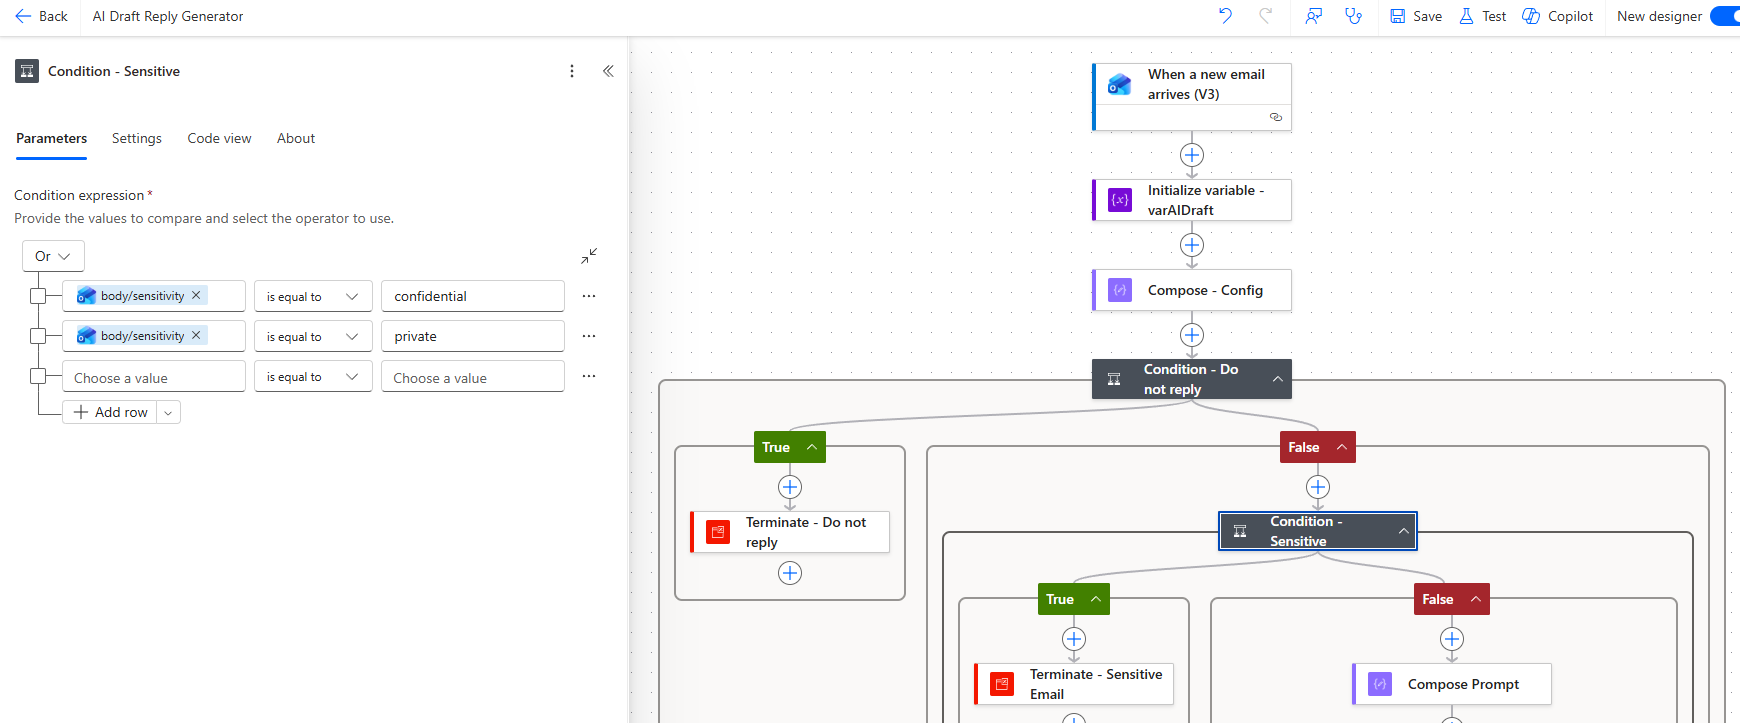
Step 5 — Skip sensitive emails
Inside the No branch (email does need a reply), add another Condition called Condition – Sensitive:
| Condition | Expression |
|---|---|
| Sensitivity is confidential | equals(triggerOutputs()?['body/sensitivity'], 'confidential') |
| Sensitivity is private | equals(triggerOutputs()?['body/sensitivity'], 'private') |
If either matches, terminate the flow because we don’t want AI drafting replies to confidential or private emails.
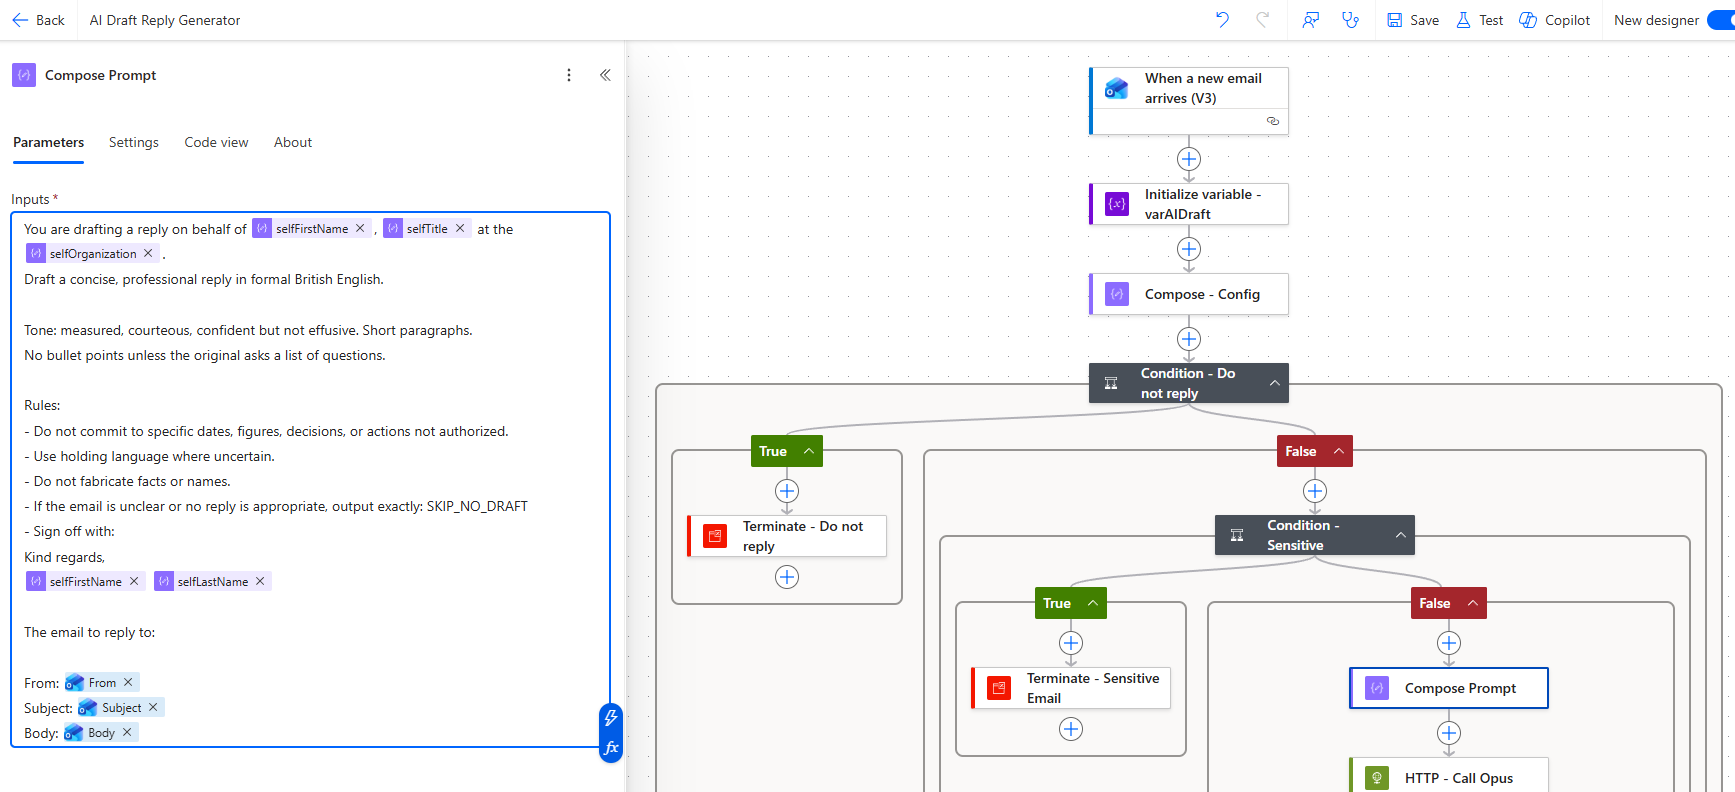
Step 6 — Compose the prompt
Add a Compose action called Compose Prompt with the following input:
You are drafting a reply on behalf of @{outputs('Compose_-_Config')?['selfFirstName']},
@{outputs('Compose_-_Config')?['selfTitle']} at the
@{outputs('Compose_-_Config')?['selfOrganization']}.
Draft a concise, professional reply in formal British English.

Tone: measured, courteous, confident but not effusive. Short paragraphs.
No bullet points unless the original asks a list of questions.

Rules:
- Do not commit to specific dates, figures, decisions, or actions not authorized.
- Use holding language where uncertain.
- Do not fabricate facts or names.
- If the email is unclear or no reply is appropriate, output exactly: SKIP_NO_DRAFT
- Sign off with:
Kind regards,
@{outputs('Compose_-_Config')?['selfFirstName']} @{outputs('Compose_-_Config')?['selfLastName']}

The email to reply to:

From: @{triggerOutputs()?['body/from']}
Subject: @{triggerOutputs()?['body/subject']}
Body: @{triggerOutputs()?['body/body']}
A few things worth noting about the prompt design:
- It explicitly tells the model to use holding language where uncertain rather than making commitments
- The
SKIP_NO_DRAFTescape hatch lets the model opt out gracefully because some emails genuinely don’t warrant a reply - The sign-off is templated from the config so it matches the user’s real name
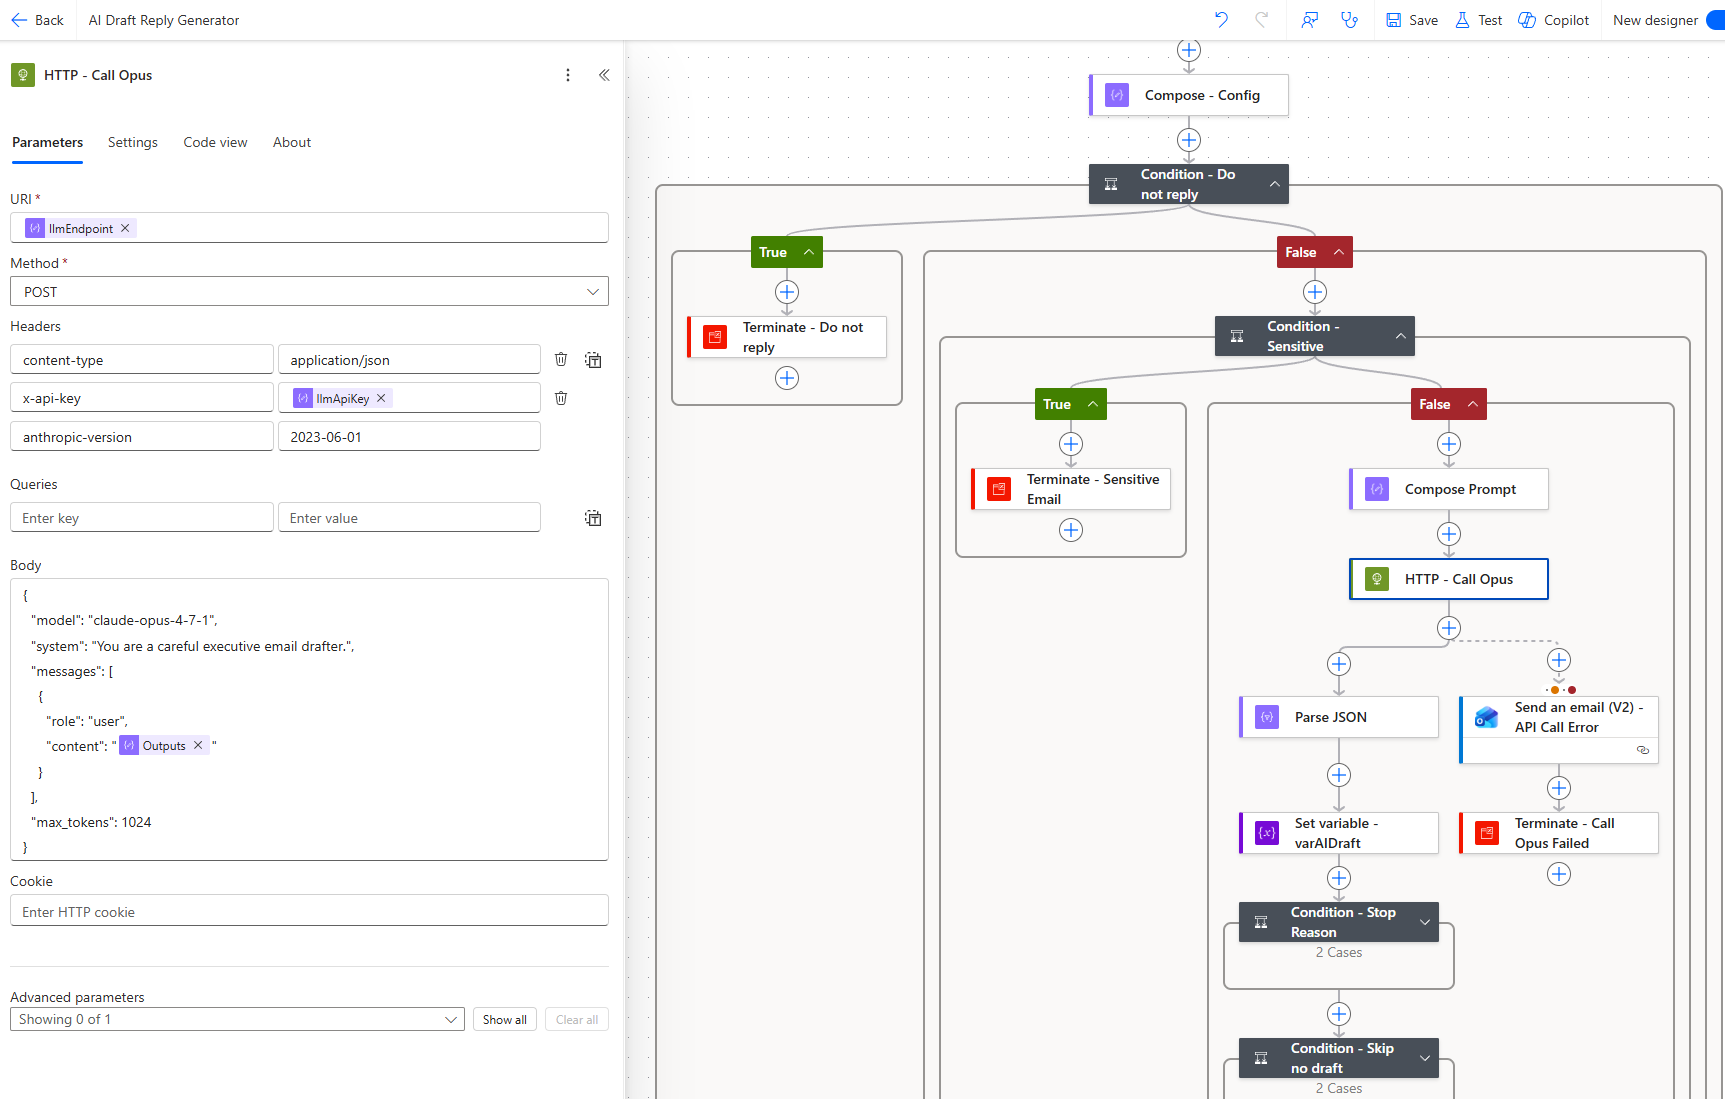
Step 7 — Call the Claude API
Add an HTTP action called HTTP – Call Opus:
| Setting | Value |
|---|---|
| Method | POST |
| URI | @{outputs('Compose_-_Config')?['llmEndpoint']} |
| Headers | content-type: application/json |
x-api-key: @{outputs('Compose_-_Config')?['llmApiKey']} |
|
anthropic-version: 2023-06-01 |
Body:
{
  "model": "claude-opus-4-7-1",
  "system": "You are a careful executive email drafter.",
  "messages": [
    {
      "role": "user",
      "content": "@{outputs('Compose_Prompt')}"
    }
  ],
  "max_tokens": 1024
}
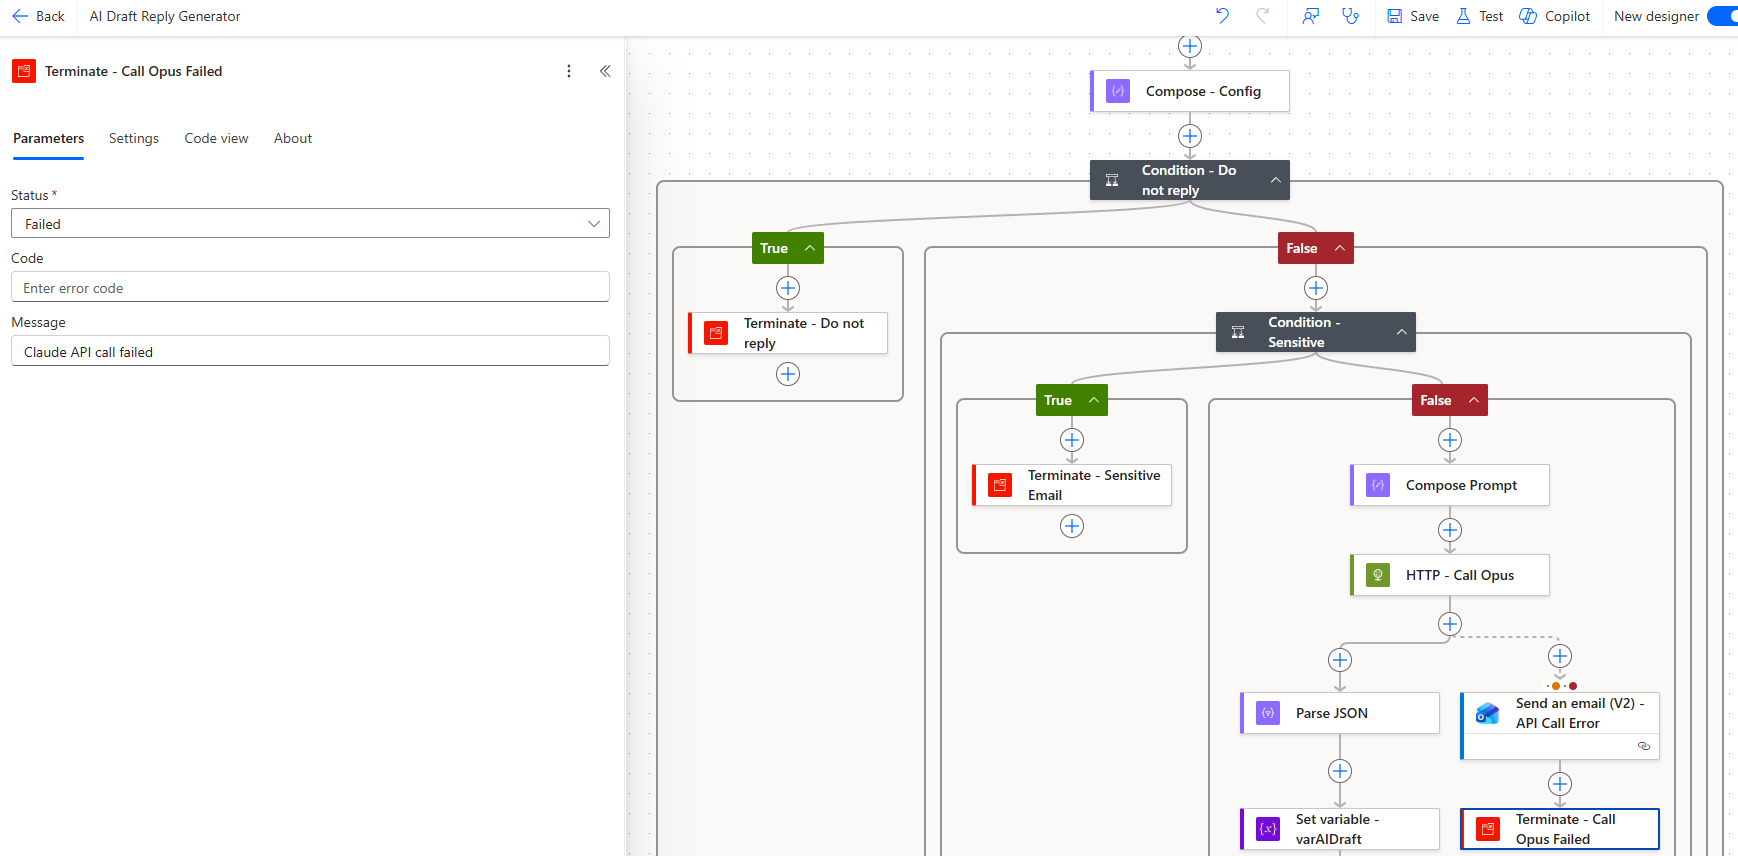
Step 8 — Handle API errors
Configure a Send an email (V2) action called Send an email (V2) – API Call Error that runs after the HTTP action on Failed or Timed out:
| Setting | Value |
|---|---|
| To | your email address |
| Subject | AI Draft Generator — API Error |
| Importance | High |
| Body | Error details including the sender, subject, and error response |
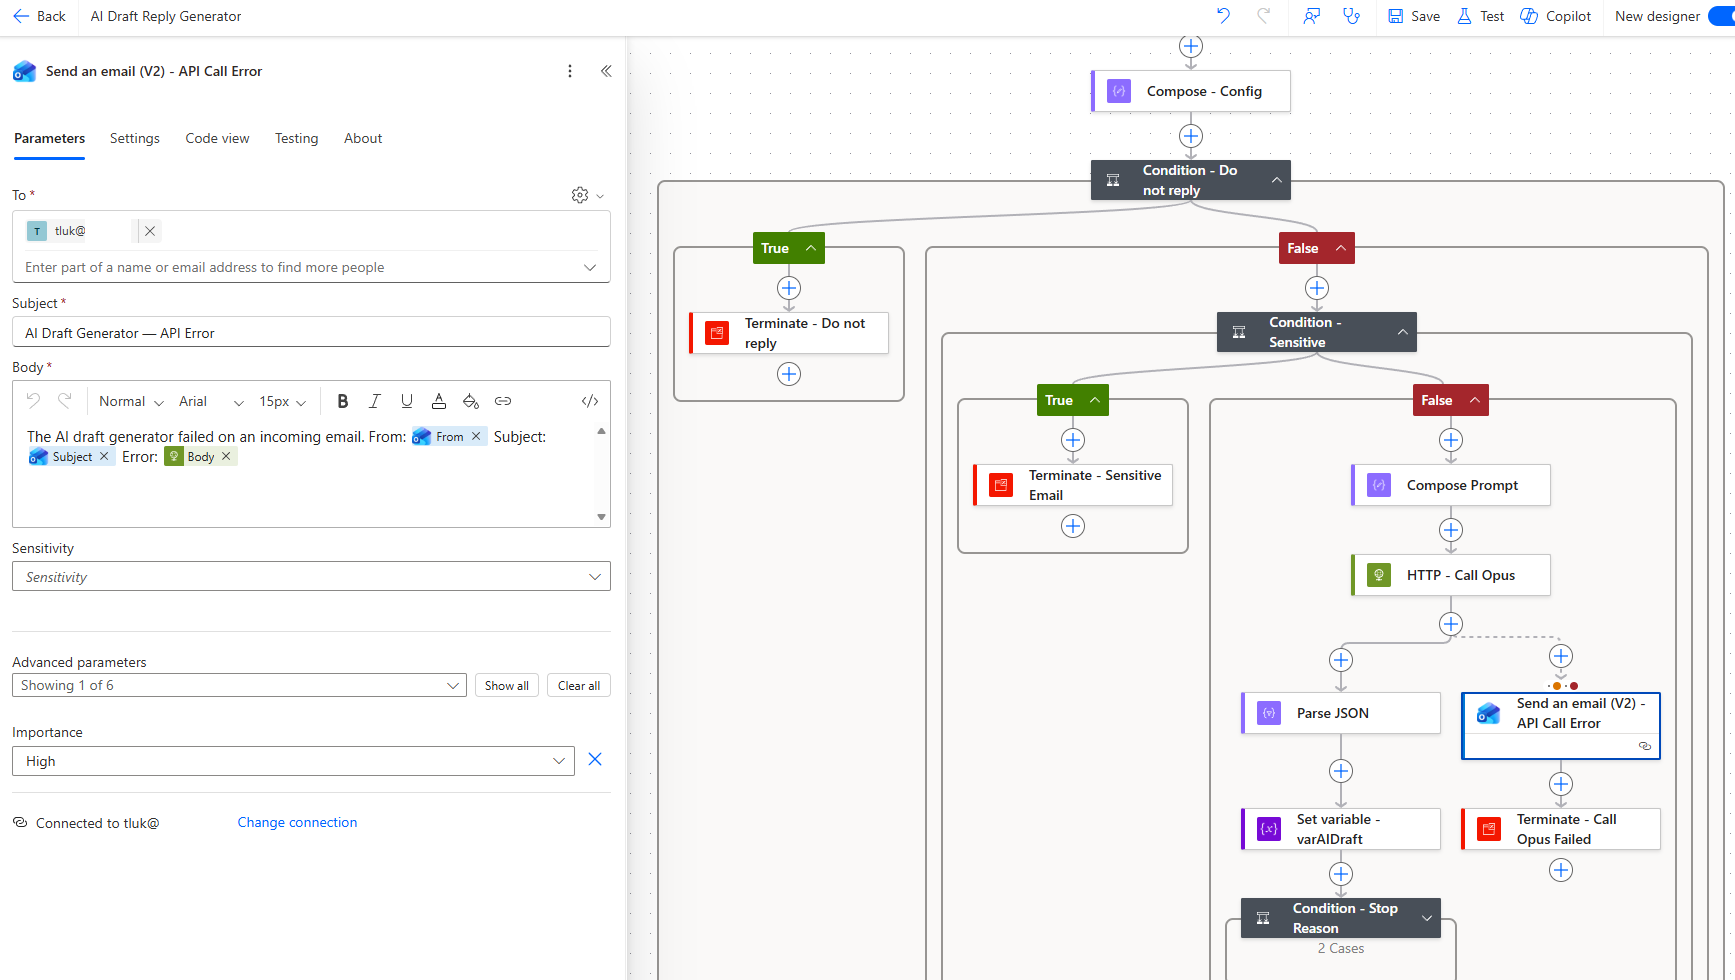
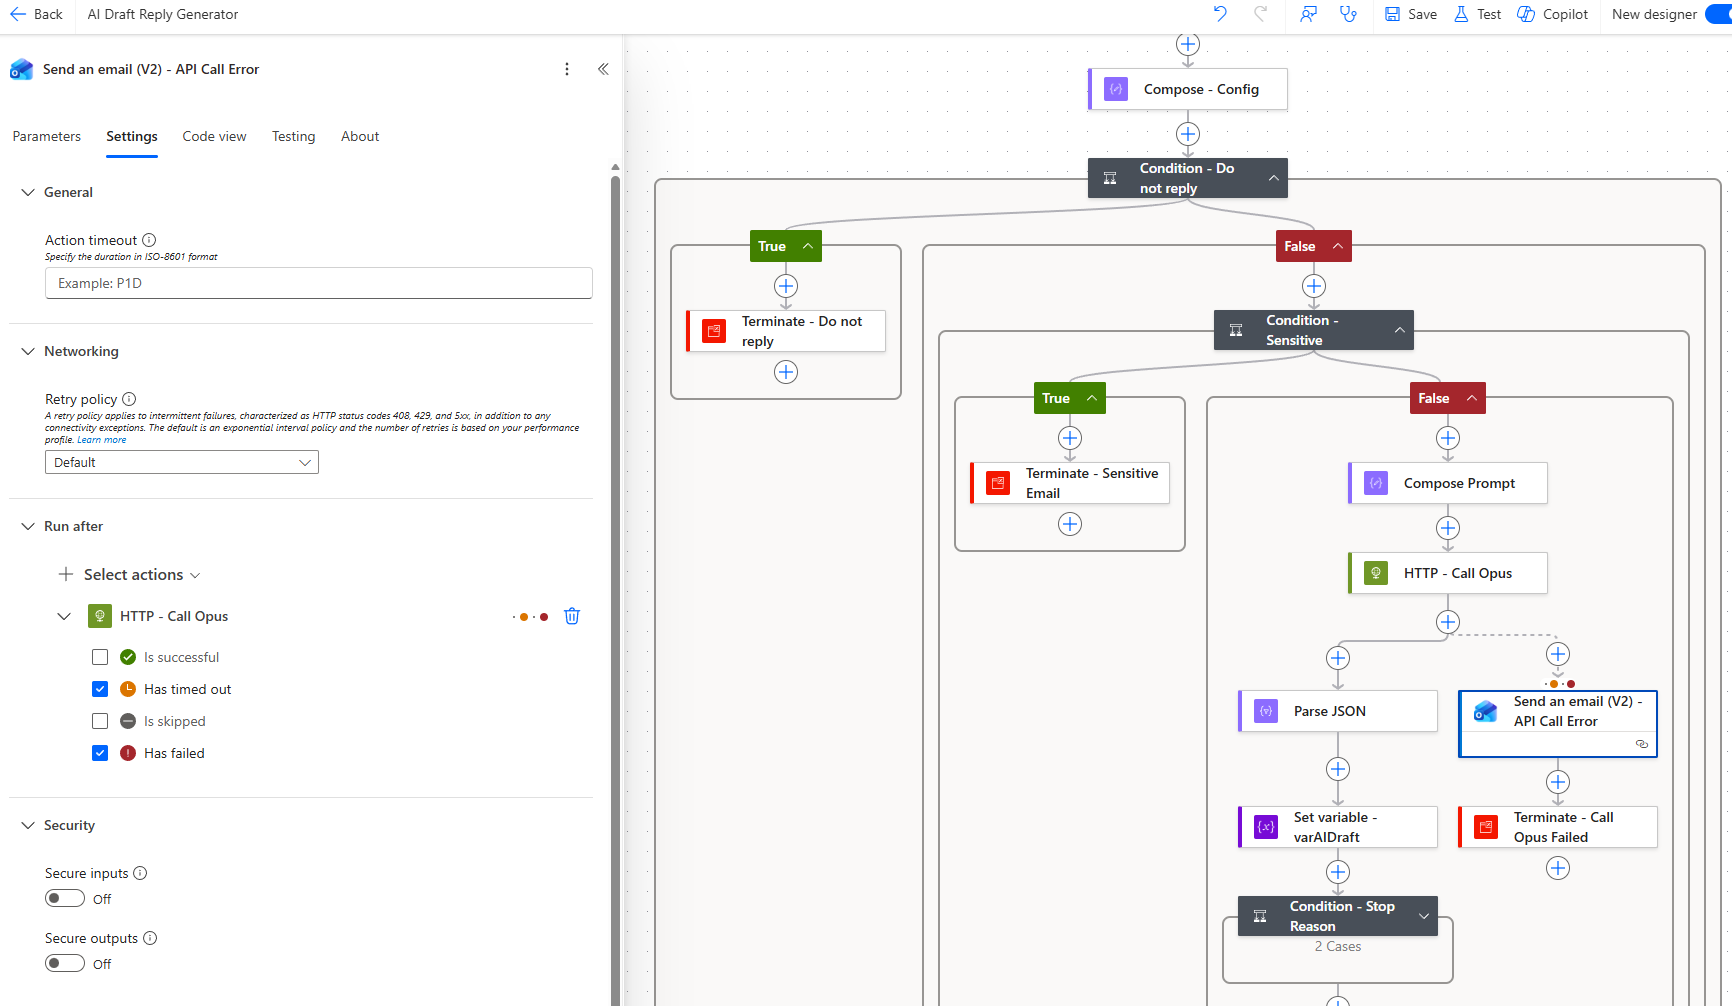
Follow this with a Terminate action set to Failed with the message “Claude API call failed”.
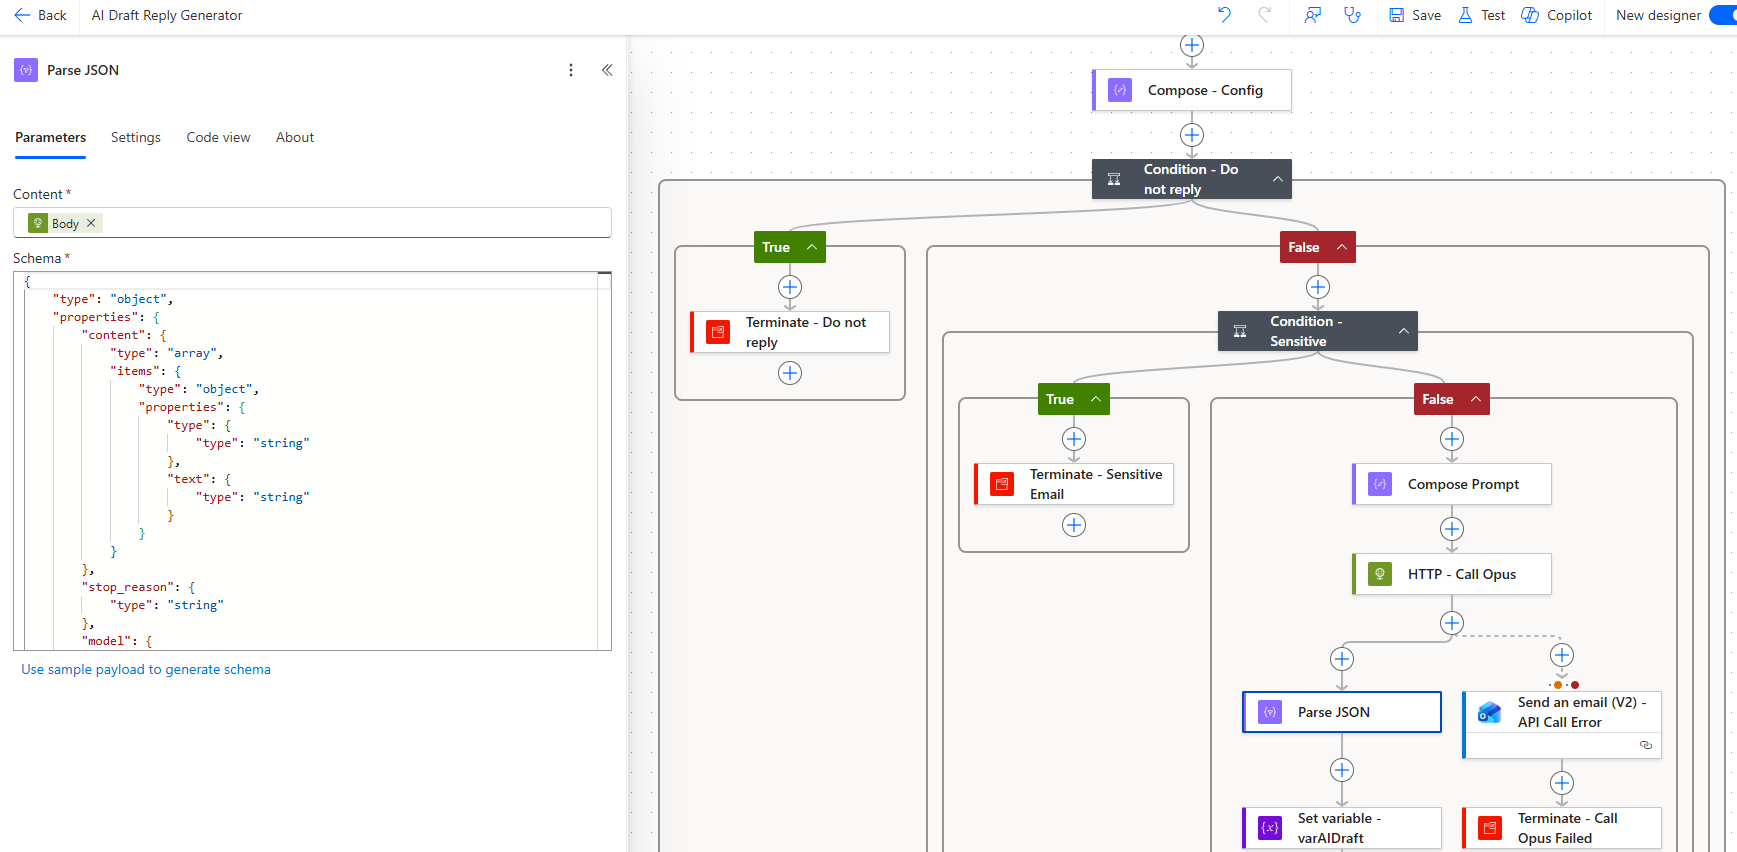
Step 9 — Parse the API response
Add a Parse JSON action on the HTTP response body. The schema only needs to capture what we use:
{
  "type": "object",
  "properties": {
    "content": {
      "type": "array",
      "items": {
        "type": "object",
        "properties": {
          "type": { "type": "string" },
          "text": { "type": "string" }
        }
      }
    },
    "stop_reason": { "type": "string" },
    "model": { "type": "string" }
  }
}
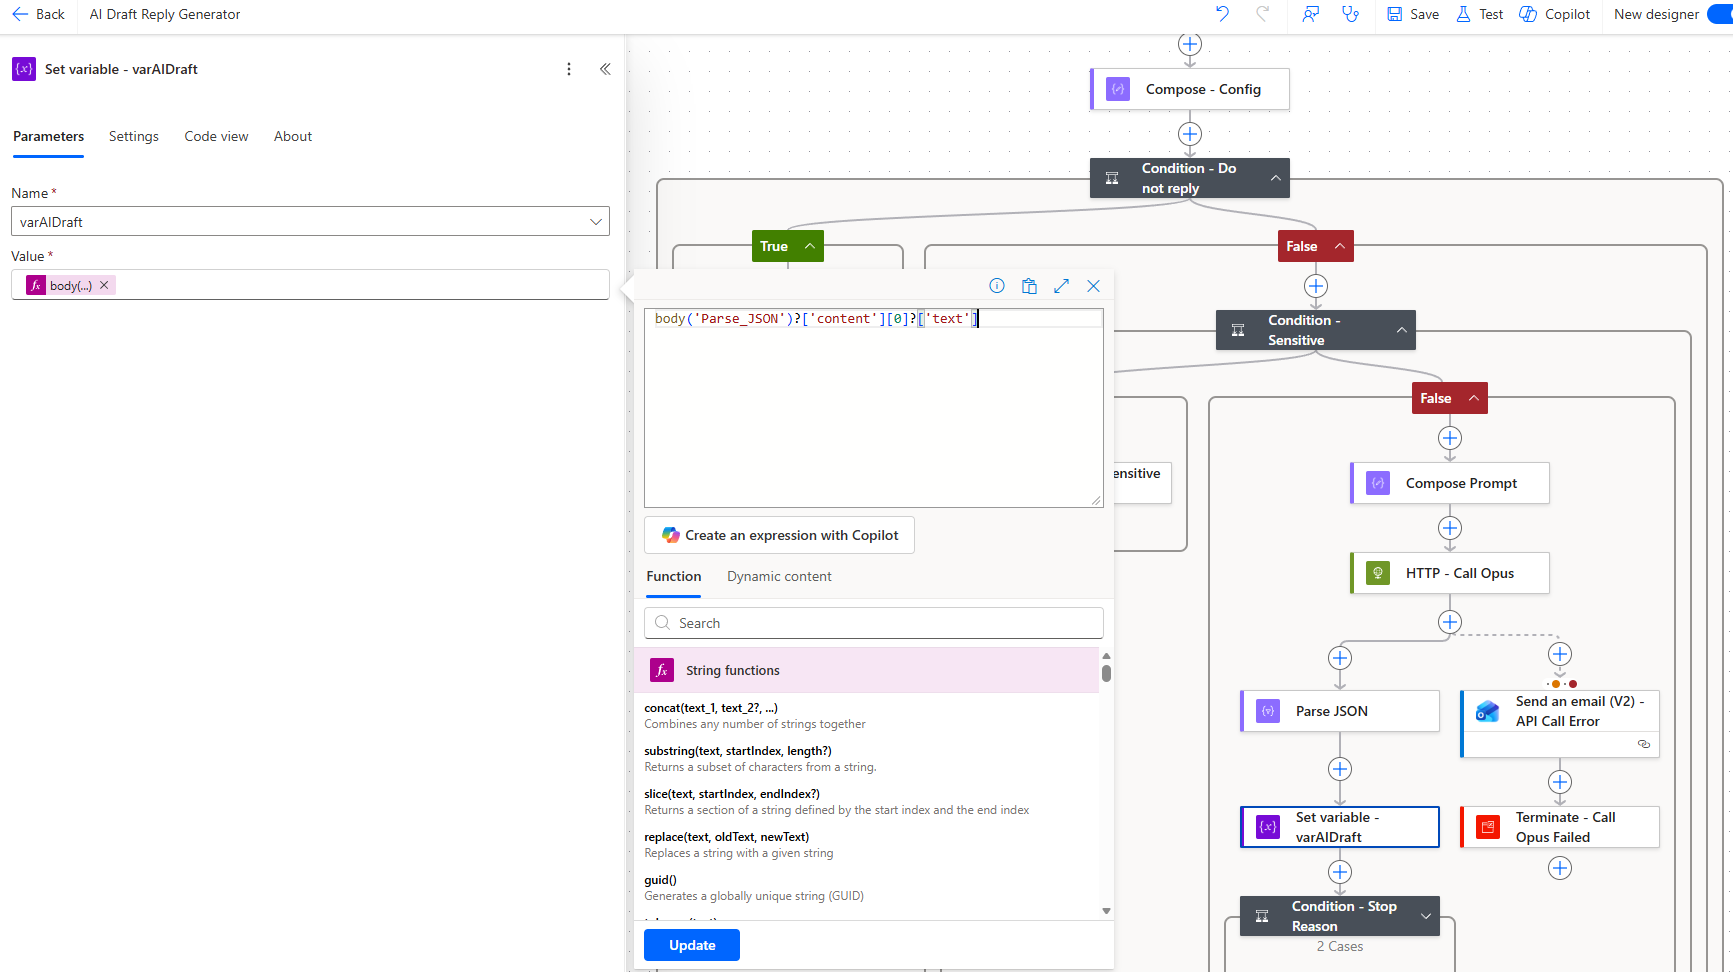
Then add a Set variable action to store the draft text:
body('Parse_JSON')?['content'][0]?['text']
Step 10 — Handle truncation
Add a Condition checking if the response was cut short:
body('Parse_JSON')?['stop_reason'] equals 'max_tokens'
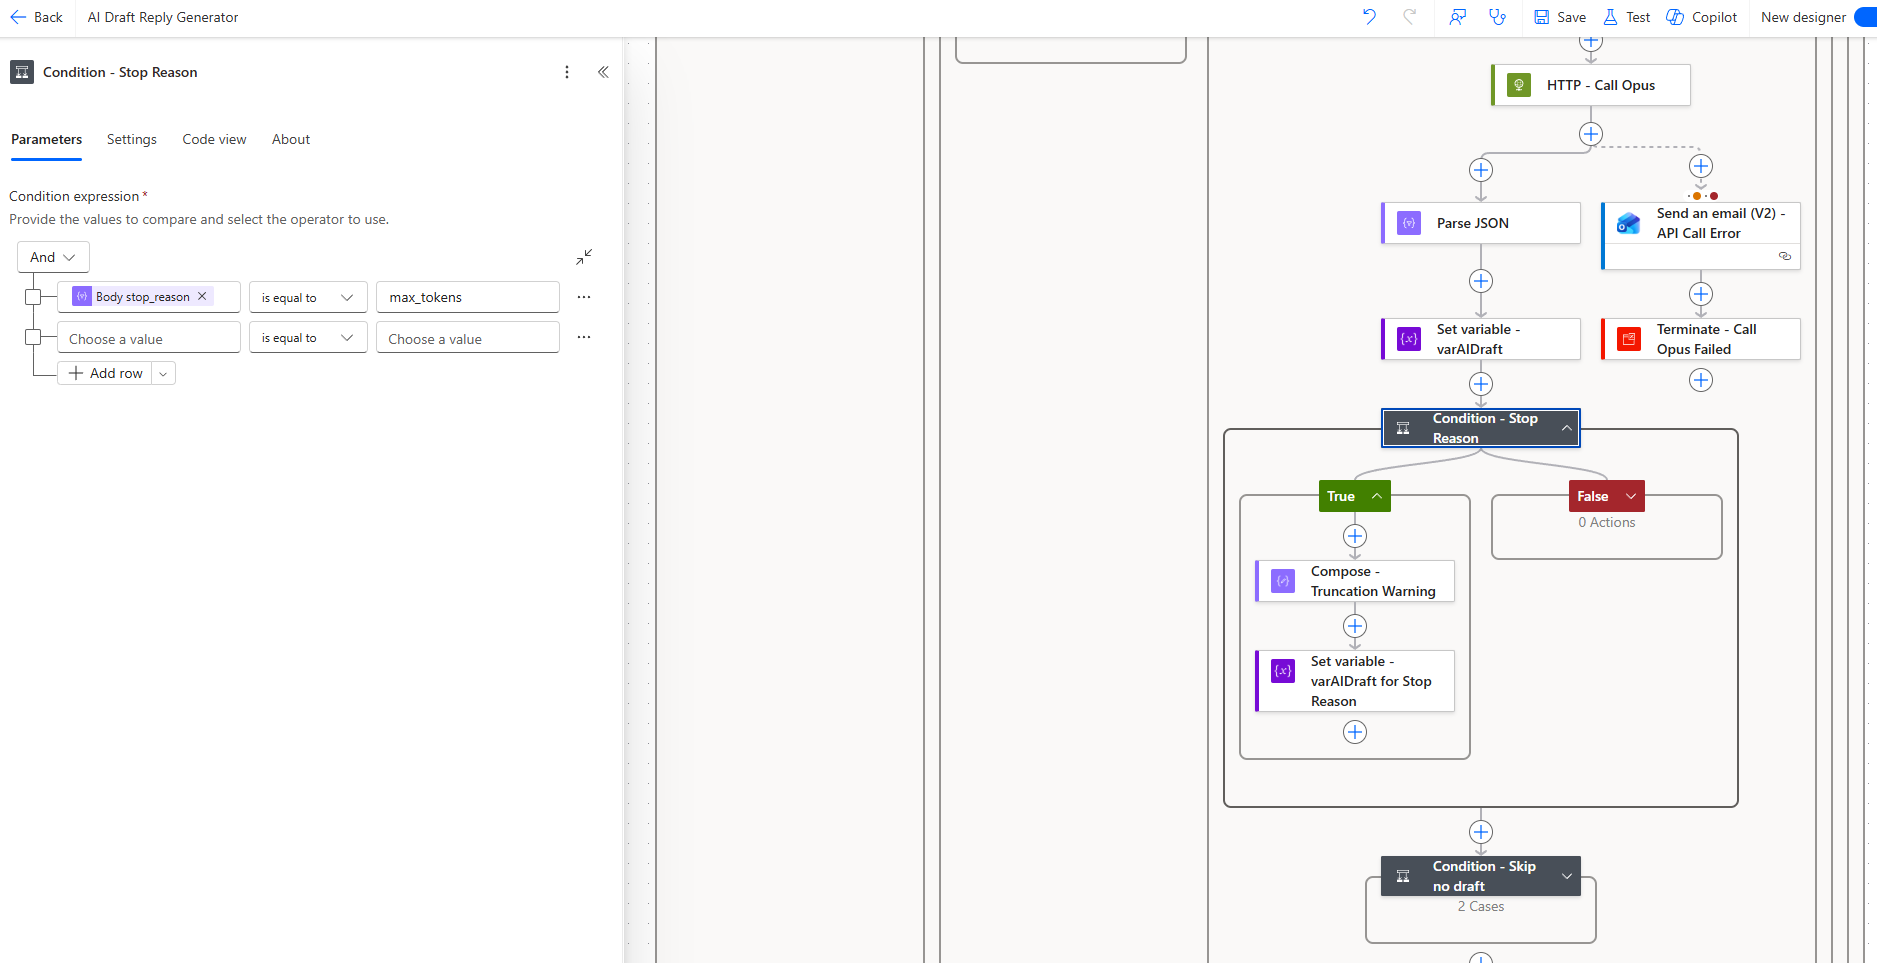
If true, prepend a warning using a Compose action:
concat('[NOTE: This draft was truncated and may be incomplete. Please review before sending.]',
       decodeUriComponent('%0A'), decodeUriComponent('%0A'),
       variables('varAIDraft'))
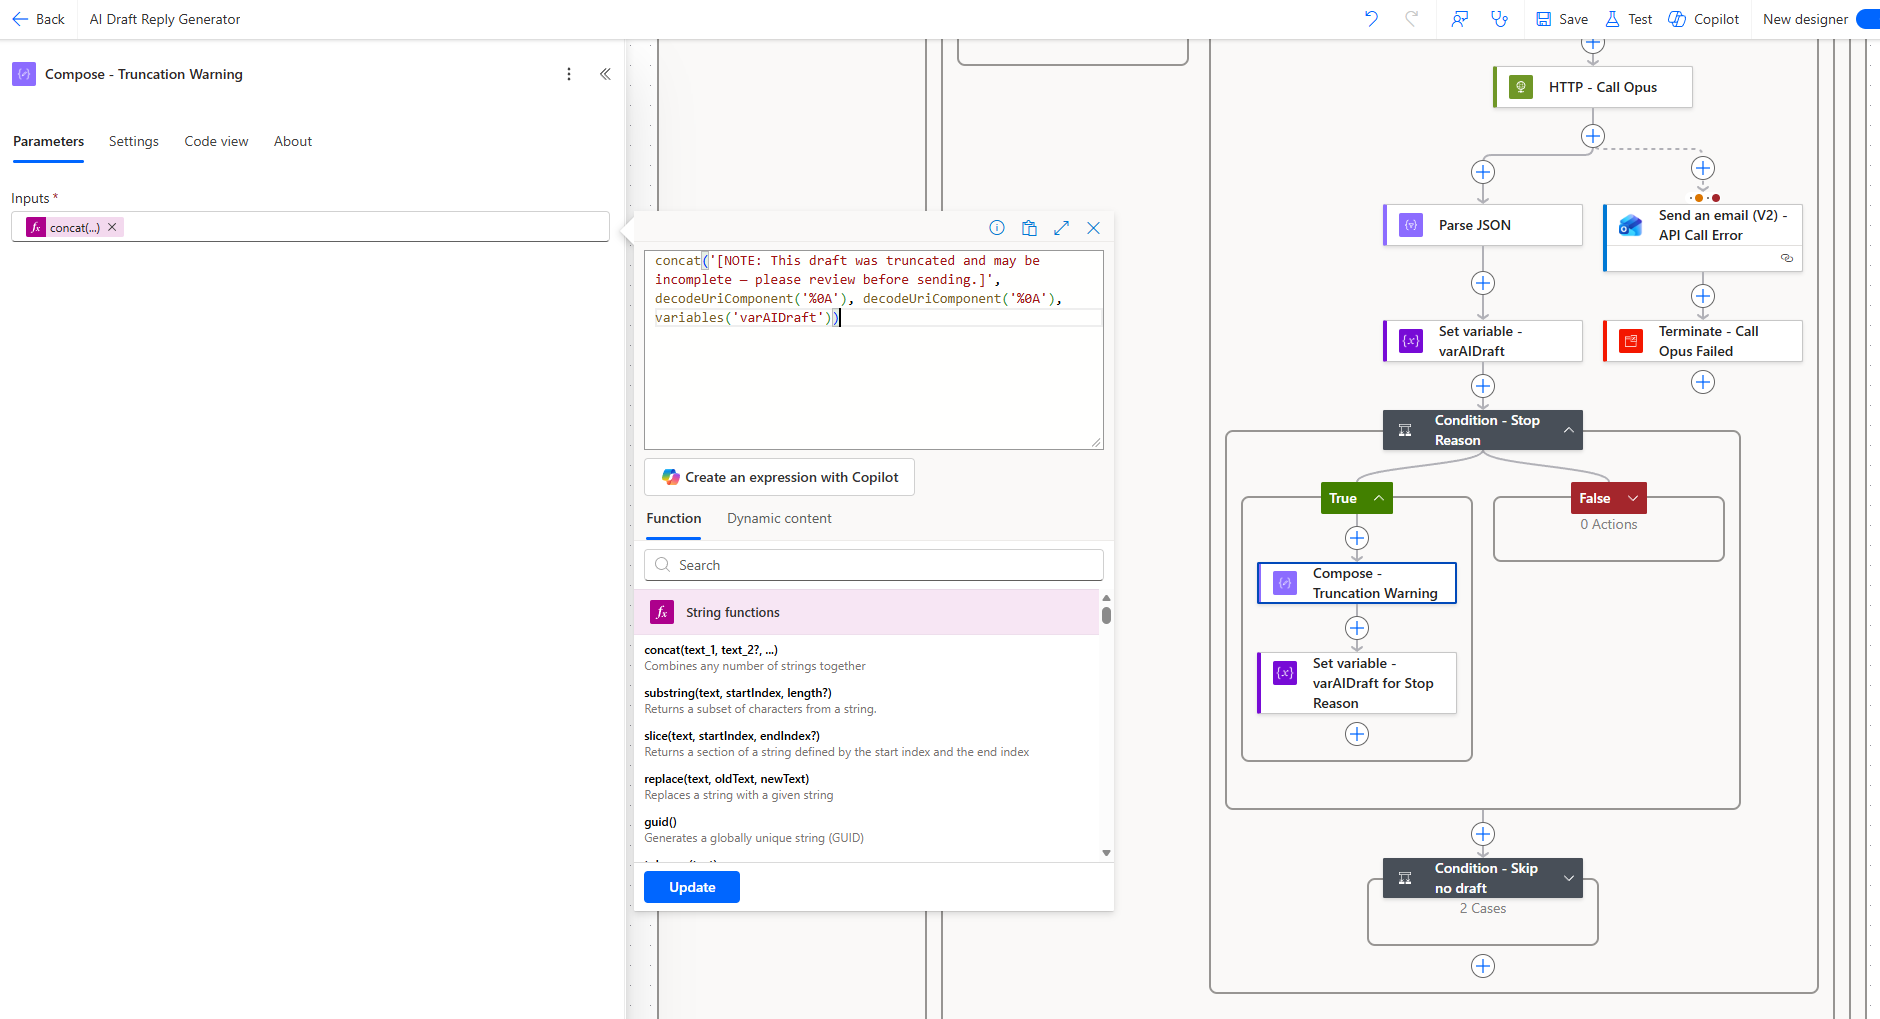
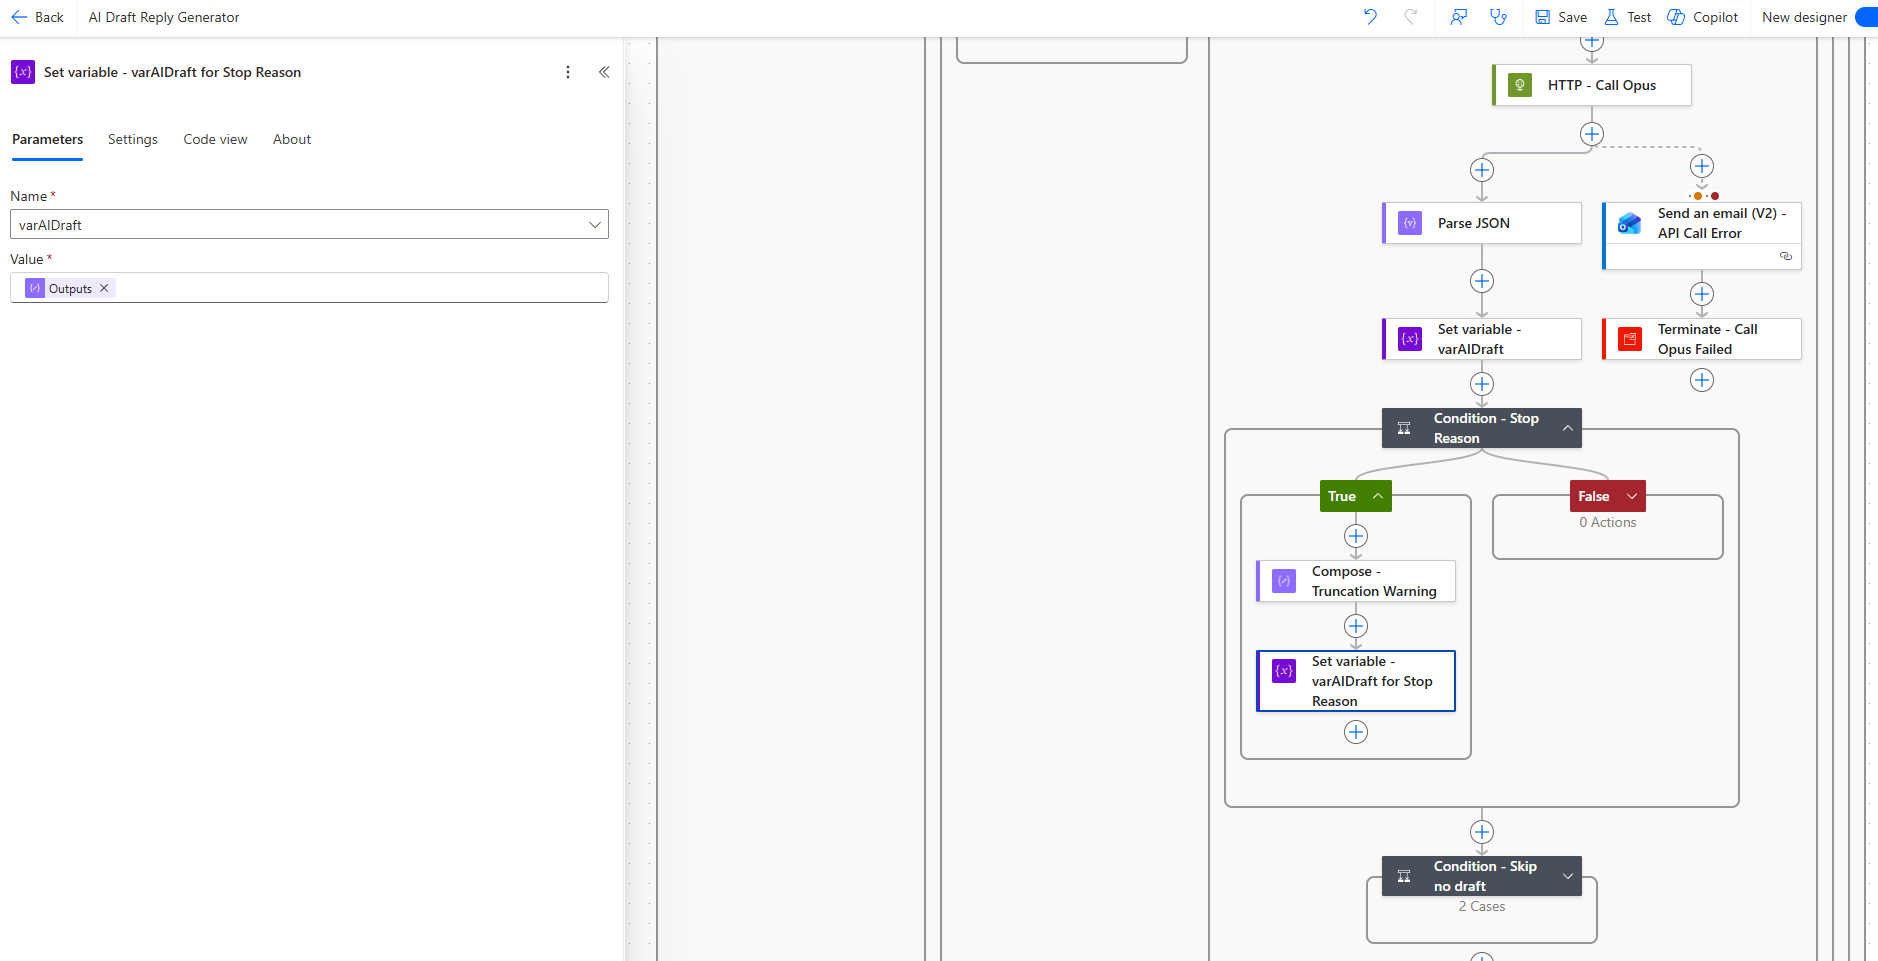
Then set varAIDraft to this composed value.
Step 11 — Skip if no draft needed
Add a Condition checking if Claude decided no reply was appropriate:
variables('varAIDraft') equals 'SKIP_NO_DRAFT'
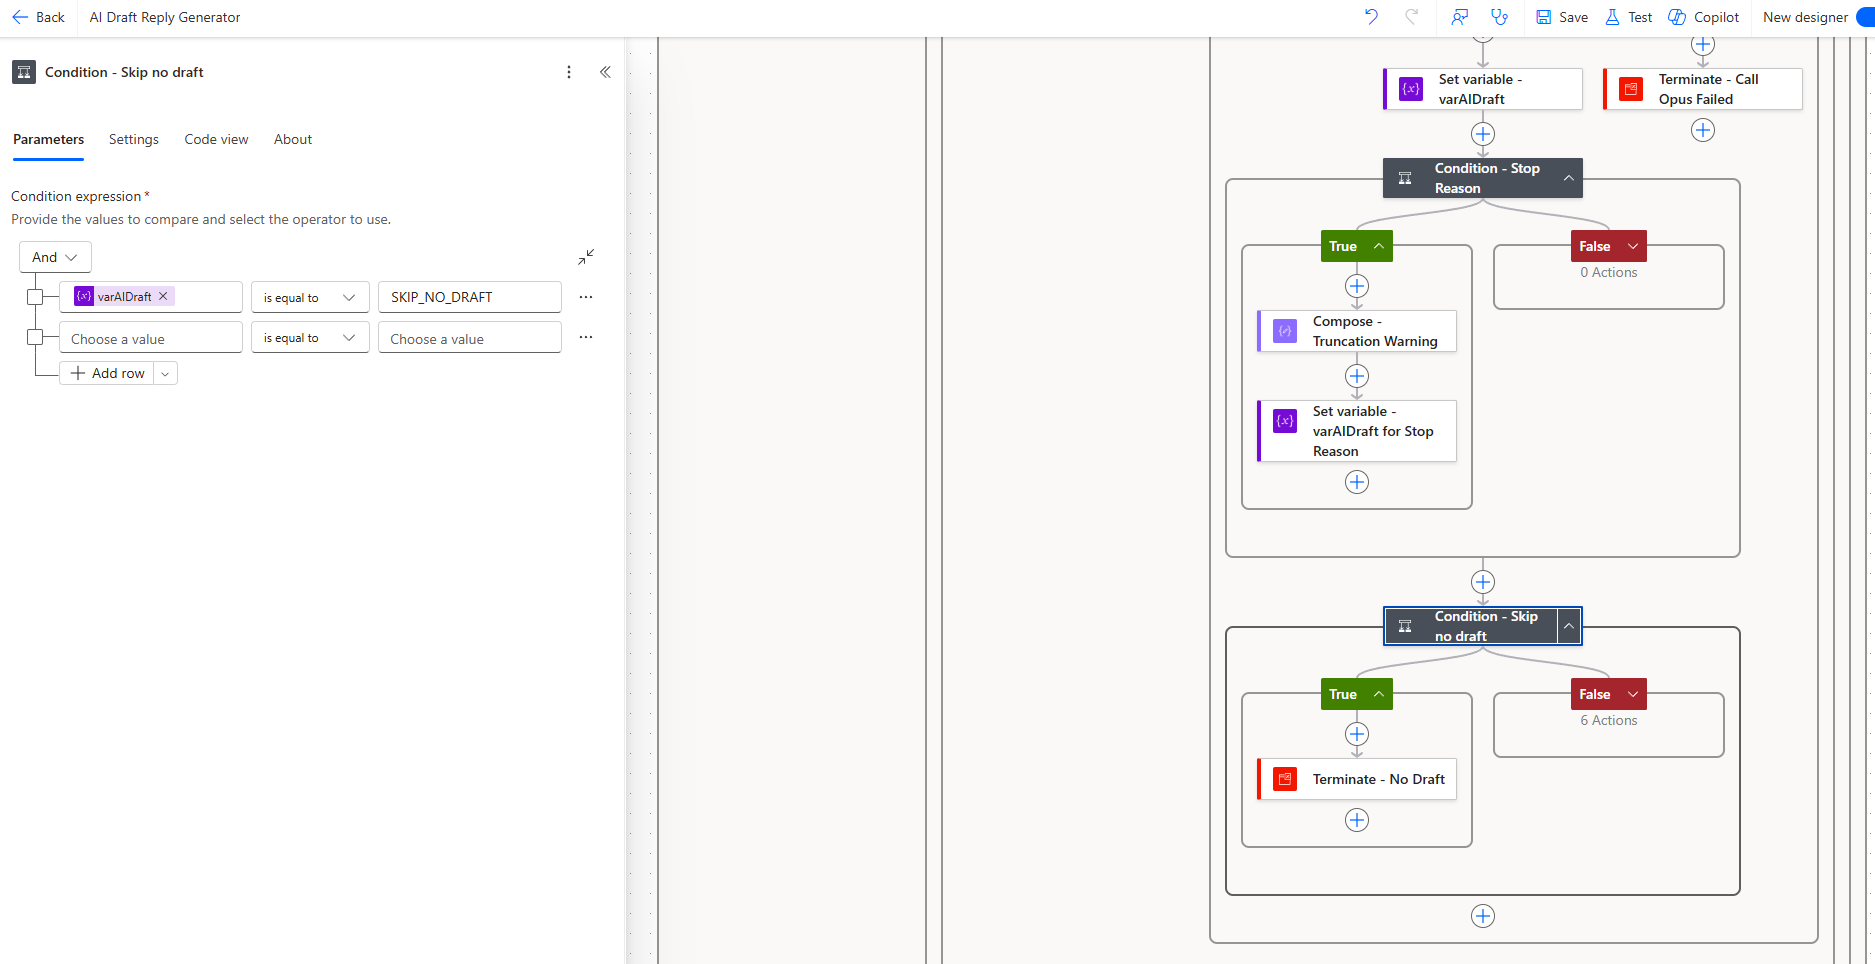
If true, terminate with Succeeded.
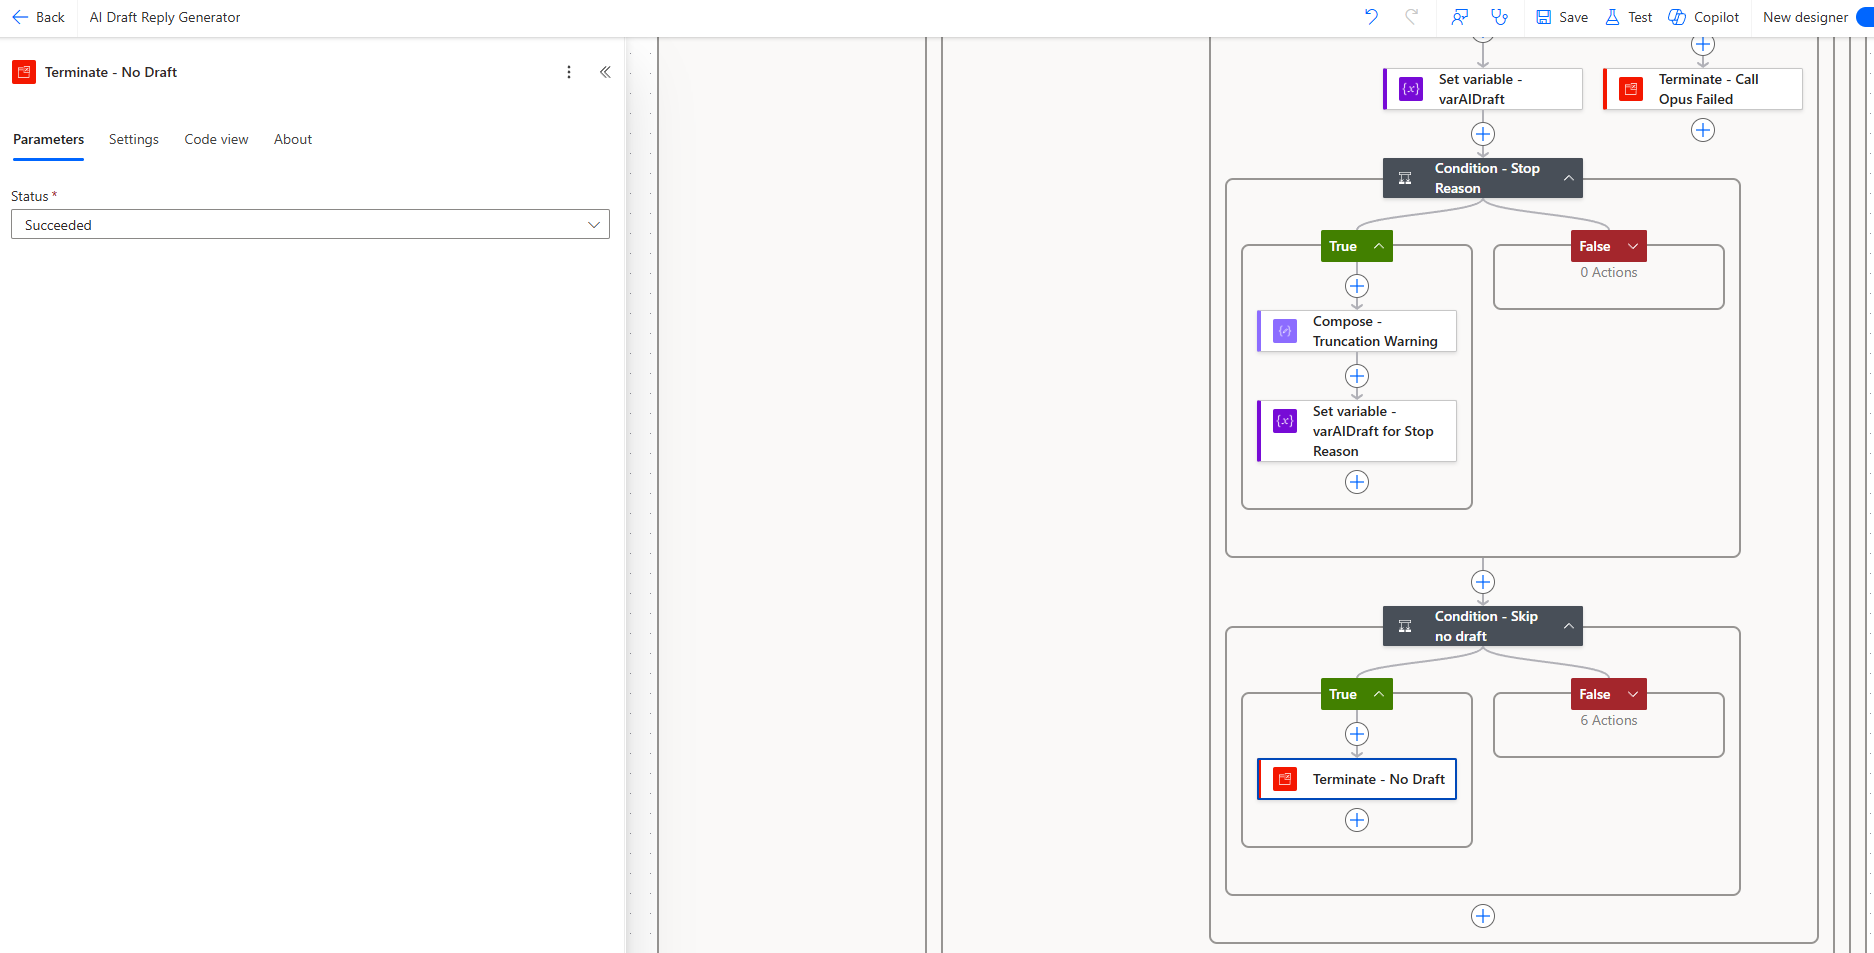
Step 12 — Format the HTML body
In the No branch (draft exists), add a Compose action called Compose – HTML Body that converts the plain-text draft to HTML:
concat(
  '<div style="font-family:Calibri,sans-serif;font-size:11pt">',
  replace(
    replace(variables('varAIDraft'), decodeUriComponent('%0D%0A'), '<br>'),
    decodeUriComponent('%0A'), '<br>'
  ),
  '</div>'
)
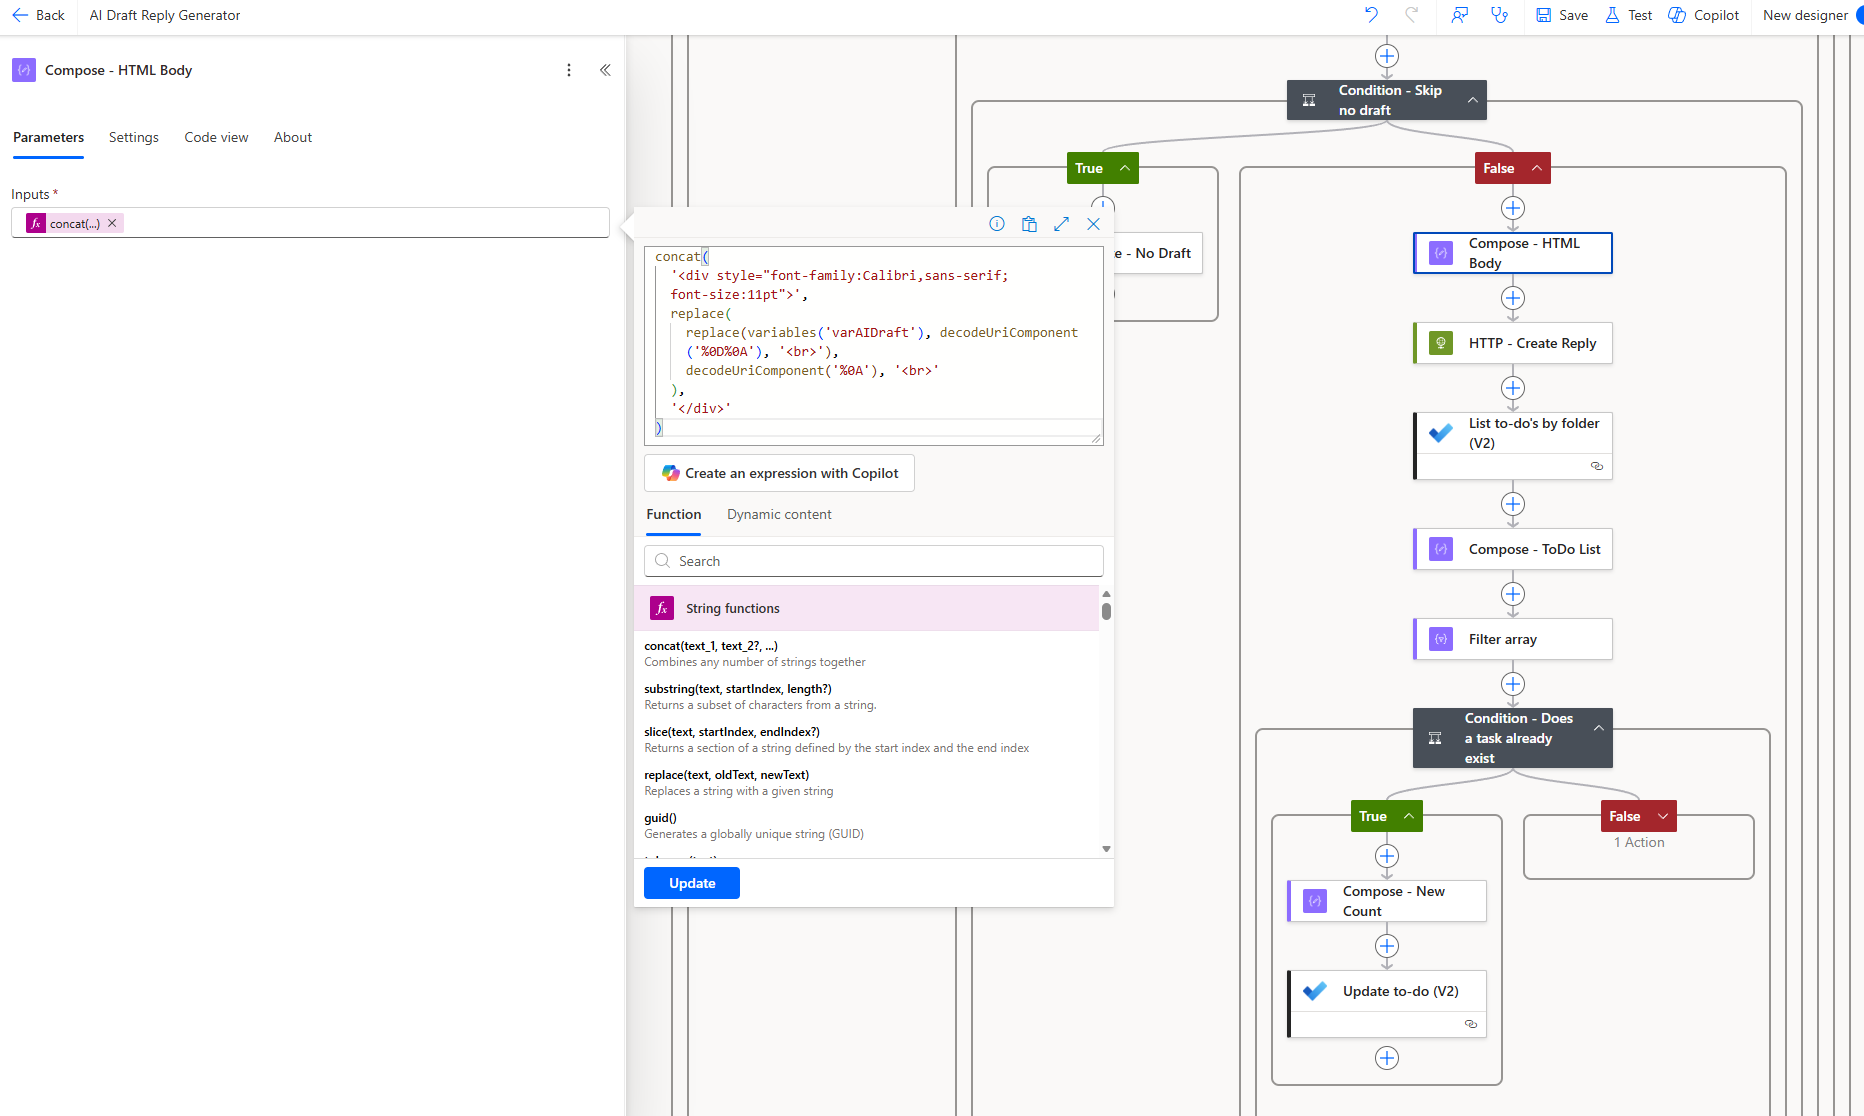
This wraps the draft in Calibri 11pt (matching Outlook’s default) and converts newlines to <br> tags.
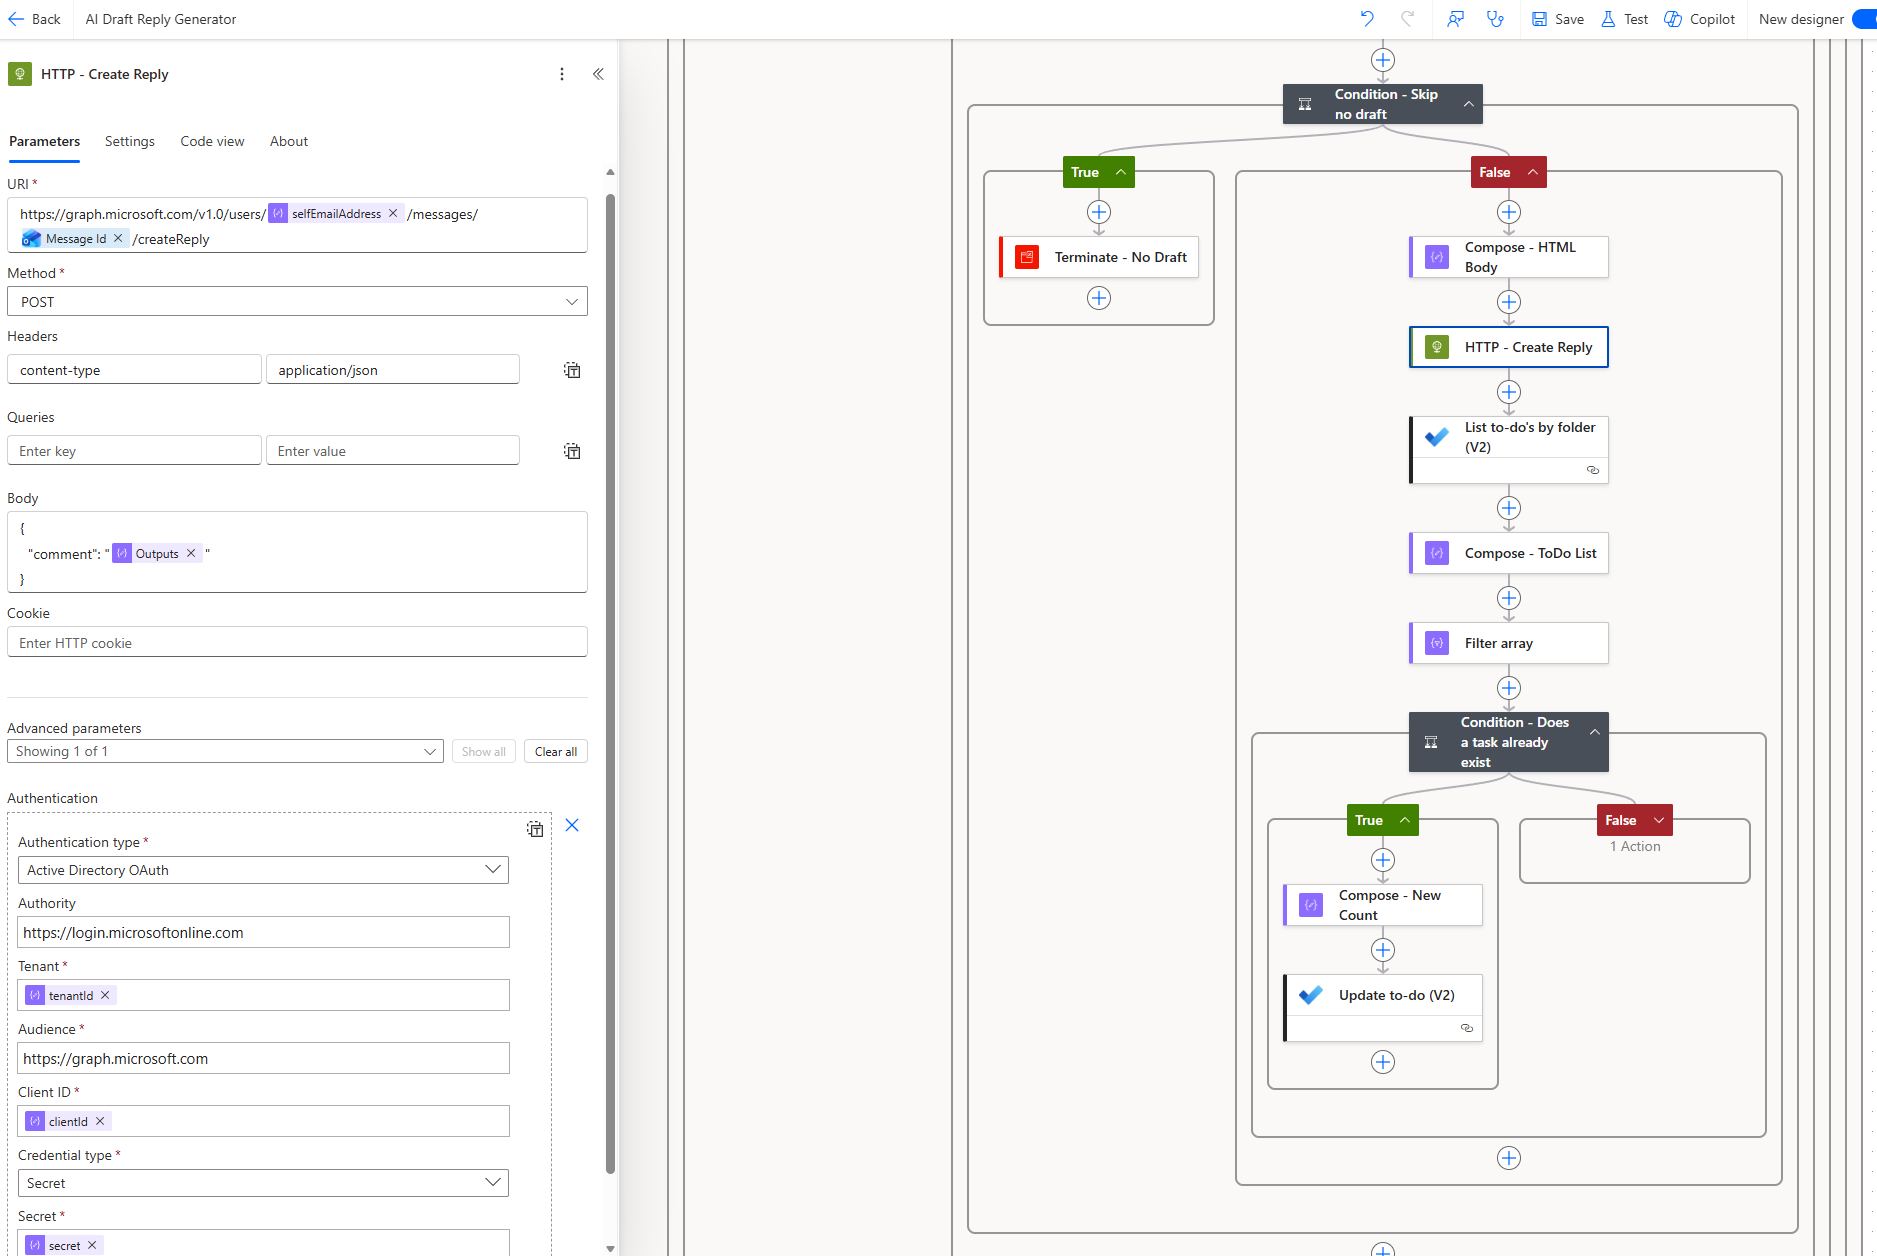
Step 13 — Create the draft reply via Graph API
Add an HTTP action called HTTP – Create Reply:
| Setting | Value |
|---|---|
| Method | POST |
| URI | https://graph.microsoft.com/v1.0/users/@{outputs('Compose_-_Config')?['selfEmailAddress']}/messages/@{triggerOutputs()?['body/id']}/createReply |
| Headers | content-type: application/json |
| Body | { "comment": "@{outputs('Compose_-_HTML_Body')}" } |
| Authentication | Active Directory OAuth |
| Authority | https://login.microsoftonline.com |
| Tenant | @{outputs('Compose_-_Config')?['tenantId']} |
| Audience | https://graph.microsoft.com |
| Client ID | @{outputs('Compose_-_Config')?['clientId']} |
| Secret | @{outputs('Compose_-_Config')?['secret']} |
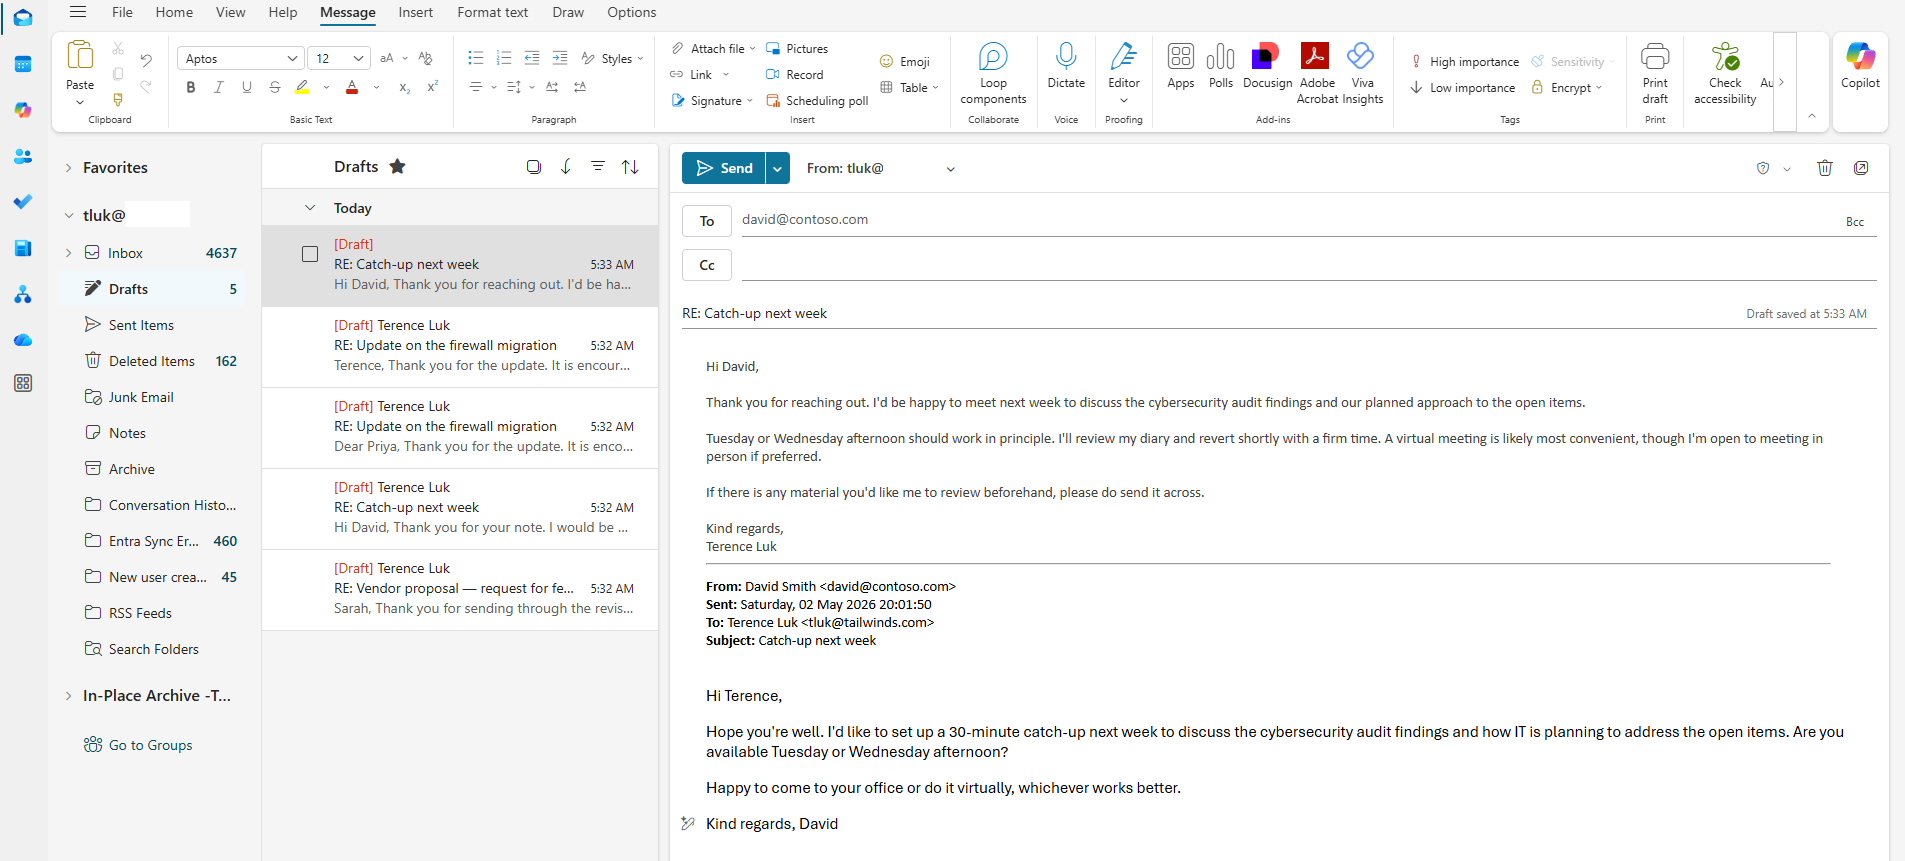
This creates a draft reply in the user’s mailbox and does not send it. The draft appears in Outlook’s Drafts folder as a reply to the original email, with the AI-generated text as the body and the original message quoted below.
Step 14 — Track drafts in Microsoft To Do
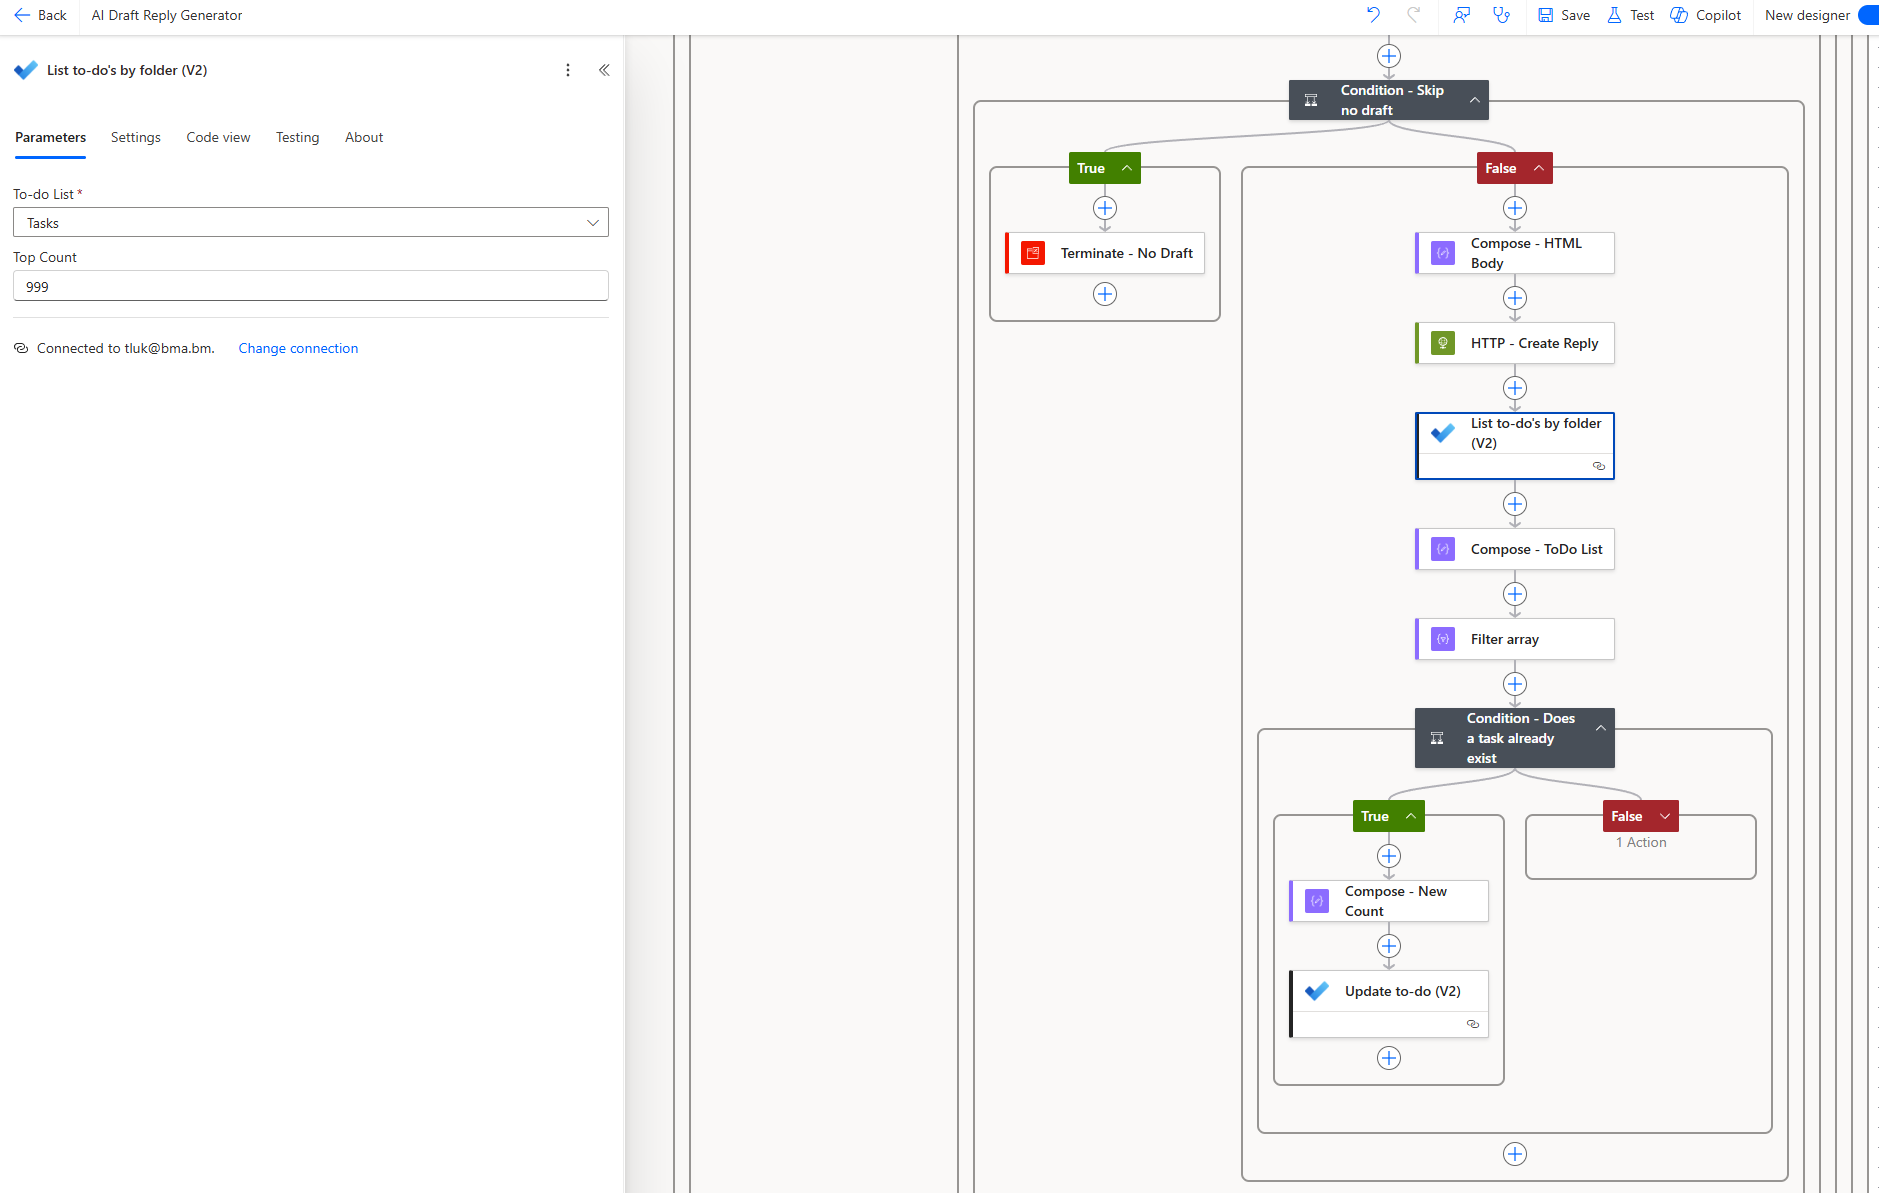
After the draft reply is created, the flow tracks it in Microsoft To Do. Add a List to-do’s by folder (V2) action from the Microsoft To Do connector:
| Setting | Value |
|---|---|
| To-do List | Select your designated review folder (e.g., “Tasks”) |
| Top Count | 999 |
This retrieves all tasks from your tracking folder so we can check if a counter task for today already exists.
Step 15 — Compose the To Do list output
Add a Compose action called Compose – ToDo List to capture the list output:
body('List_to-do''s_by_folder_(V2)') This intermediate step makes the list output easier to reference in the next filter action.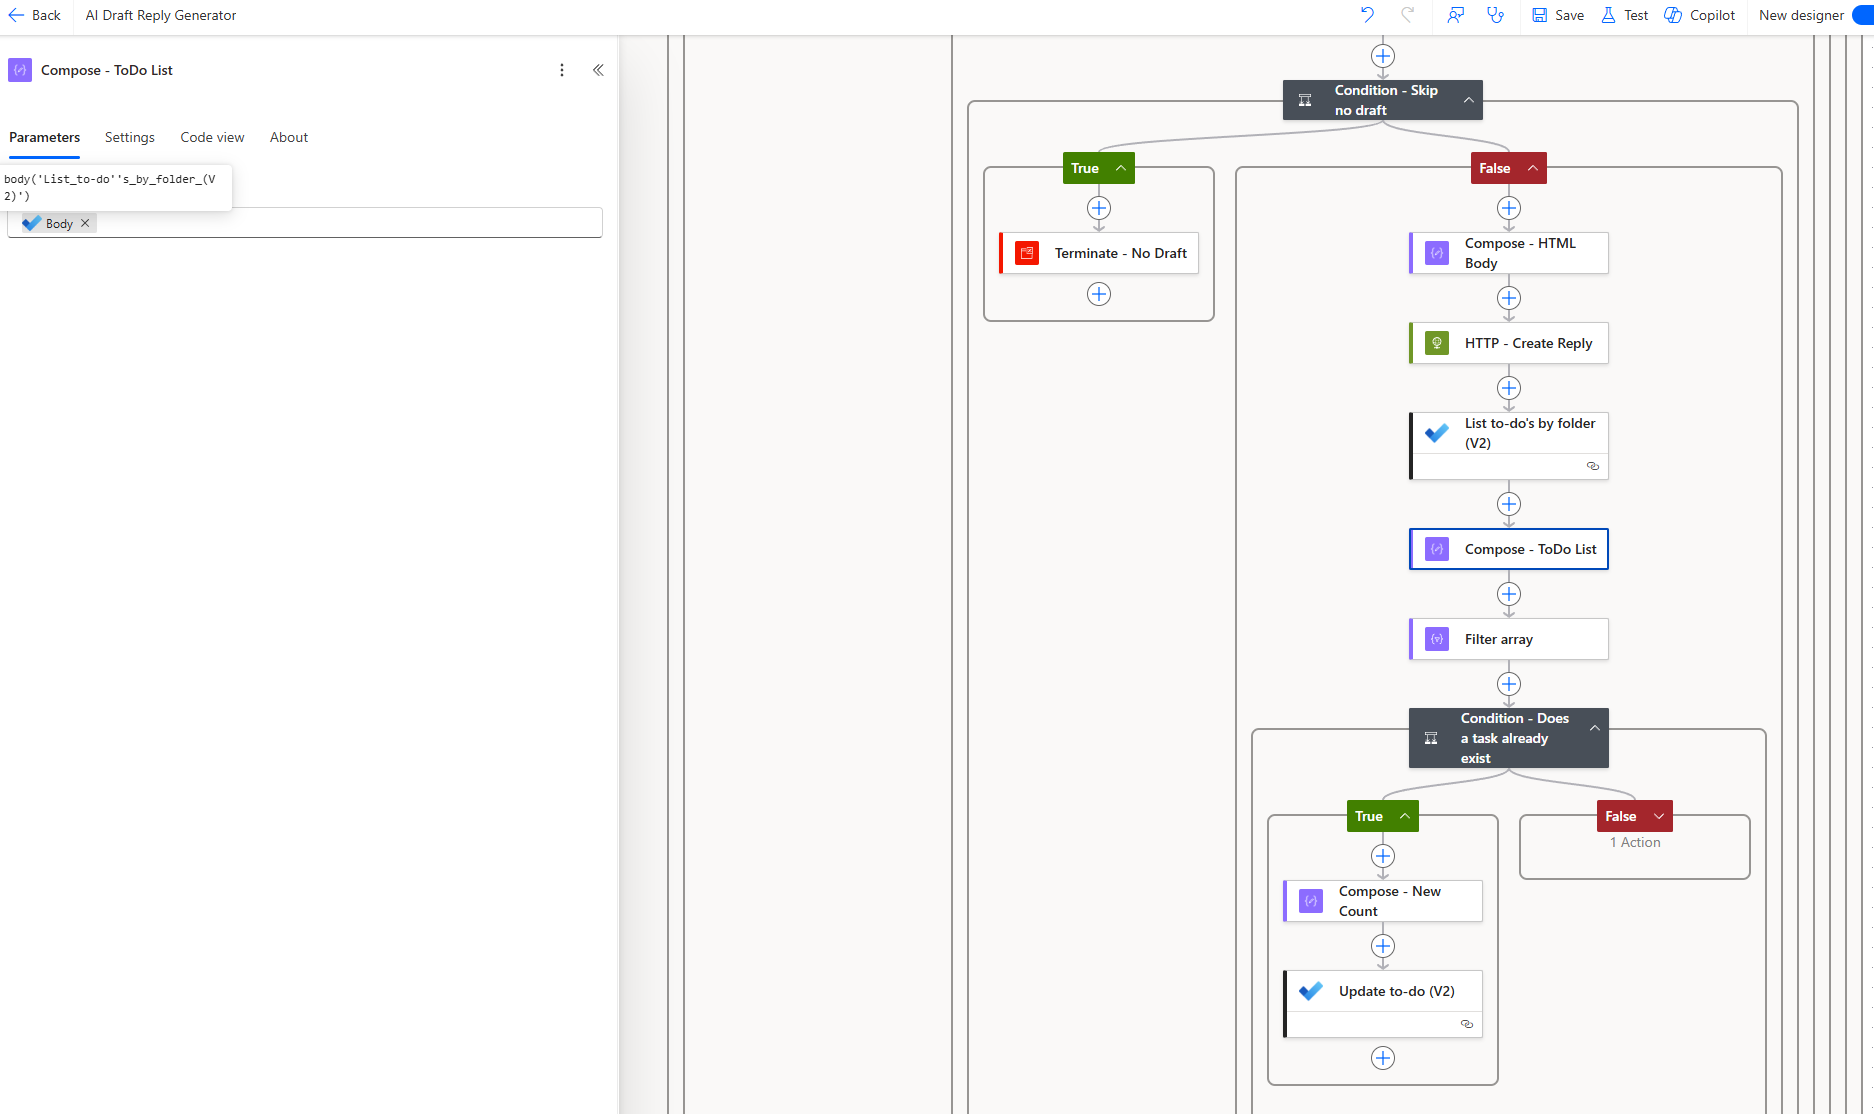
Add a Filter array action that searches the task list for an entry matching today’s date:
| Setting | Value |
|---|---|
| From | @outputs('Compose_-_ToDo_List') |
| Where (condition) | contains(item()?['title'], formatDateTime(convertTimeZone(utcNow(), 'UTC', 'Eastern Standard Time'), 'MMMM dd, yyyy')) |
This filters the full task list down to only tasks whose title contains today’s date formatted as something like “May 05, 2026”.

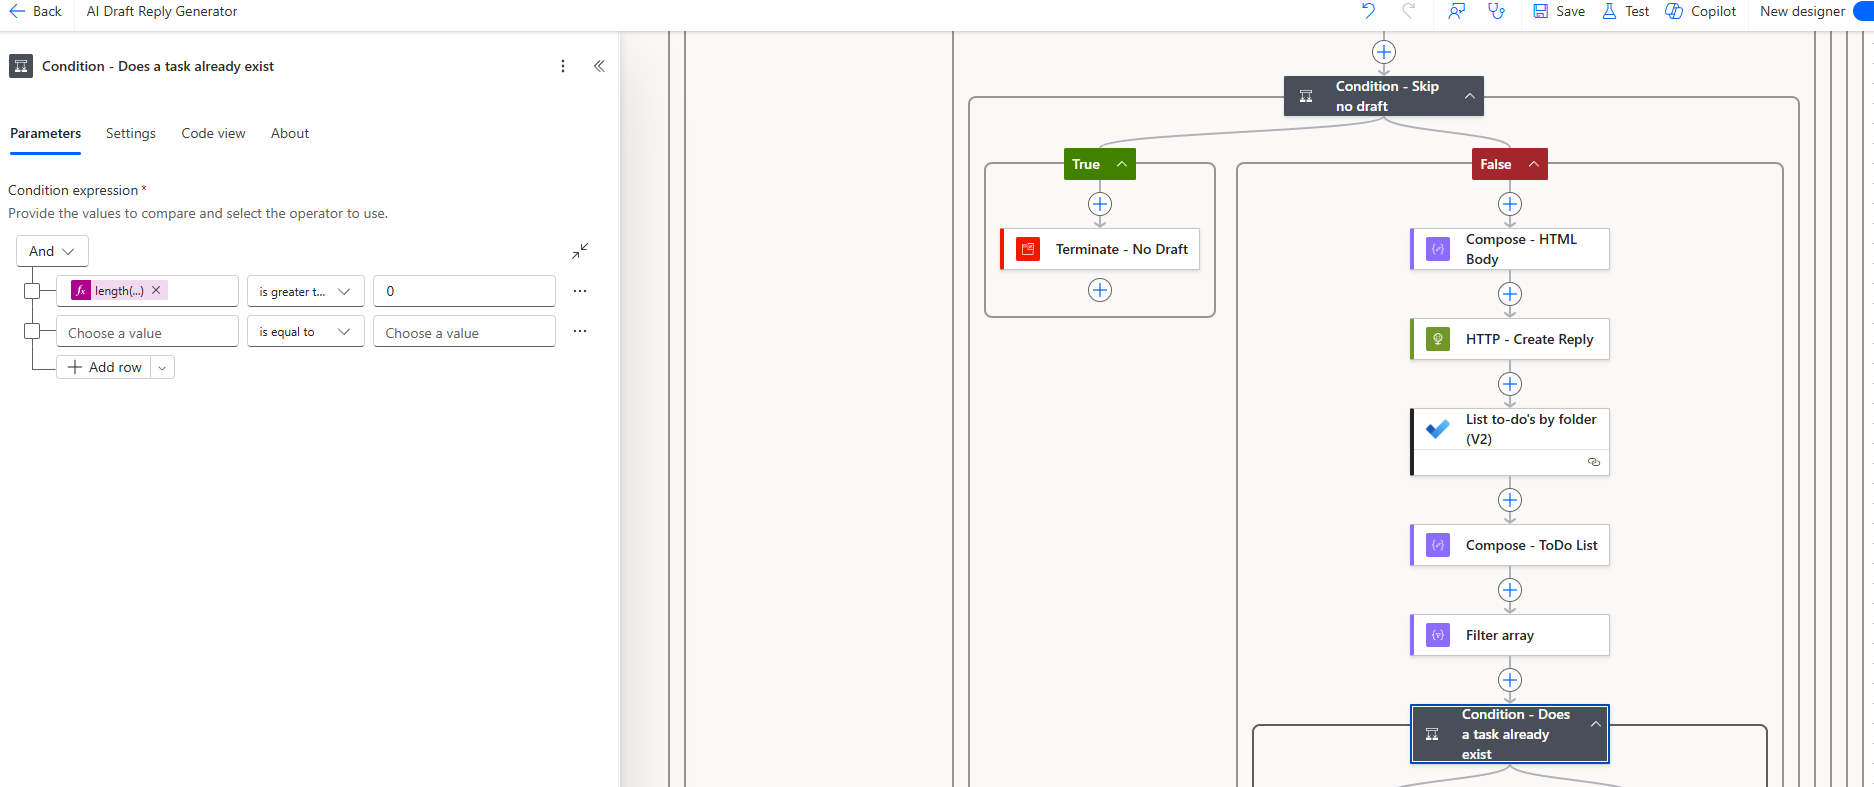
Step 17 — Check if a task already exists for today
Add a Condition called Condition – Does a task already exist that checks whether the filter returned any results:
| Left | Operator | Right |
|---|---|---|
length(body('Filter_array')) |
is greater than | 0 |
Step 18 — True branch: Increment the counter
If a task for today already exists, we need to increment the count in its title.
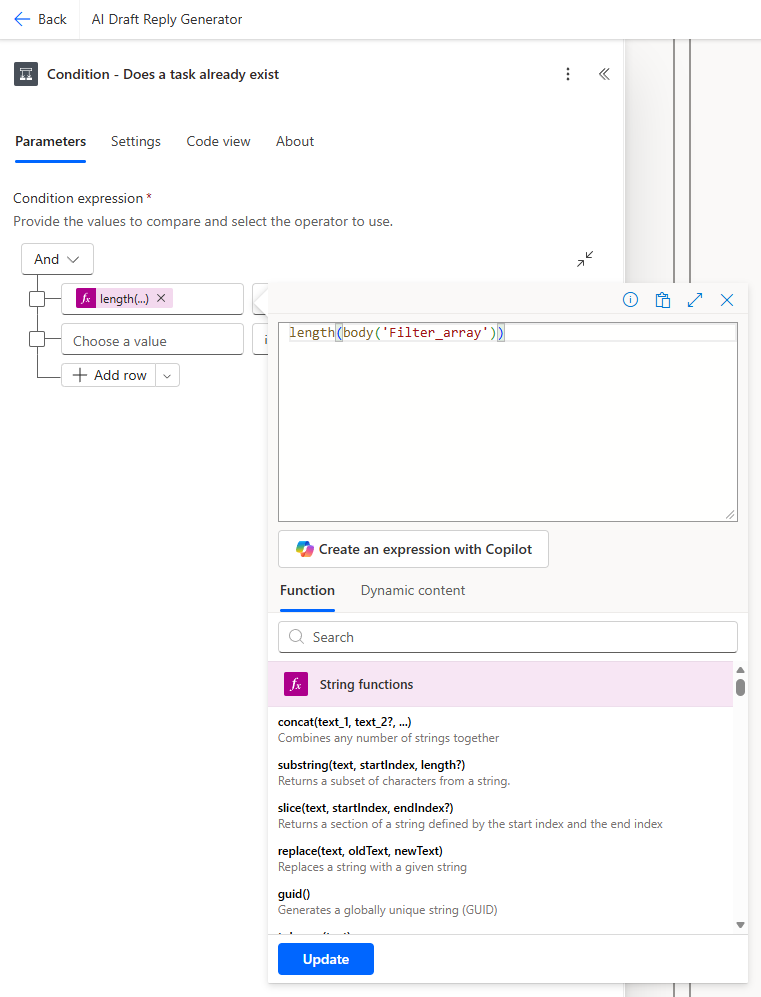
First, add a Compose action called Compose – New Count that extracts the leading number from the existing task title, splits on the first space, converts to integer, and adds 1:
add(int(first(split(first(body('Filter_array'))?['title'], ' '))), 1)For example, if the current title is “2 AI Draft emails to review and reply for May 05, 2026”, this splits on space, takes “2”, converts to integer, and returns 3.
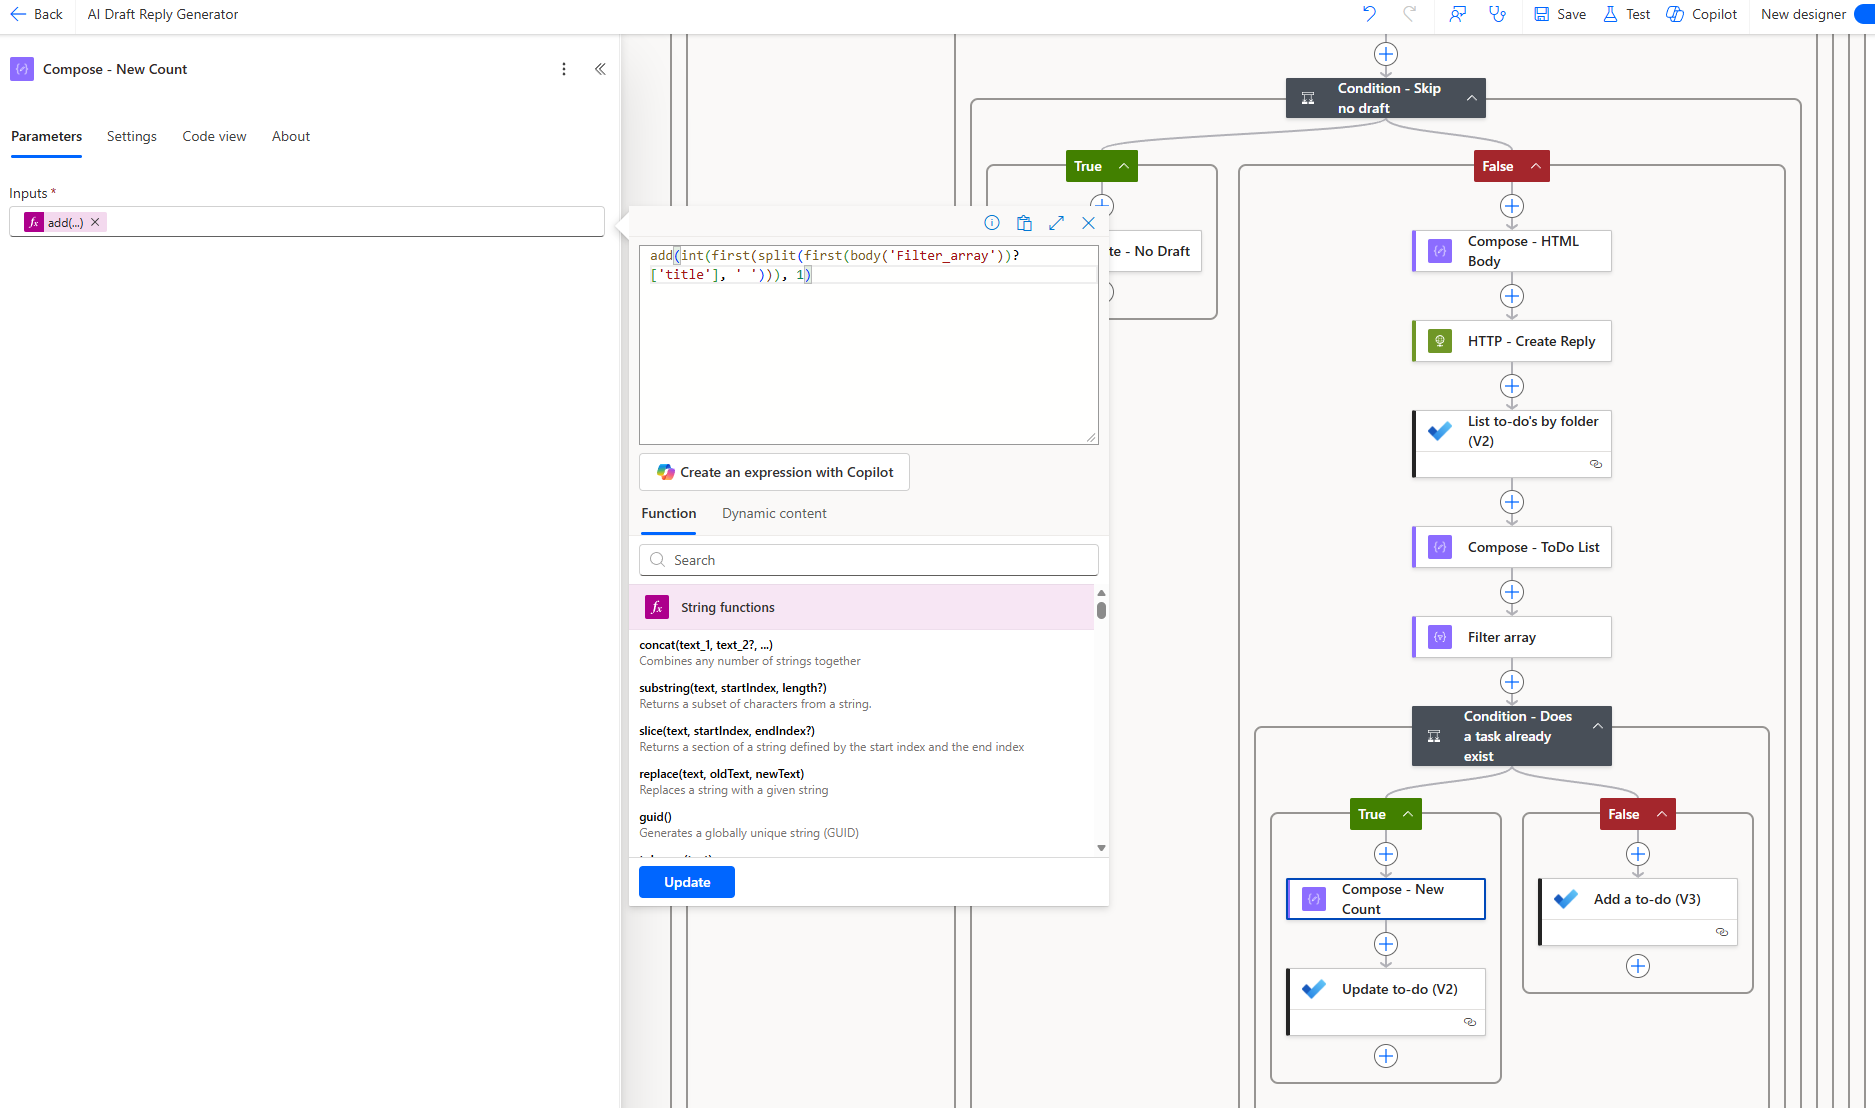
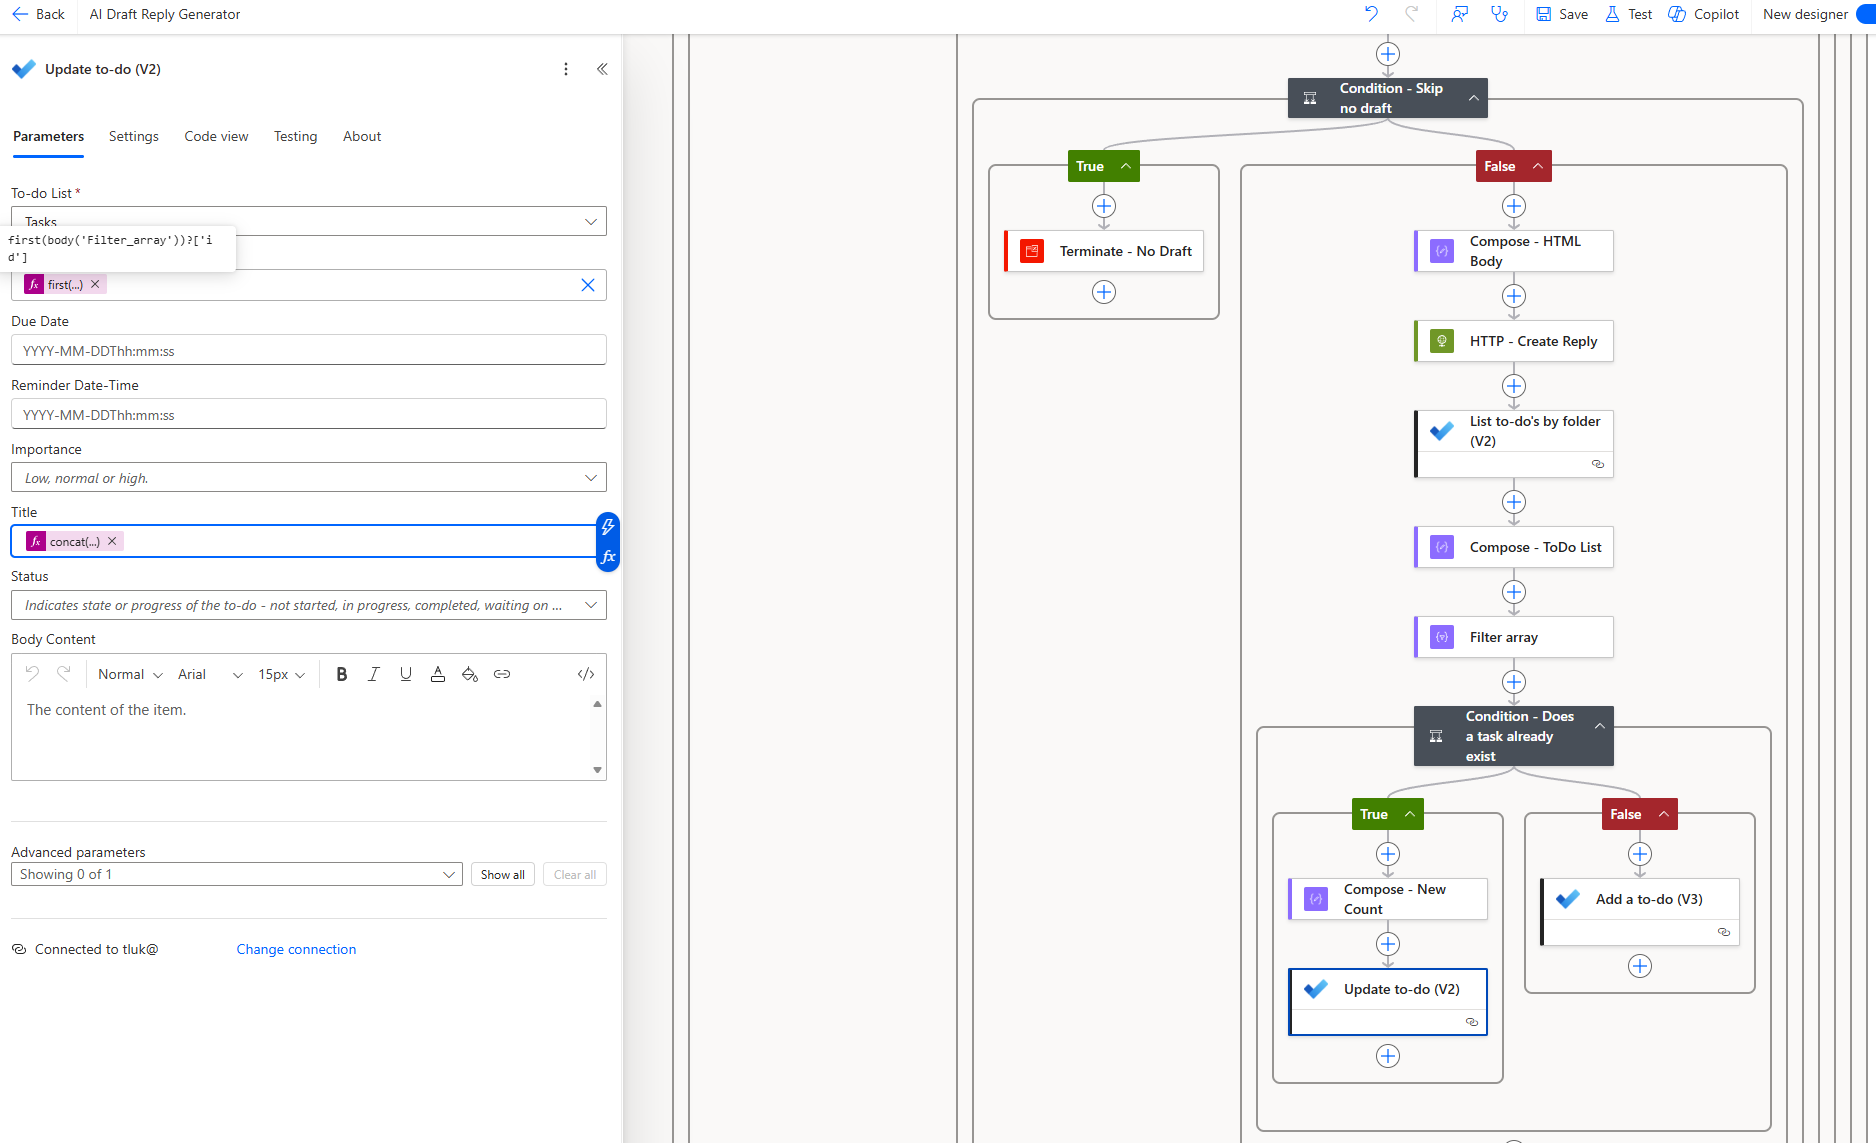
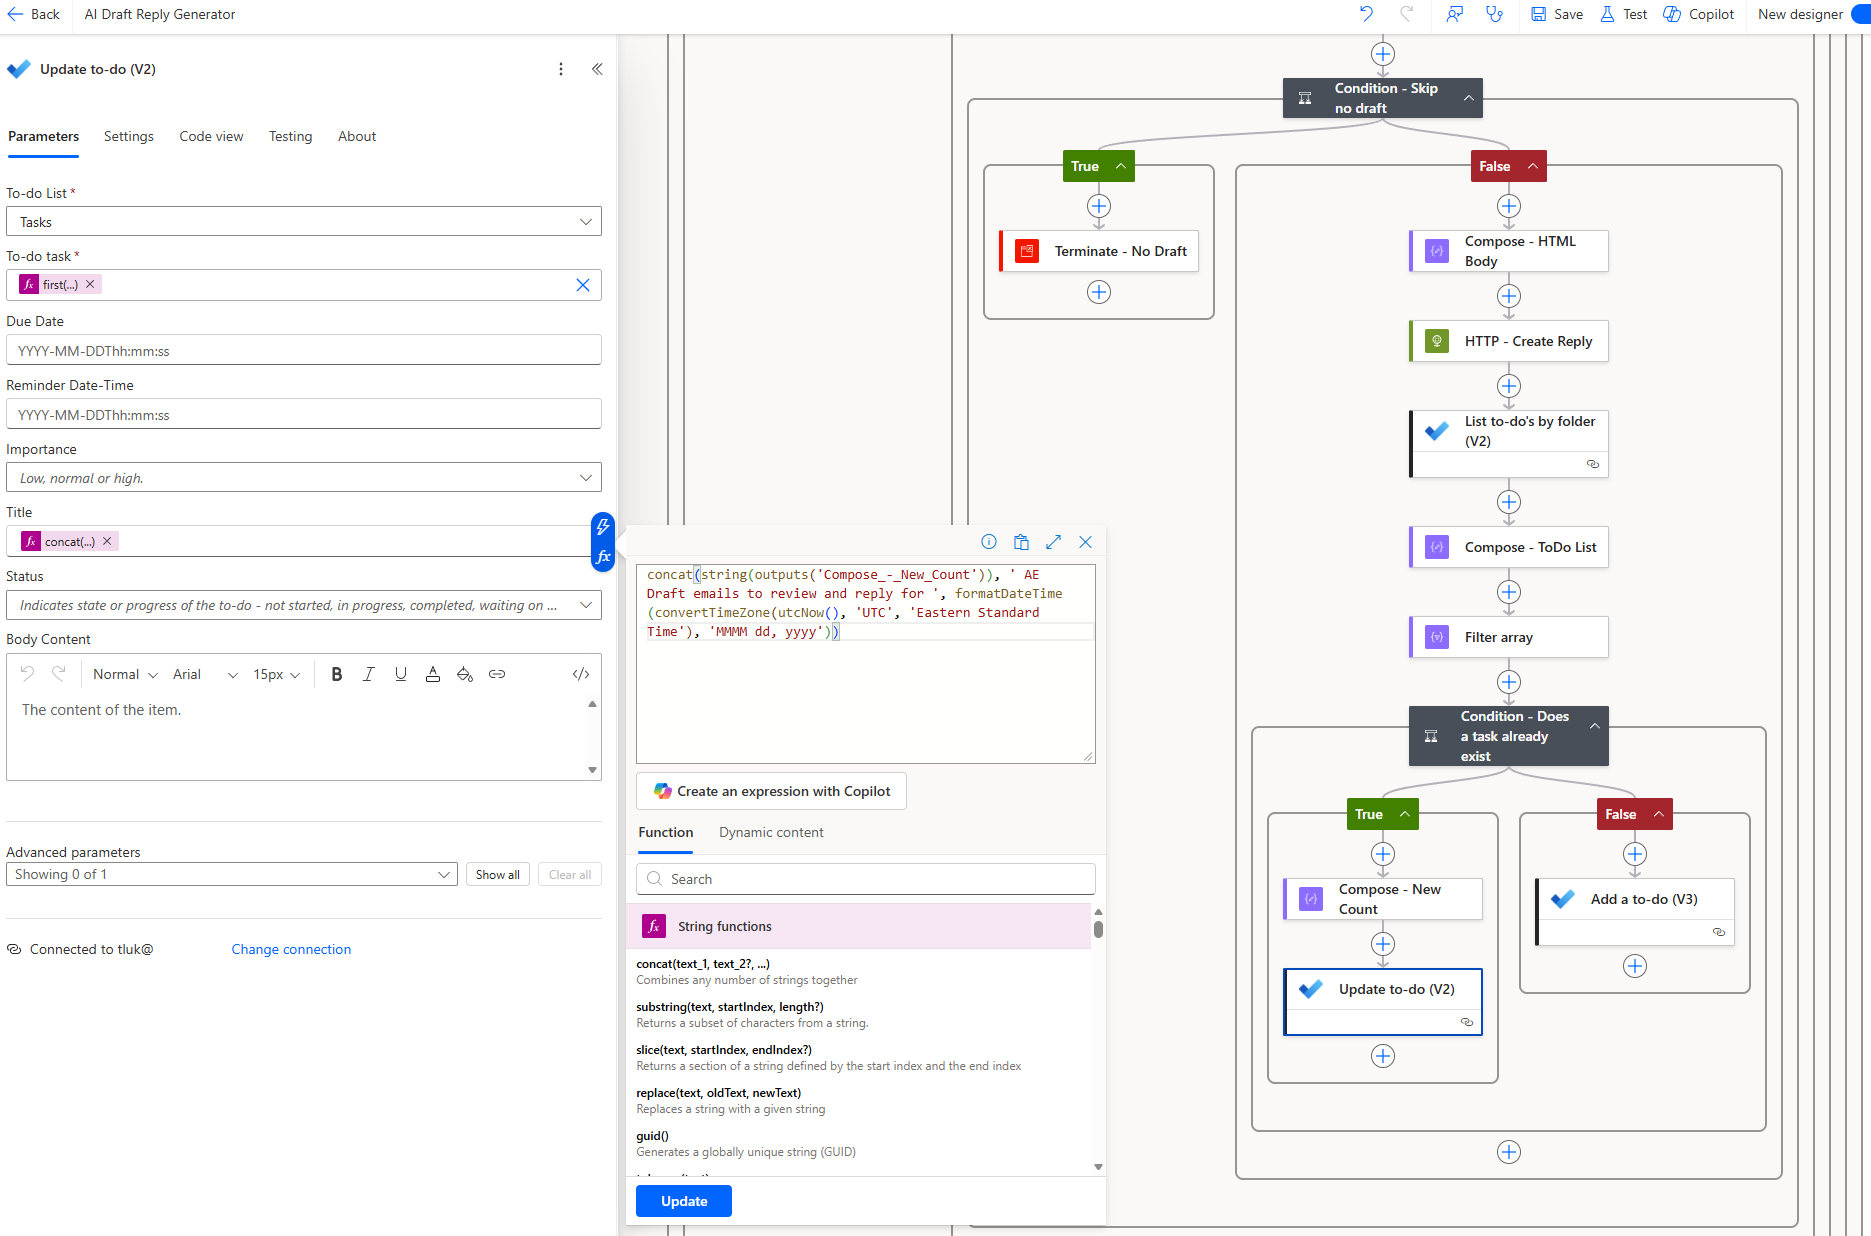
Then add an Update to-do (V2) action:
| Setting | Value |
|---|---|
| To-do List | Same folder as Step 14 |
| To-do task | first(body('Filter_array'))?['id'] |
| Title | (expression below) |
Title expression:
concat(
  string(outputs('Compose_-_New_Count')),
  ' AE Draft emails to review and reply for ',
  formatDateTime(convertTimeZone(utcNow(), 'UTC', 'Eastern Standard Time'), 'MMMM dd, yyyy')
)
This overwrites the existing task’s title with the incremented count.
Step 19 — False branch: Create a new task for today
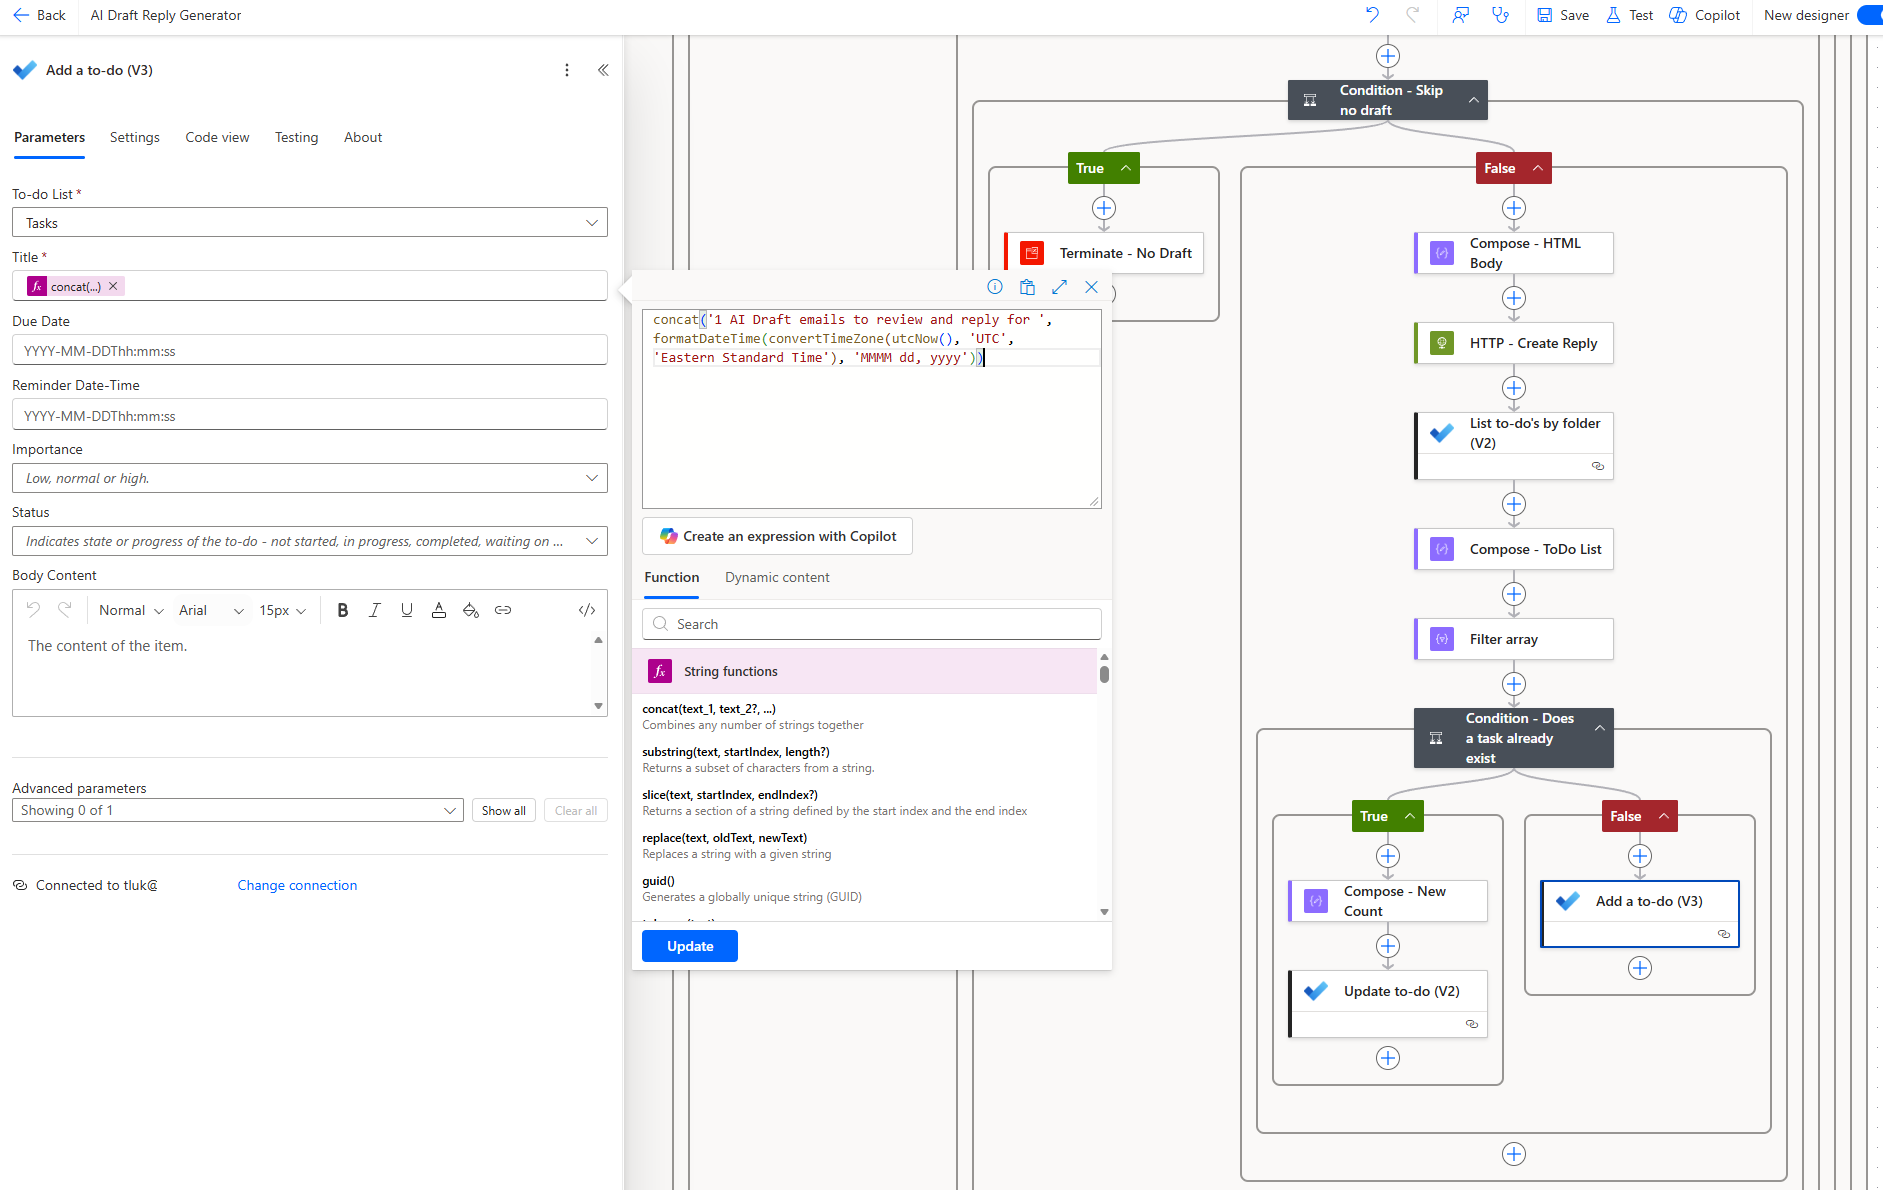
If no task exists for today yet, add an Add a to-do (V3) action in the False branch:
| Setting | Value |
|---|---|
| To-do List | Same folder as Step 14 |
| Title | (expression below) |
Title expression:
concat(
  '1 AI Draft emails to review and reply for ',
  formatDateTime(convertTimeZone(utcNow(), 'UTC', 'Eastern Standard Time'), 'MMMM dd, yyyy')
)
This creates a new task starting at count 1 for the current day.
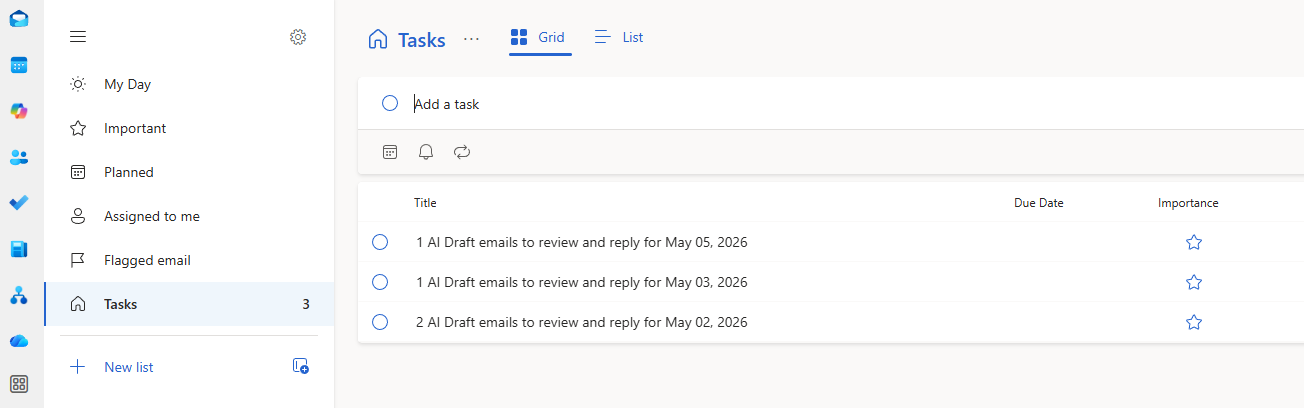
The To Do result
The result is a single To Do task per day with a title like “5 AI Draft emails to review and reply for May 05, 2026” that updates throughout the day as new drafts are created. When you open Microsoft To Do in the morning, you can see at a glance how many AI-drafted replies are waiting for your review.
Results
When an email comes in, the flow processes it and within a few seconds a draft reply appears in the Outlook Drafts folder. The draft is properly threaded as a reply to the original email, that is ready to be reviewed, adjusted and sent.
The To Do integration provides a quick morning or mid day check allowing the user to glance how many drafts accumulated overnight or throughout the day that needs attention.
Closing thoughts
While the volume and complexity of emails I deal with day to day would still require a human touch for most replies, this flow has been a fun build and the concept is genuinely useful. Microsoft has just recently released Workflows in the Frontier program that allows you to use natural language to build an automation like this but I’ve always preferred to at least try to build it out manually to better understand the intricacies of the workings under the hood.
The exported JSON for this flow is available in my GitHub repo: https://github.com/terenceluk/Power-Automate/tree/main/AI-Draft%20Reply%20Generator