An ex-colleague of mine recently reached out with an interesting issue that I had not encountered before, largely due to my lack of day-to-day involvement with user account administration. Never the type to say no to a challenge, I took a look at the problem and set out to find a method to accomplish what was intended to be done.
What followed was a deep dive into the limitations of Microsoft Graph, the nuances of Exchange Online distribution groups, and a practical solution built with Azure Logic Apps. This post documents what I learned and the workaround I came up with.
The Challenges
#1 – Accounts without an Exchange Mailbox cannot be added to Distribution Lists
If we are to use the Exchange admin center administration portal to try and add a user account that does not have a mailbox to a Distribution List, we will immediately notice that the user account is not listed:
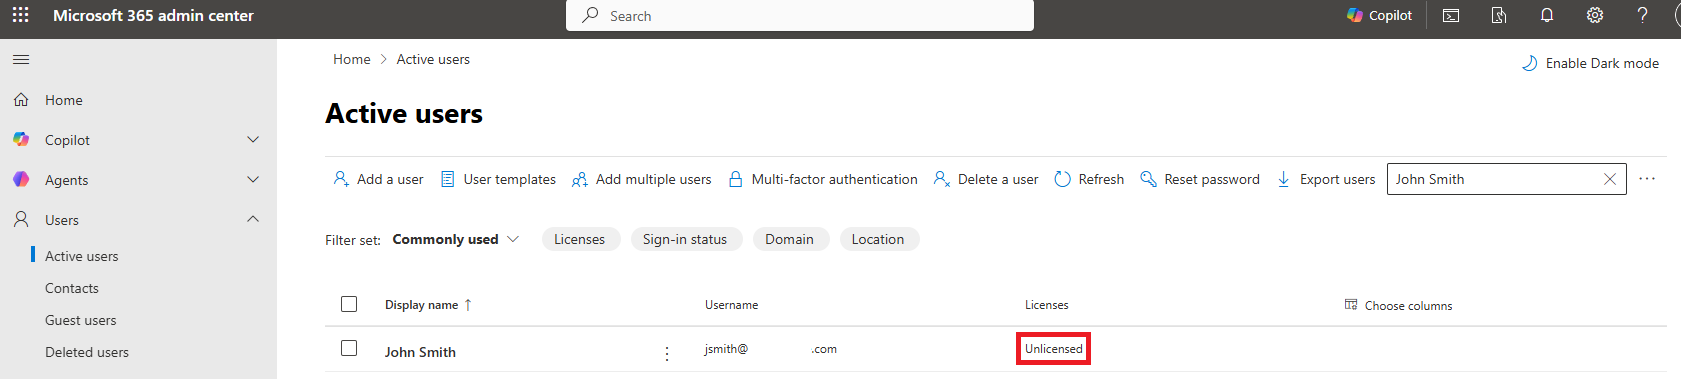

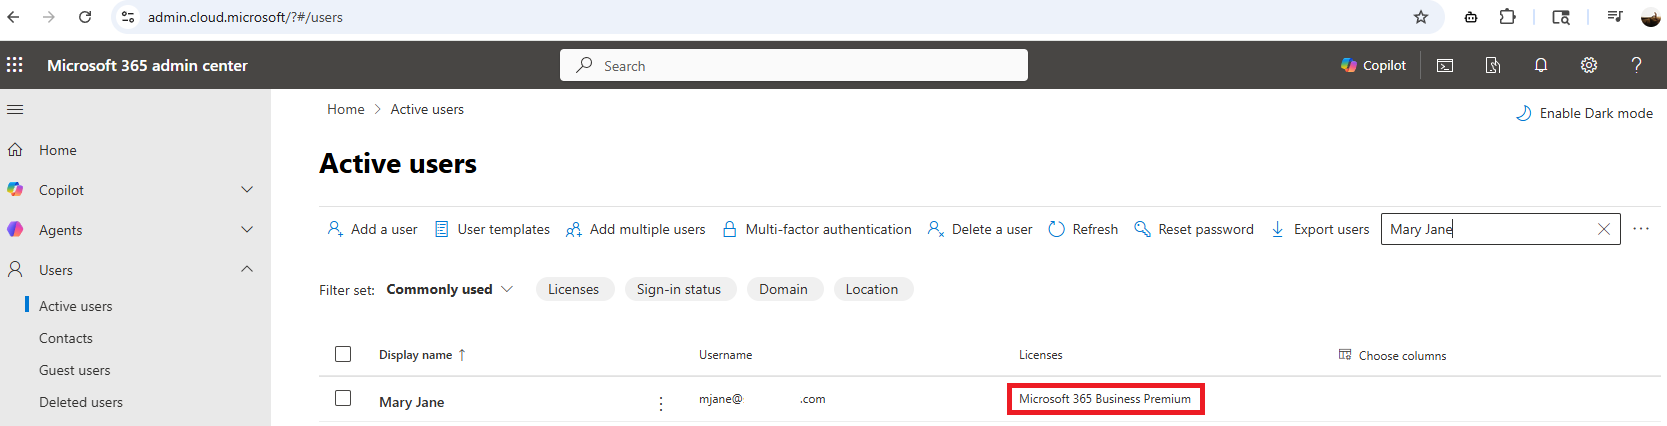
Where as if the user was licensed, we would be able to add them to a Distribution List:

#2 – Microsoft Graph Limitation with Distribution Lists
Administrators who have tried to automate adding a user to a distribution list using Microsoft Graph would have ran into the limitation where Microsoft Graph can read distribution groups but cannot edit them when they are mail-enabled security groups or distribution lists managed by Exchange Online.
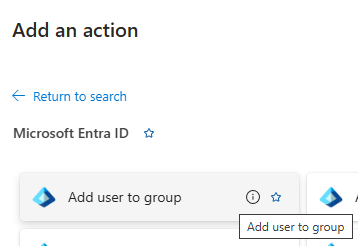
To be sure, I went ahead and tested the native Logic App action “Add user to Group”, which likely uses Microsoft Graph in the background:
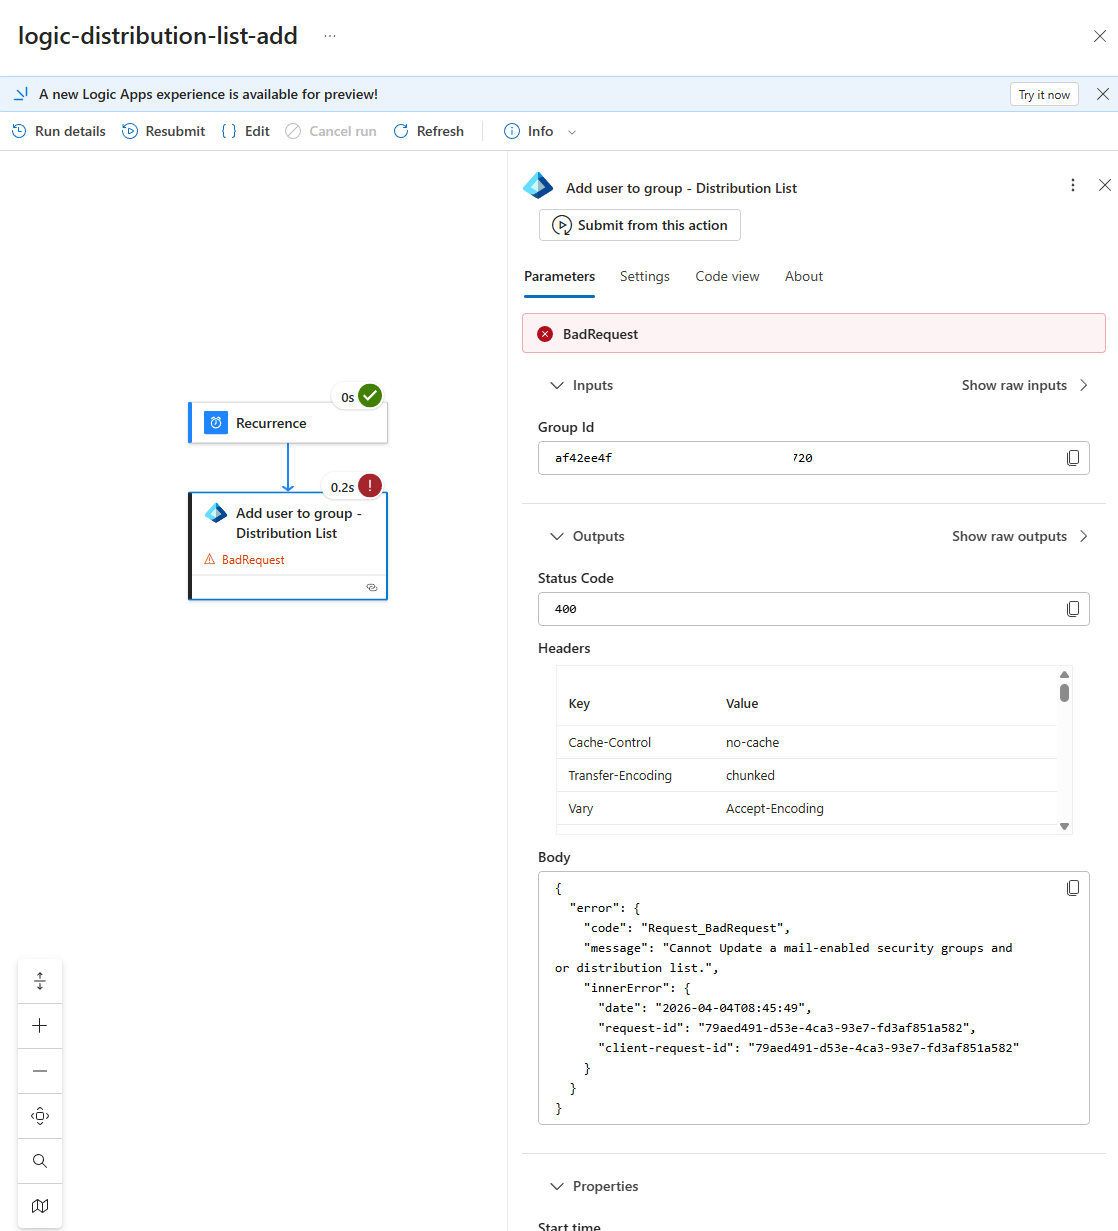
… and confirmed that it will fail every time with a Status Code 400 BadRequest when you try to add a user to a distribution list, regardless of whether the user has a license or a mailbox, producing this error:
{
  "error": {
    "code": "Request_BadRequest",
    "message": "Cannot Update a mail-enabled security groups and or distribution list.",
    "innerError": {
      "date": "2026-04-04T08:45:49",
      "request-id": "79aed491-d53e-4ca3-93e7-fd3af851a582",
      "client-request-id": "79aed491-d53e-4ca3-93e7-fd3af851a582"
    }
  }
}
From various Microsoft documentation and forum posts, the root cause points to the fact that distribution lists are managed by Exchange Online and not Microsoft Graph. To modify them programmatically, we would need to use the Exchange Online PowerShell. I’ve called PowerShell cmdlets in the past with Automation Accounts or Function Apps but I didn’t want to introduce another external component in the Logic App so what I started looking into was using the Exchange Online REST API instead. There’s a good post Jozsef Hajek (https://hajekj.net/2025/06/20/working-with-exchange-online-distribution-groups-via-rest/) that goes into the details of working with Exchange Online distribution groups via REST.
The example I would like to use for this post is an onboarding automation I created in the past where new employee accounts are created without an Office 365 license initially because the license may not have been provisioned. This means I have two problems to solve:
-
Using the correct API — Exchange Online REST instead of Microsoft Graph
-
Handling the mailbox dependency — unlicensed users don’t have mailboxes and cannot be added to distribution lists yet
The Target Solution
This led me to the decision to build a dedicated Logic App that:
- Triggered via an HTTP request and accepts a userObjectId (user to add to Distribution List) and dgObjectId (Distribution Group object ID)
-
Uses the Exchange Online REST API (not Graph) to modify distribution lists
- Authenticate with the Logic App’s System Managed Identity so we don’t have to maintain secrets
-
Checks if the user has a mailbox by looking for proxyAddresses
-
Waits and retries daily until a mailbox is provisioned (license assigned)
-
Then adds the user to the distribution list
Let’s walk through the configuration.
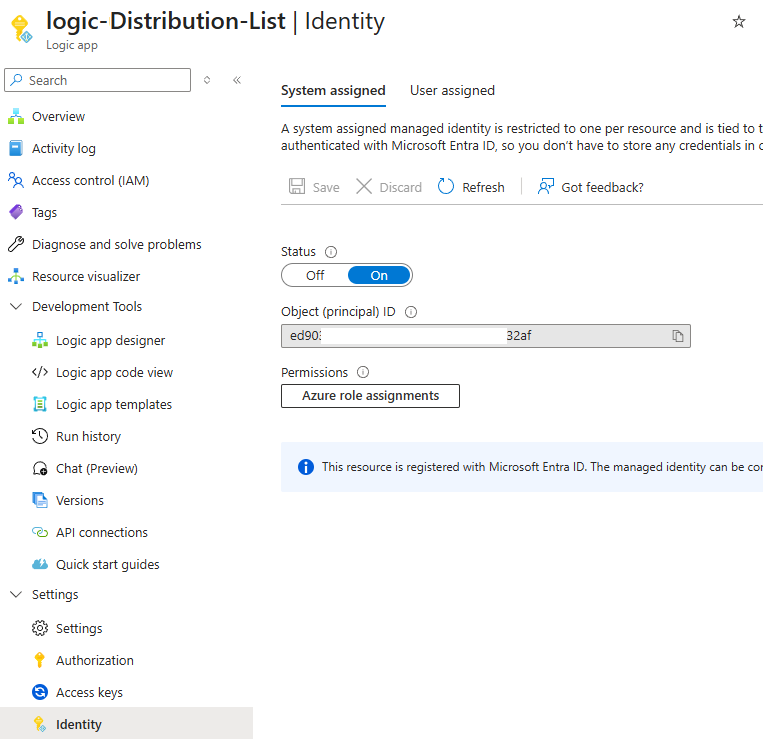
Step 1: Turn on System Managed Identity for Logic App
First, enable a system-assigned managed identity for your Logic App. This allows it to authenticate to both Microsoft Graph and Exchange Online without storing secrets. Navigate to your Logic App in the Azure Portal, select Identity under the Security section, turn System assigned to On, and click Save.
Step 2: Assign Graph Permissions to the Managed Identity
The Logic App needs permission to read user properties (specifically proxyAddresses). We’ll grant User.Read.All application permission to the managed identity.
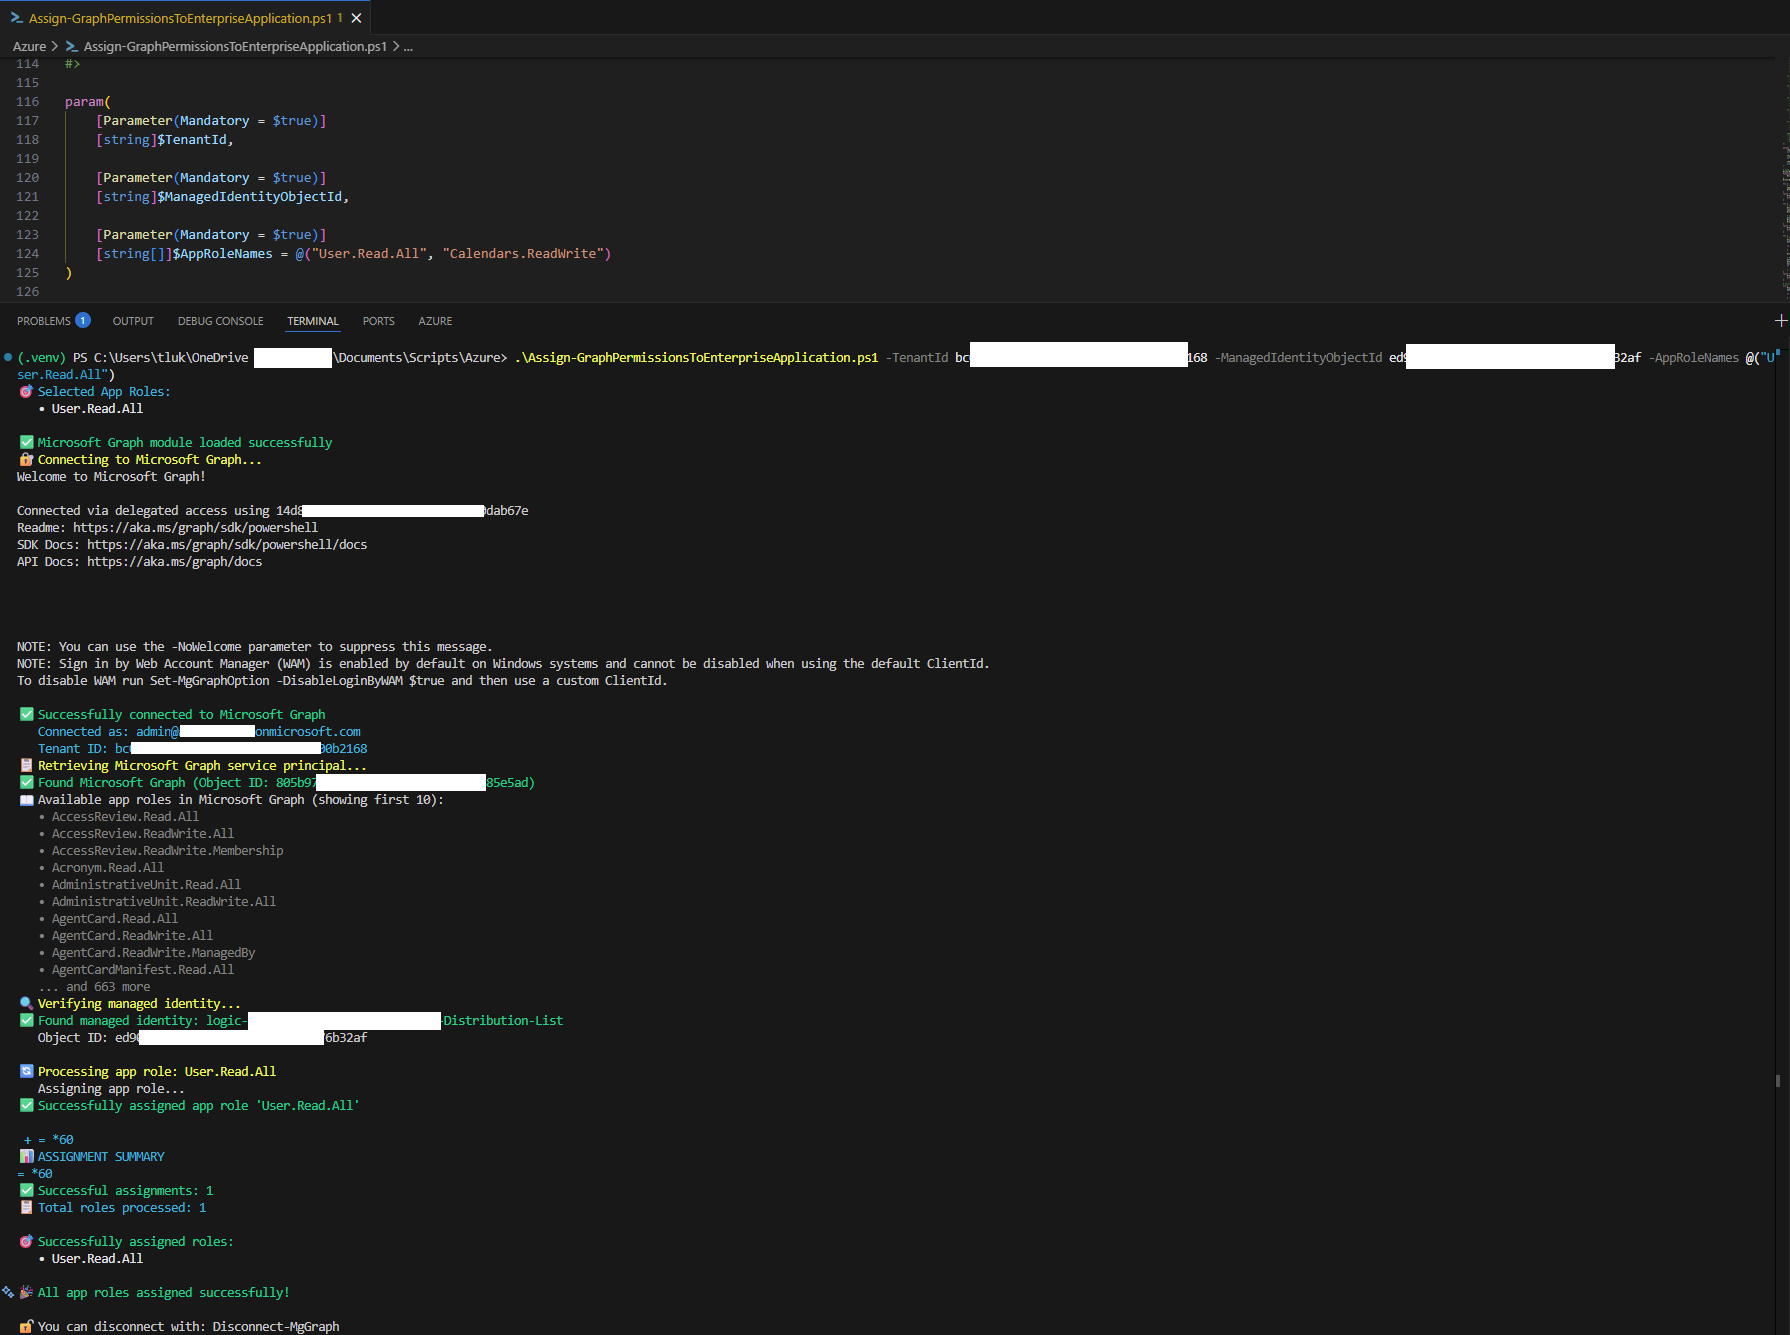
I’ve written a PowerShell script that simplifies this process. You can find it in my GitHub repo: https://github.com/terenceluk/Azure/blob/2f6429a22f162b25b7891edcb83388a79bf8eece/PowerShell/Assign-GraphPermissionsToEnterpriseApplication.ps1
Fill in the required parameters for the TenantId and Logic App’s Object (principal) ID as the ManagedIdentityObjectId:
.\Assign-GraphPermissionsToEnterpriseApplication.ps1 -TenantId xxxxxxx-xxxx-xxxx-xxxx-xxxxxxxxxxxx -ManagedIdentityObjectId xxxxxxx-xxxx-xxxx-xxxx-xxxxxxxxxx -AppRoleNames @(“User.Read.All”)
Run the script to assign the required Graph permission to the Logic App’s service principal.
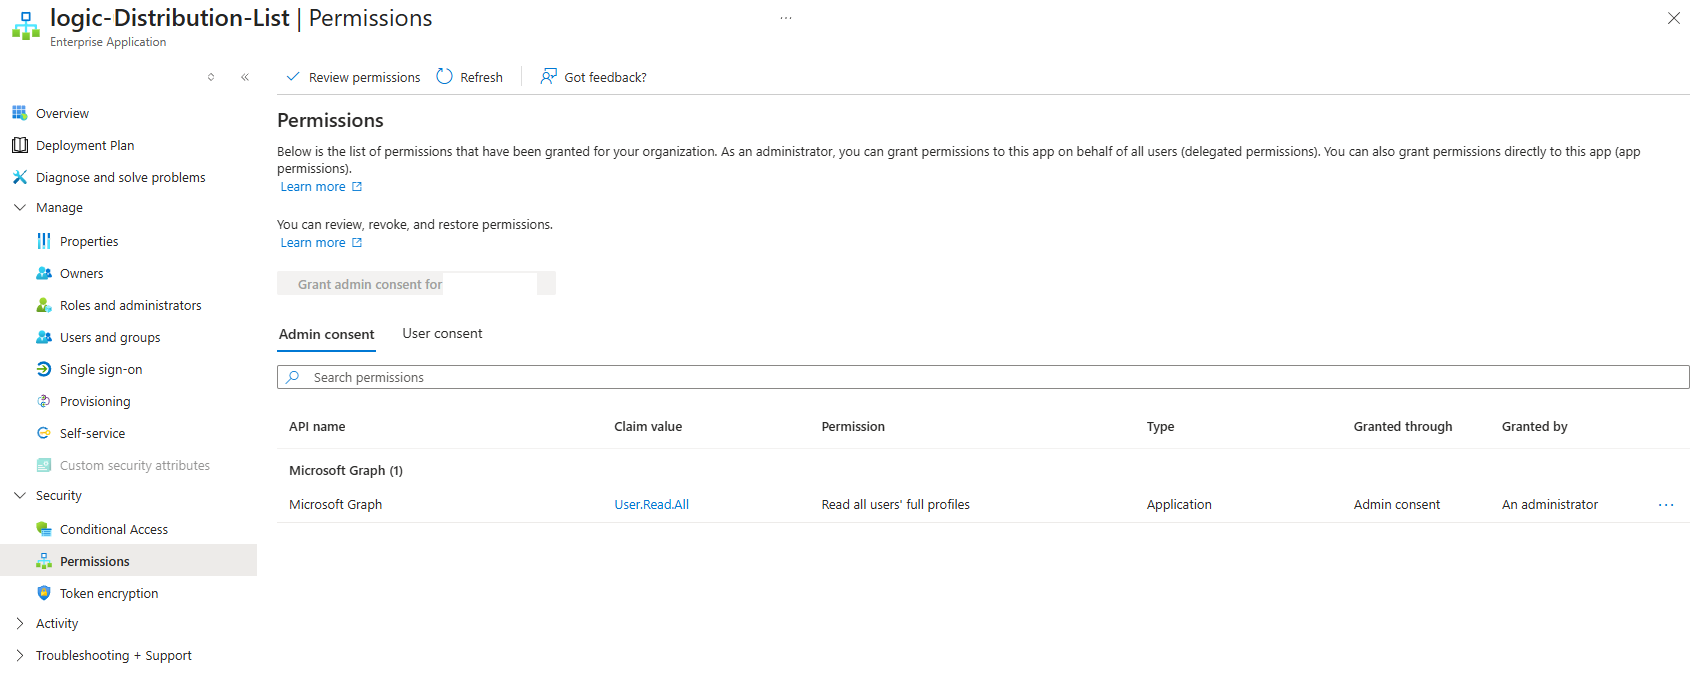
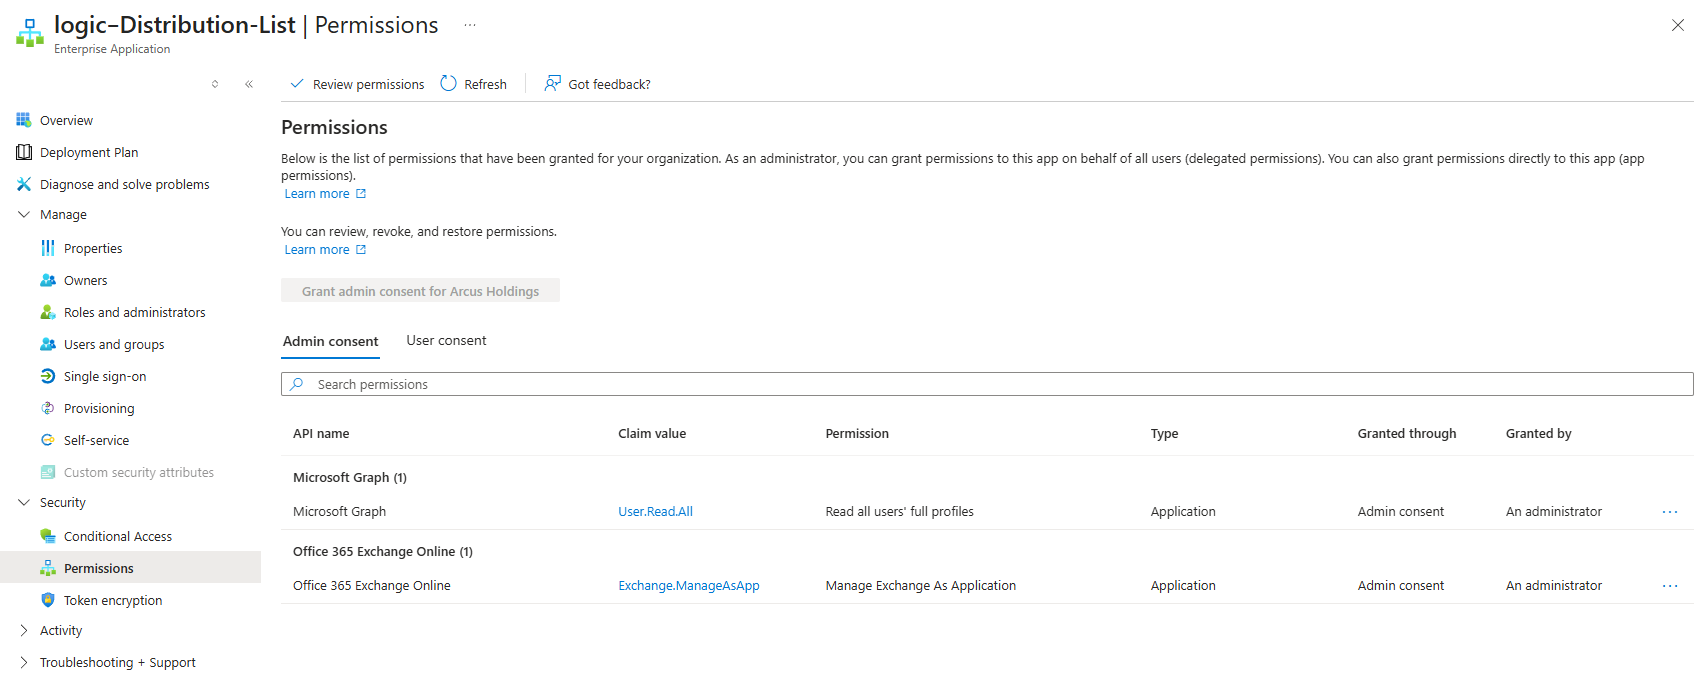
After the assignment has successfully completed, we should see the following Microsoft Graph User.Read.All permission displayed in the Enterprise Application representing the Logic App:
Step 3: Assign Exchange Online Permissions to the Managed Identity
Since Microsoft Graph cannot modify Exchange Online distribution groups, and I did not want to use the Exchange Online PowerShell cmdlets to add a user account to the Distribution List, we’ll have the Logic App call the Office 365 Exchange Online REST API directly, which means the Logic App’s managed identity will need to be assigned the Exchange.ManageAsApp role.
Here’s the PowerShell script to assign the permissions (v2 version of the previous script used for Microsoft Graph that now supports Exchange Online): https://github.com/terenceluk/Azure/blob/main/PowerShell/Assign-GraphPermissionsToEnterpriseApplication_v2.ps1
Fill in the required parameters for the TenantId and Logic App’s Object (principal) ID as the ManagedIdentityObjectId:
.\Assign-AnyApiPermissions_v2.ps1 -TenantId xxxxxxx-xxxx-xxxx-xxxx-xxxxxxxxxxxx -ManagedIdentityObjectId xxxxxxx-xxxx-xxxx-xxxx-xxxxxxxxxx -ApiIdentifier "00000002-0000-0ff1-ce00-000000000000" -AppRoleNames @("Exchange.ManageAsApp")
The GUID 00000002-0000-0ff1-ce00-000000000000 is Microsoft’s well-known AppId for the Exchange Online service principal. Unlike a display name that might change or be localized, this GUID is consistent across all Azure AD tenants, making it the most reliable way to reference the Exchange Online API. The script automatically detects the provided an AppId (rather than a display name) and retrieves the corresponding service principal, providing Exchange.ManageAsApp Exchange-specific role.
Run the script to assign the required Graph permission to the Logic App’s service principal.
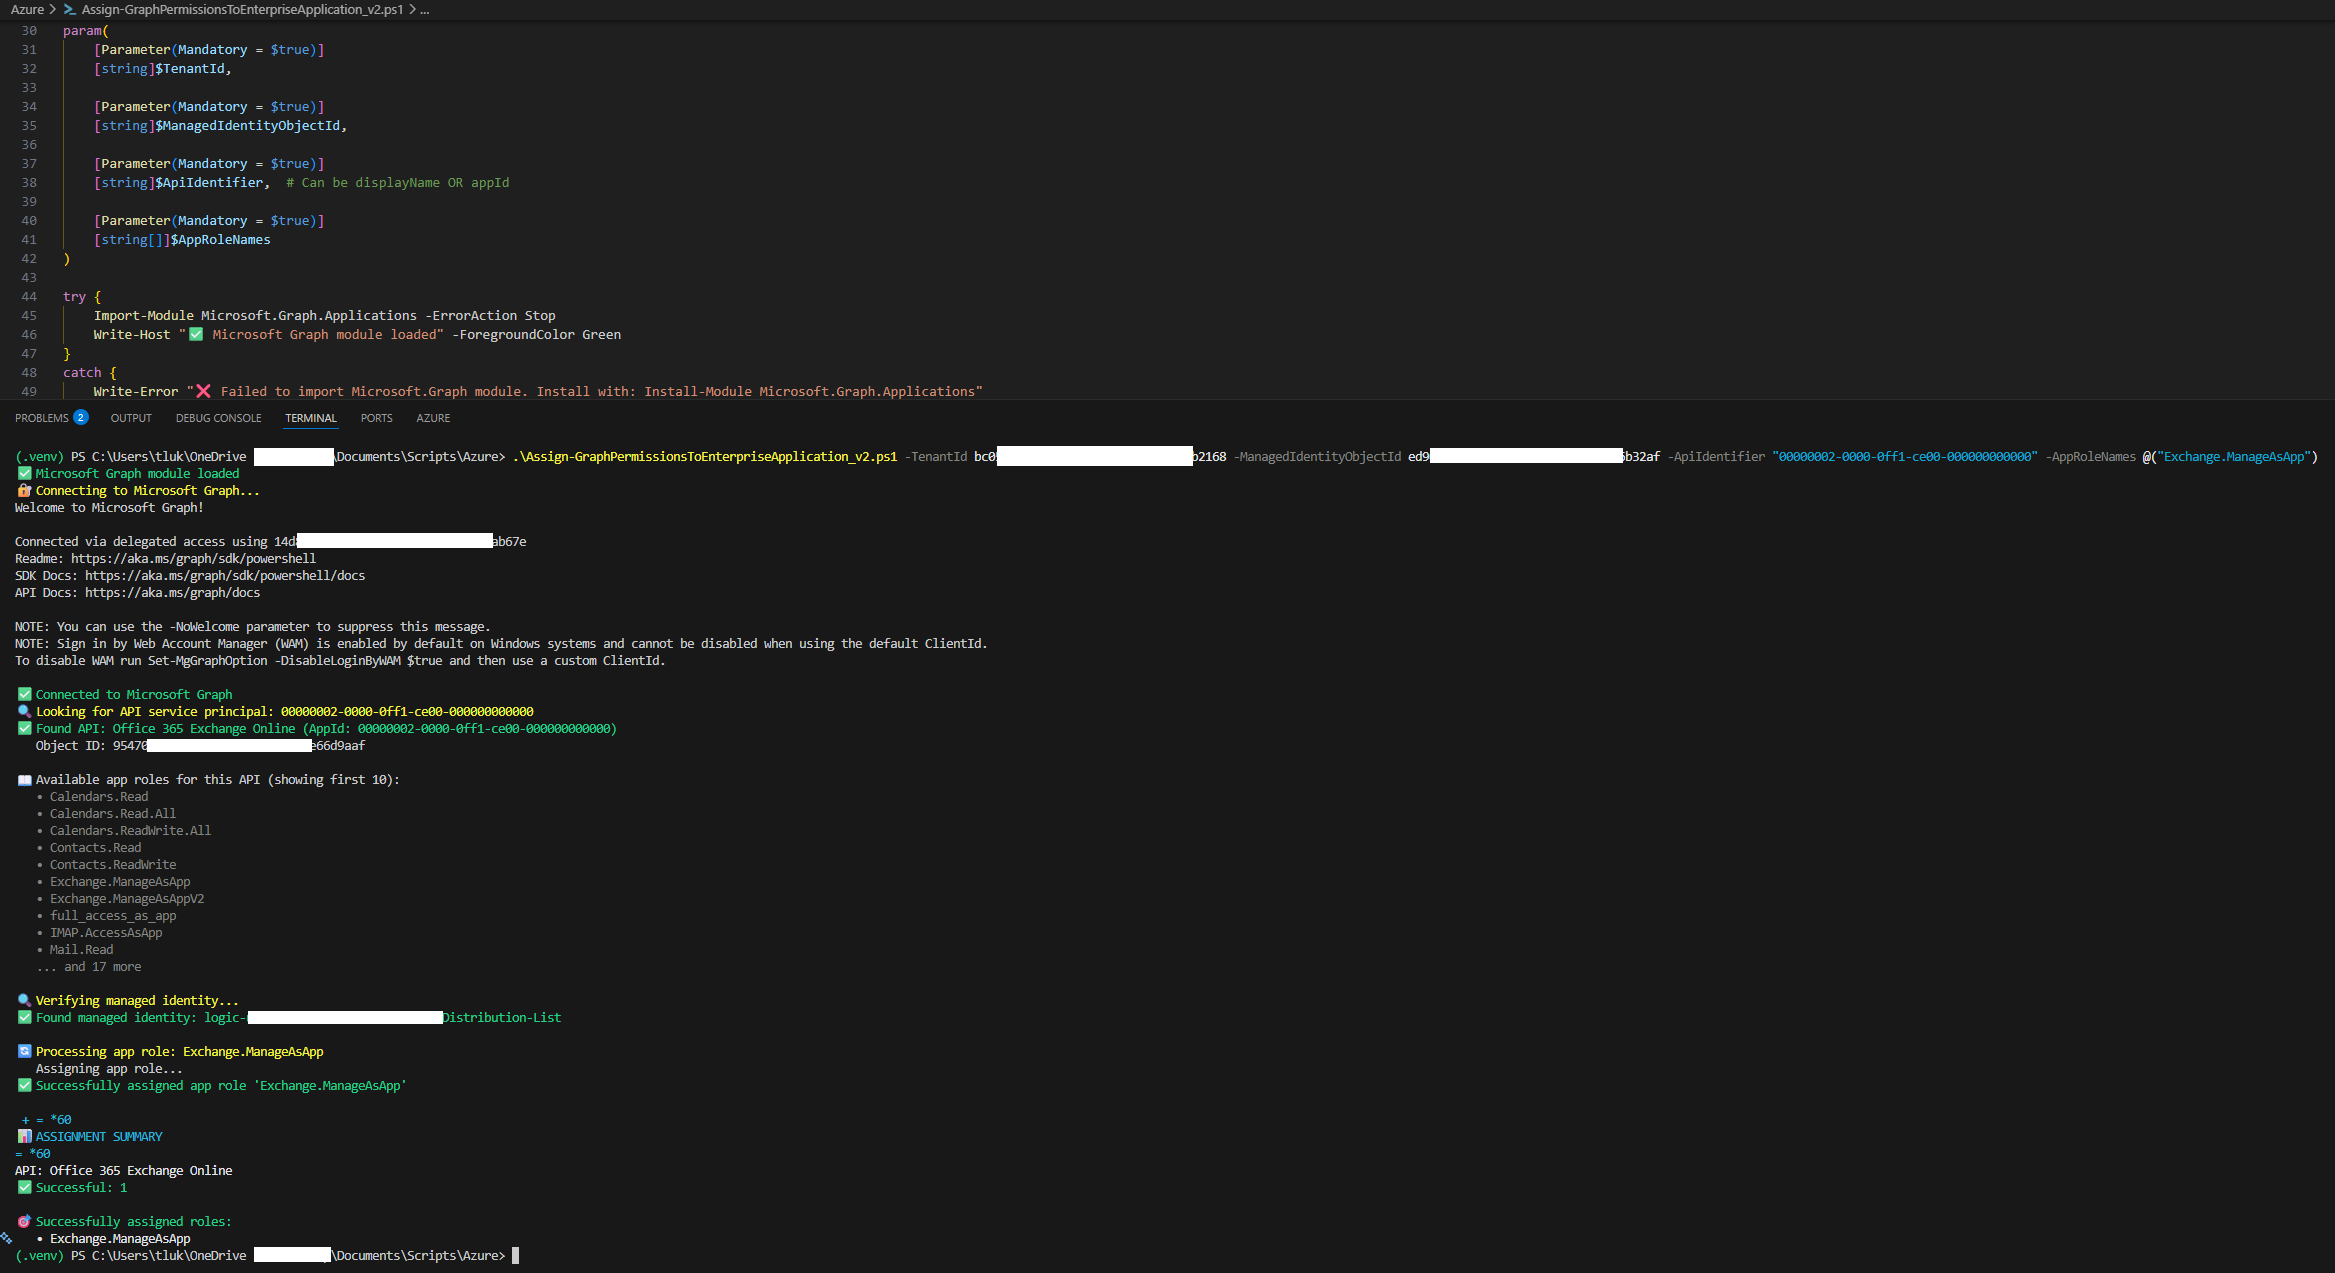
After the assignment has successfully completed, we should see the following Office 365 Exchange Online Exchange.ManageAsApp permission displayed in the Enterprise Application representing the Logic App:
In addition to the Exchange.ManageAsApp role, we’ll also need to grant the Logic App System Managed Identity the Exchange Recipient Administrator role:

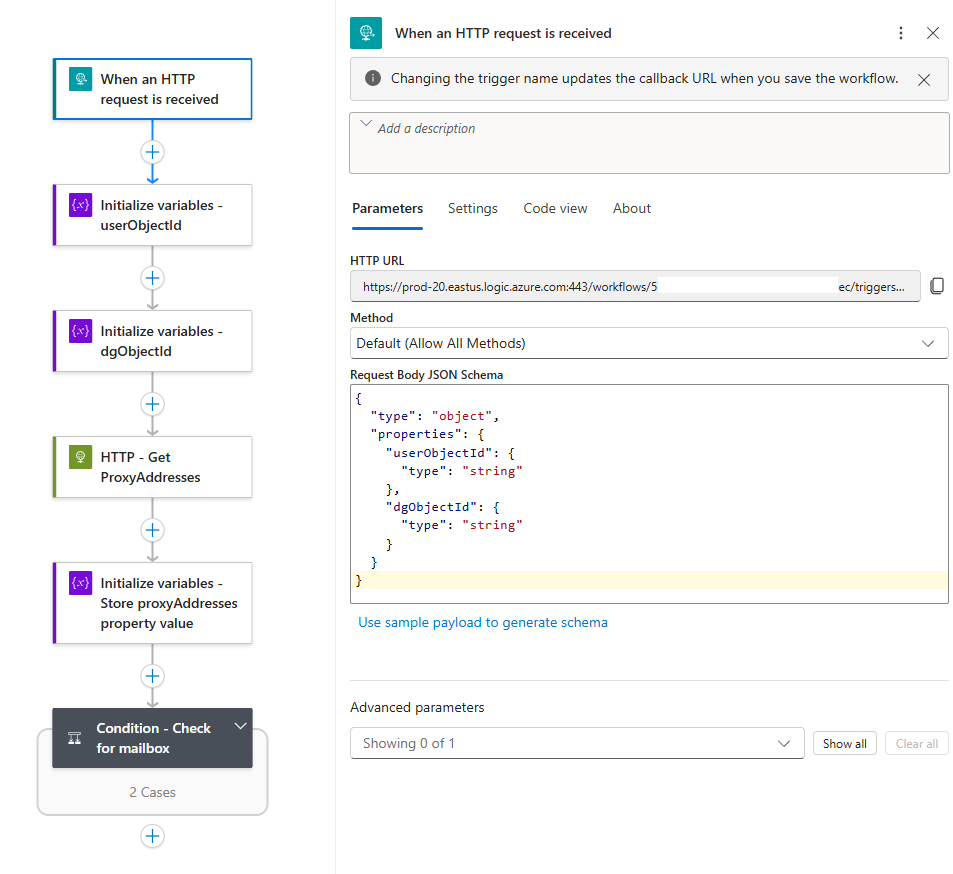
Step 4: Configure the HTTP Trigger and Variables
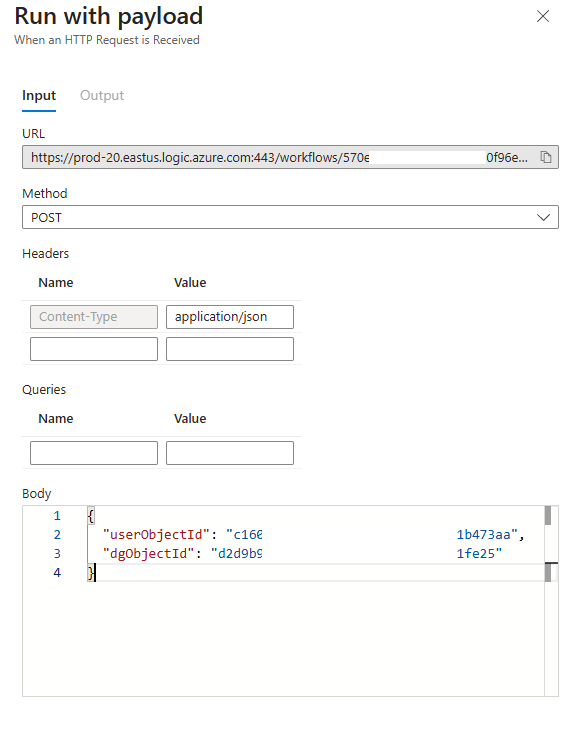
Now let’s build the Logic App starting with a trigger that accepts an HTTP POST request with a JSON body containing:
{
“userObjectId”: “abc123…”,
“dgObjectId”: “def456…”
}
The Request Body JSON Schema will be:
{
“type”: “object”,
“properties”: {
“userObjectId”: {
“type”: “string”
},
“dgObjectId”: {
“type”: “string”
}
}
}
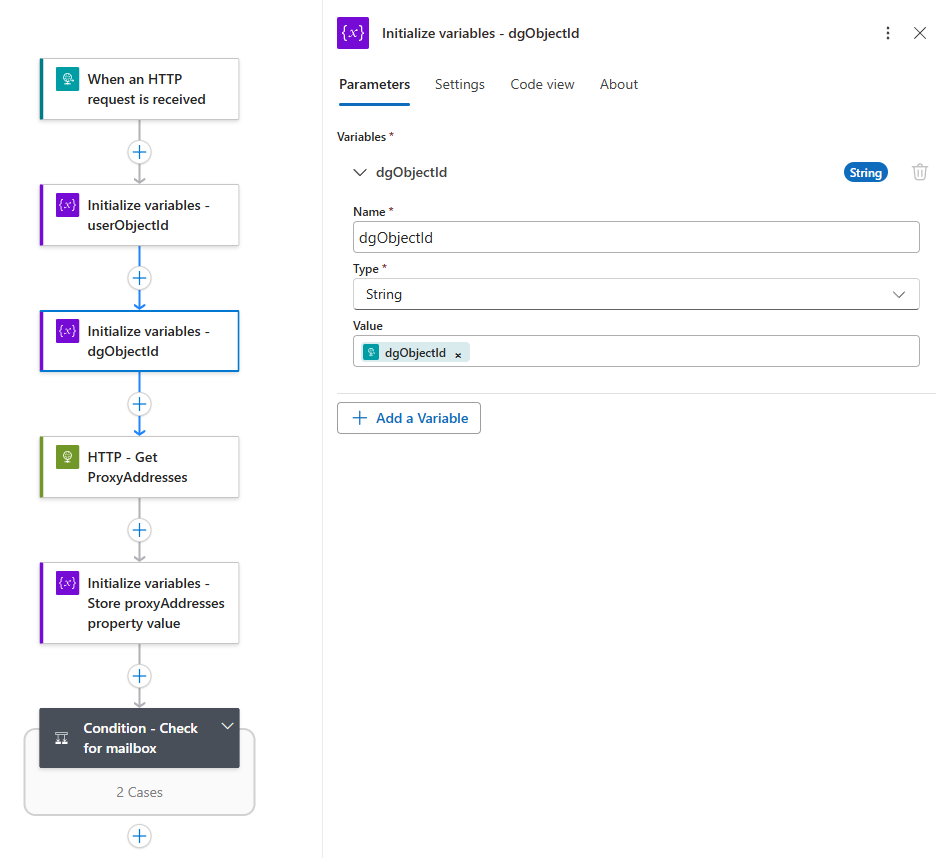
Initialize two string variables to store these values for later use:

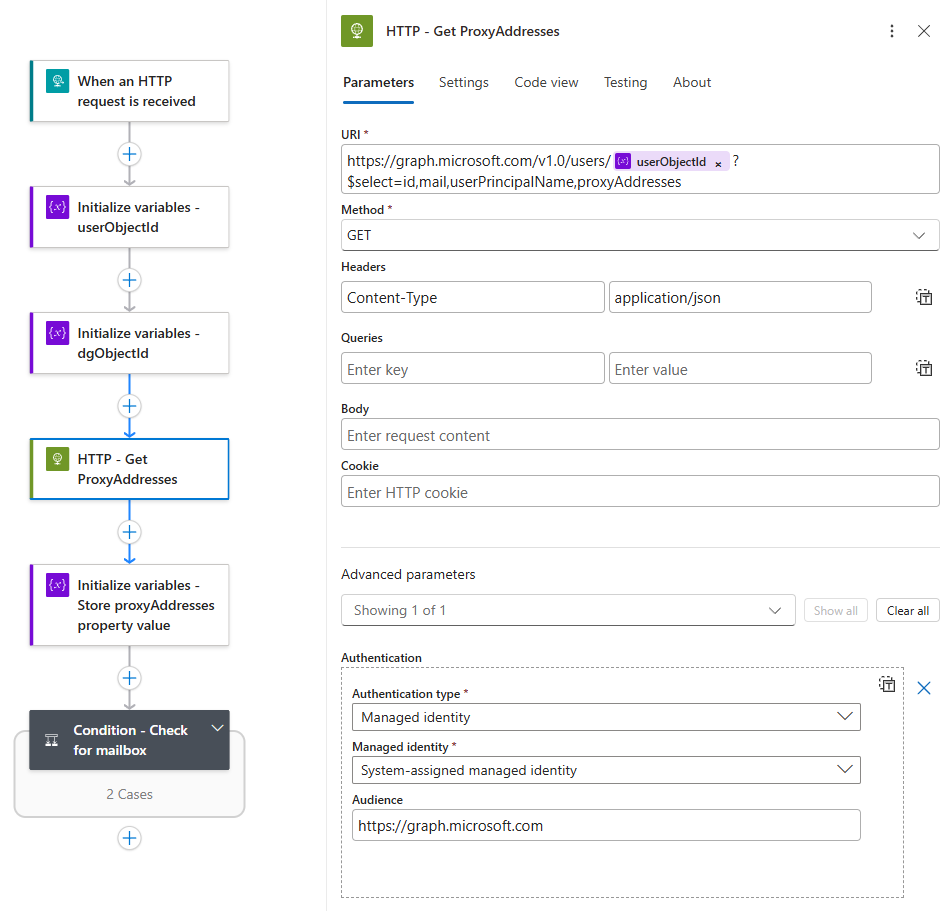
Step 5: Retrieve the User’s ProxyAddresses
An HTTP action is used to call Microsoft Graph to fetch the user’s proxyAddresses property. This attribute contains all email addresses associated with the user and if the user has a mailbox, this array will contain at least one entry (e.g., SMTP:user@domain.com).
HTTP Action Configuration:
-
Method: GET
- Headers: Content-Type application/json
-
URI: https://graph.microsoft.com/v1.0/users/@{variables(‘userObjectId’)}?$select=id,mail,userPrincipalName,proxyAddresses
-
Authentication: Managed Identity (audience: https://graph.microsoft.com)
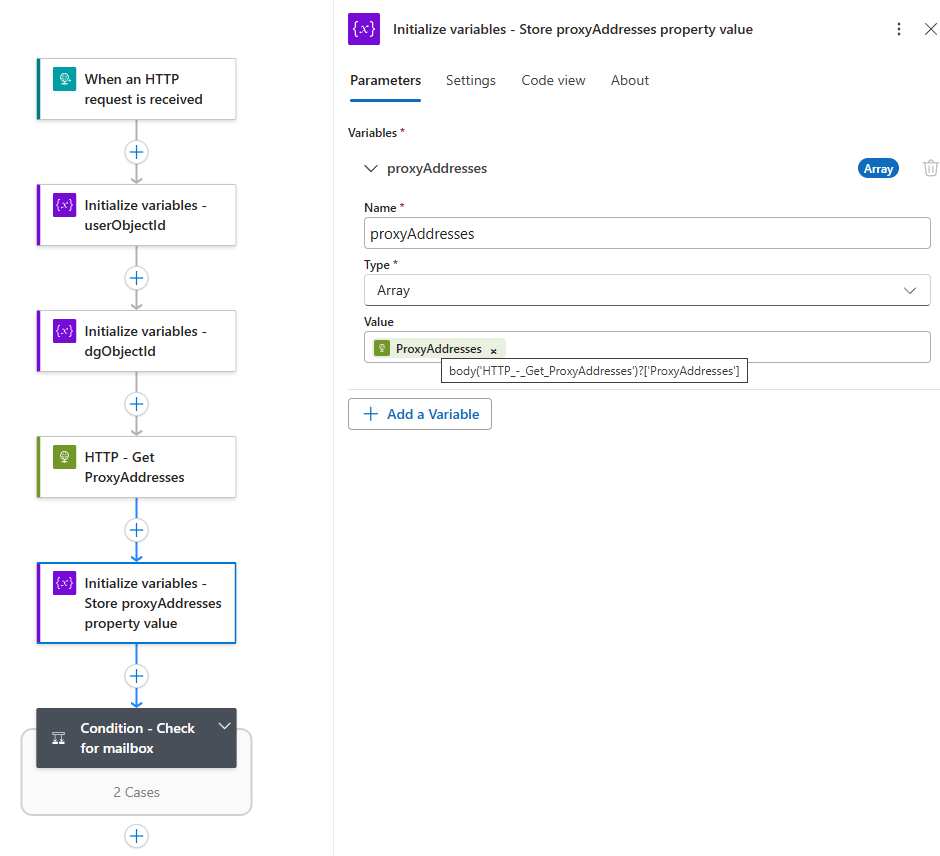
Initialize an array variable called proxyAddresses to store the response value:
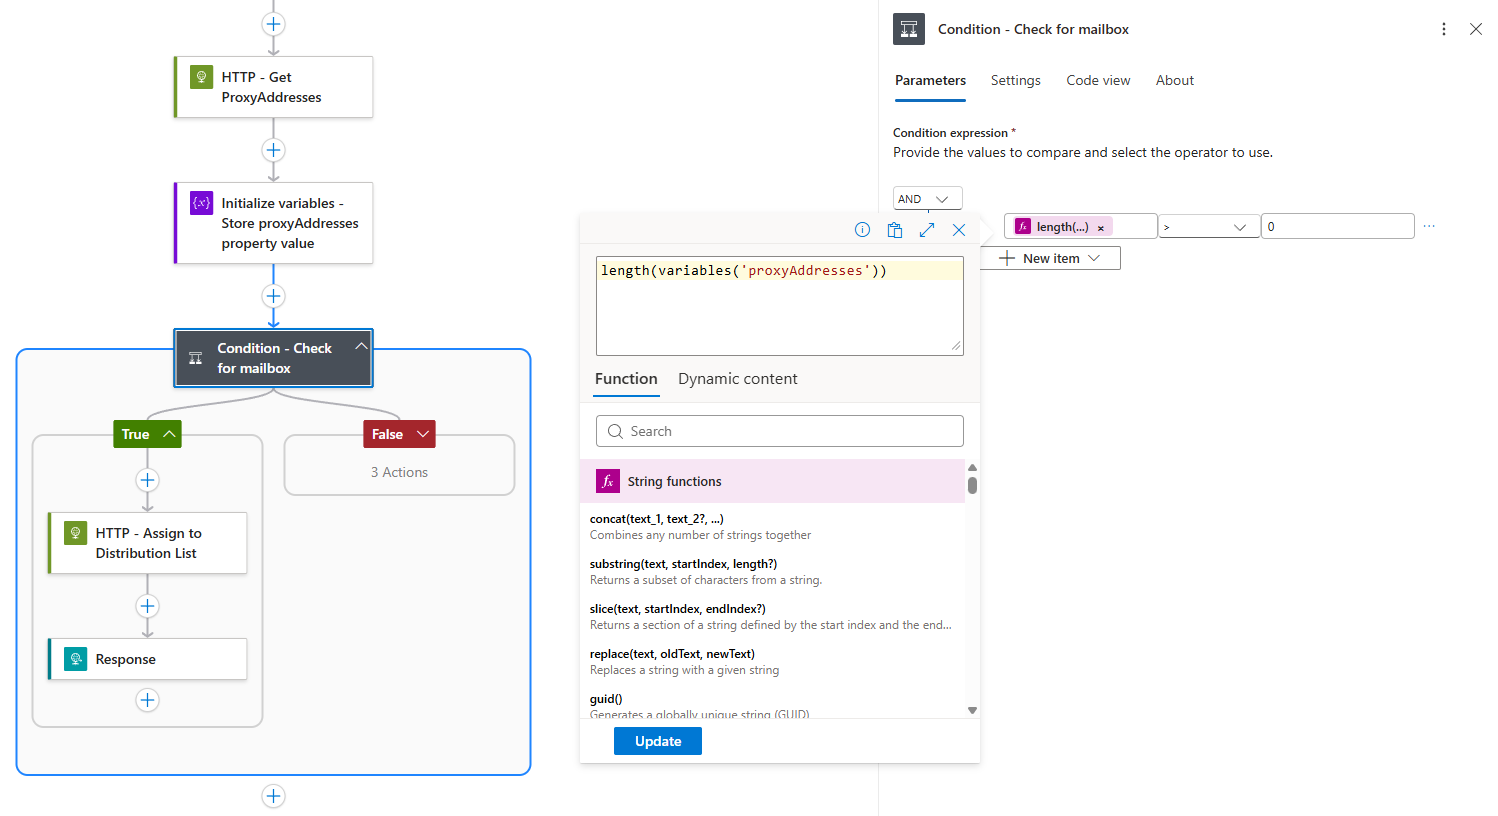
Step 6: Conditional Logic – Does the User Have a Mailbox?
A condition will be configured to check if the proxyAddresses array has more than 0 items:
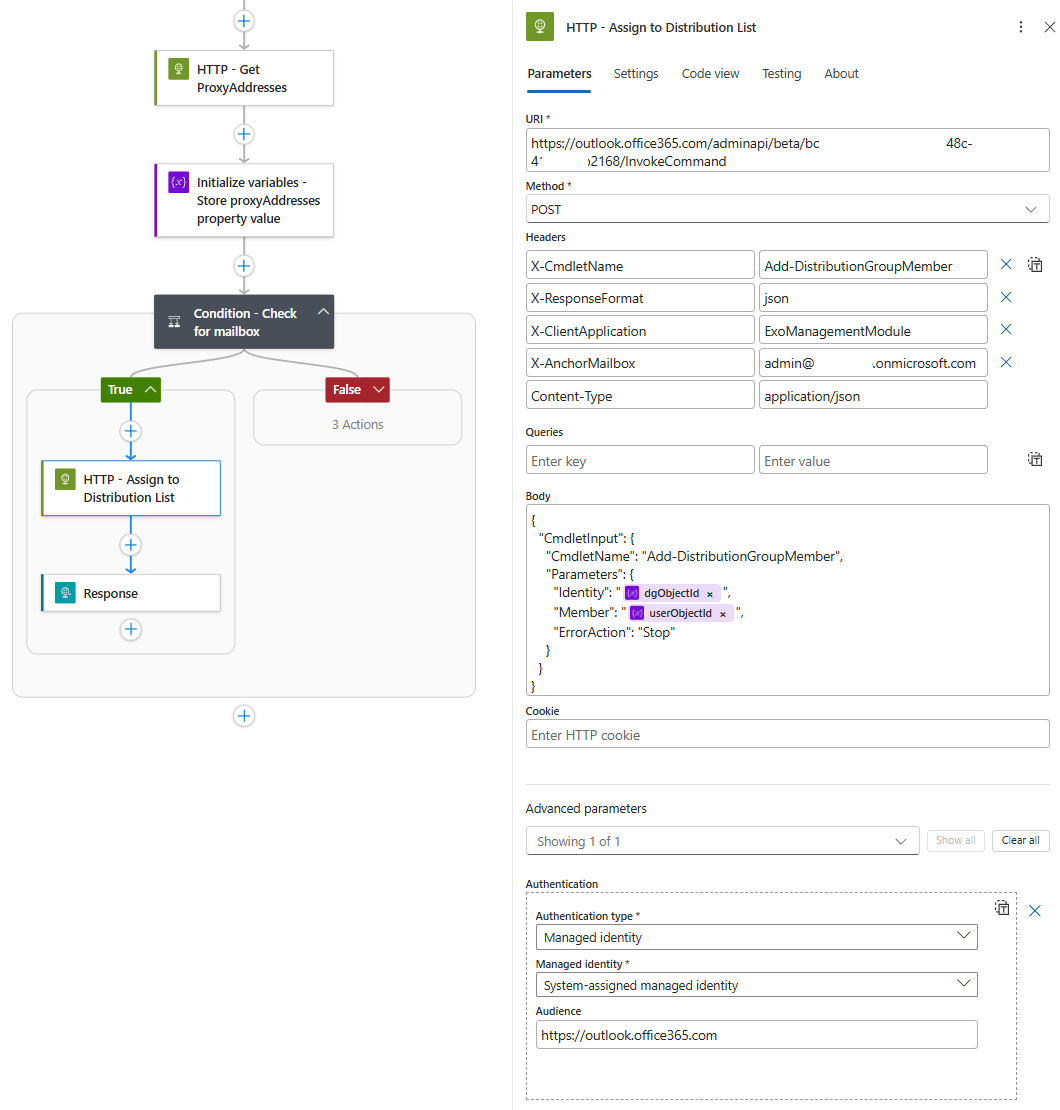
If True (Has Mailbox)
The user has a mailbox, so we immediately add them to the distribution group using the Exchange Online REST API.
HTTP Action Configuration for Exchange:
-
Method: POST
-
URI: https://outlook.office365.com/adminapi/beta/{tenant-id}/InvokeCommand
-
Headers:
- X-CmdletName: Add-DistributionGroupMember
- X-ResponseFormat: json
- X-AnchorMailbox: admin@yourdomain.onmicrosoft.com
- Content-Type: application/json
- Body:
{
“CmdletInput”: {
“CmdletName”: “Add-DistributionGroupMember”,
“Parameters”: {
“Identity”: “@{variables(‘dgObjectId’)}”,
“Member”: “@{variables(‘userObjectId’)}”,
“ErrorAction”: “Stop”
}
}
}
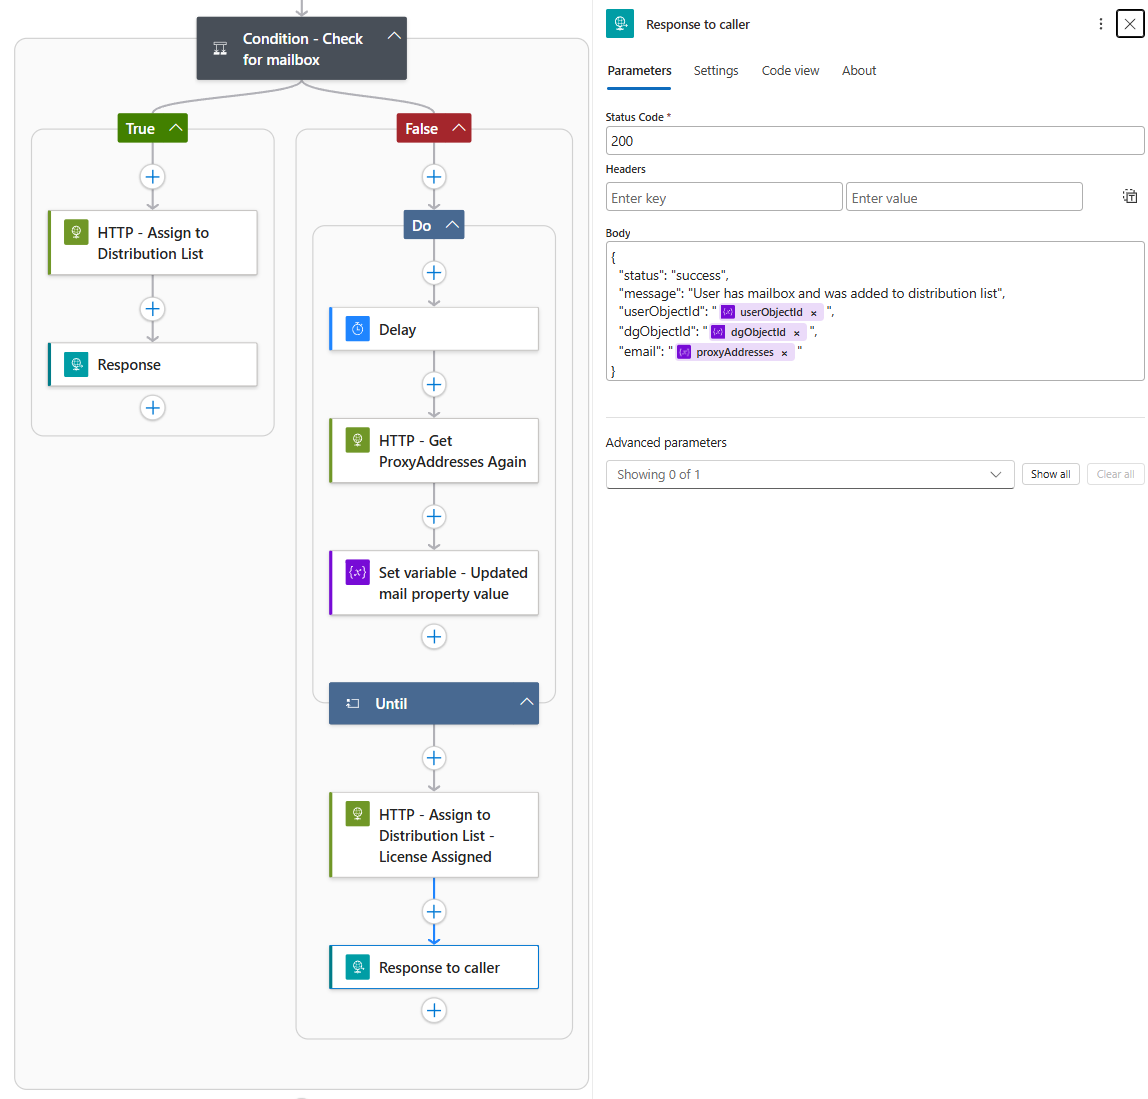
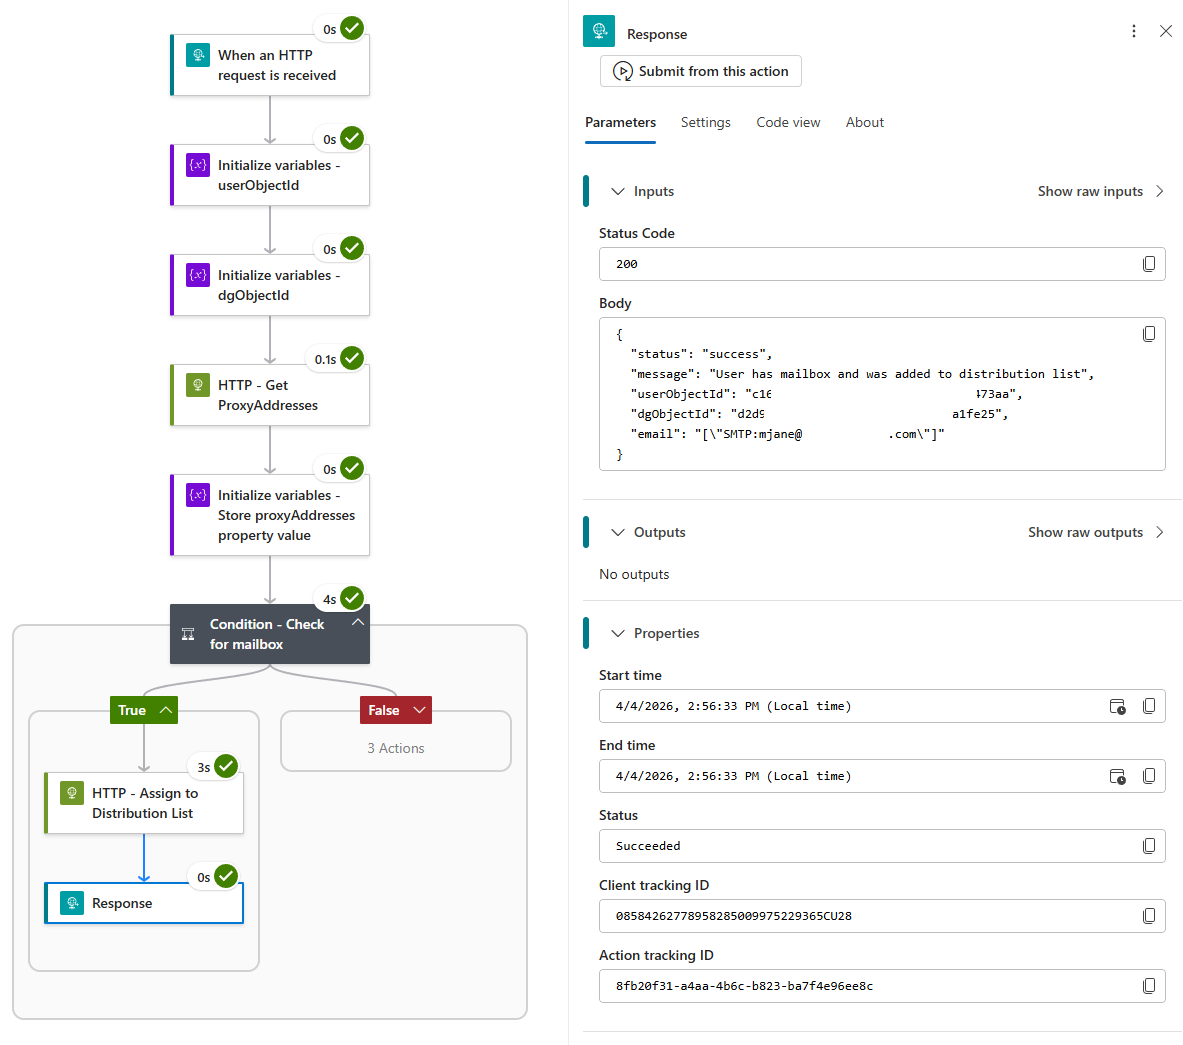
Return a success response to the caller:
{
“status”: “success”,
“message”: “User has mailbox and was added to distribution list”,
“userObjectId”: “@{variables(‘userObjectId’)}”,
“dgObjectId”: “@{variables(‘dgObjectId’)}”,
“email”: “@{variables(‘proxyAddresses’)}”
}

If False (No Mailbox Yet)
The user doesn’t have a mailbox, so the Logic App enters a “Do Until” loop.
Inside the loop:
-
Wait for 1 day (Delay action)

-
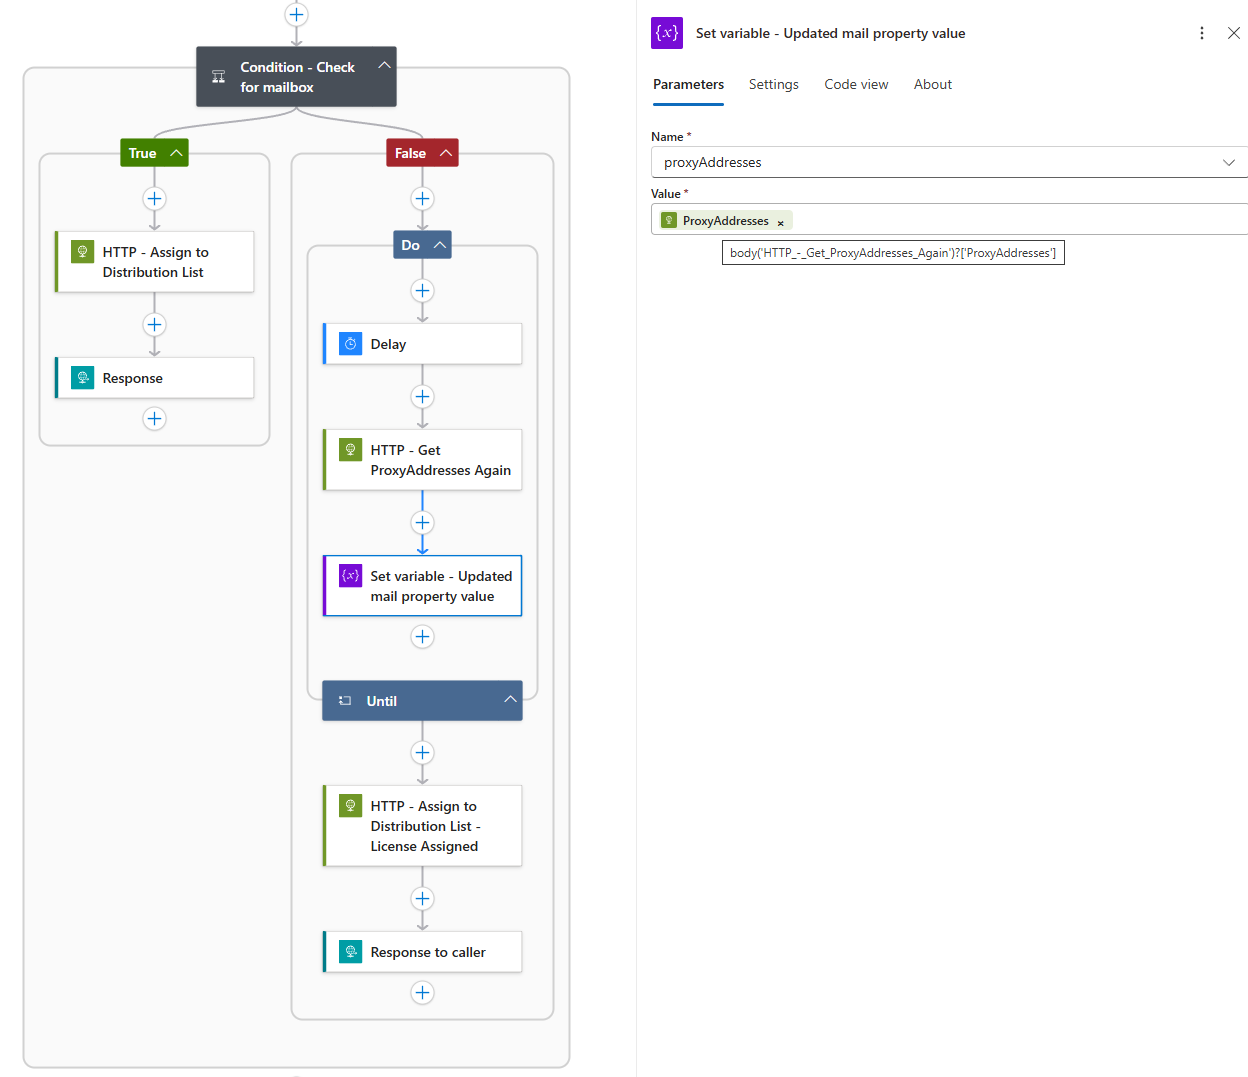
Call Graph again to fetch proxyAddresses

-
Update the proxyAddresses variable with the new value

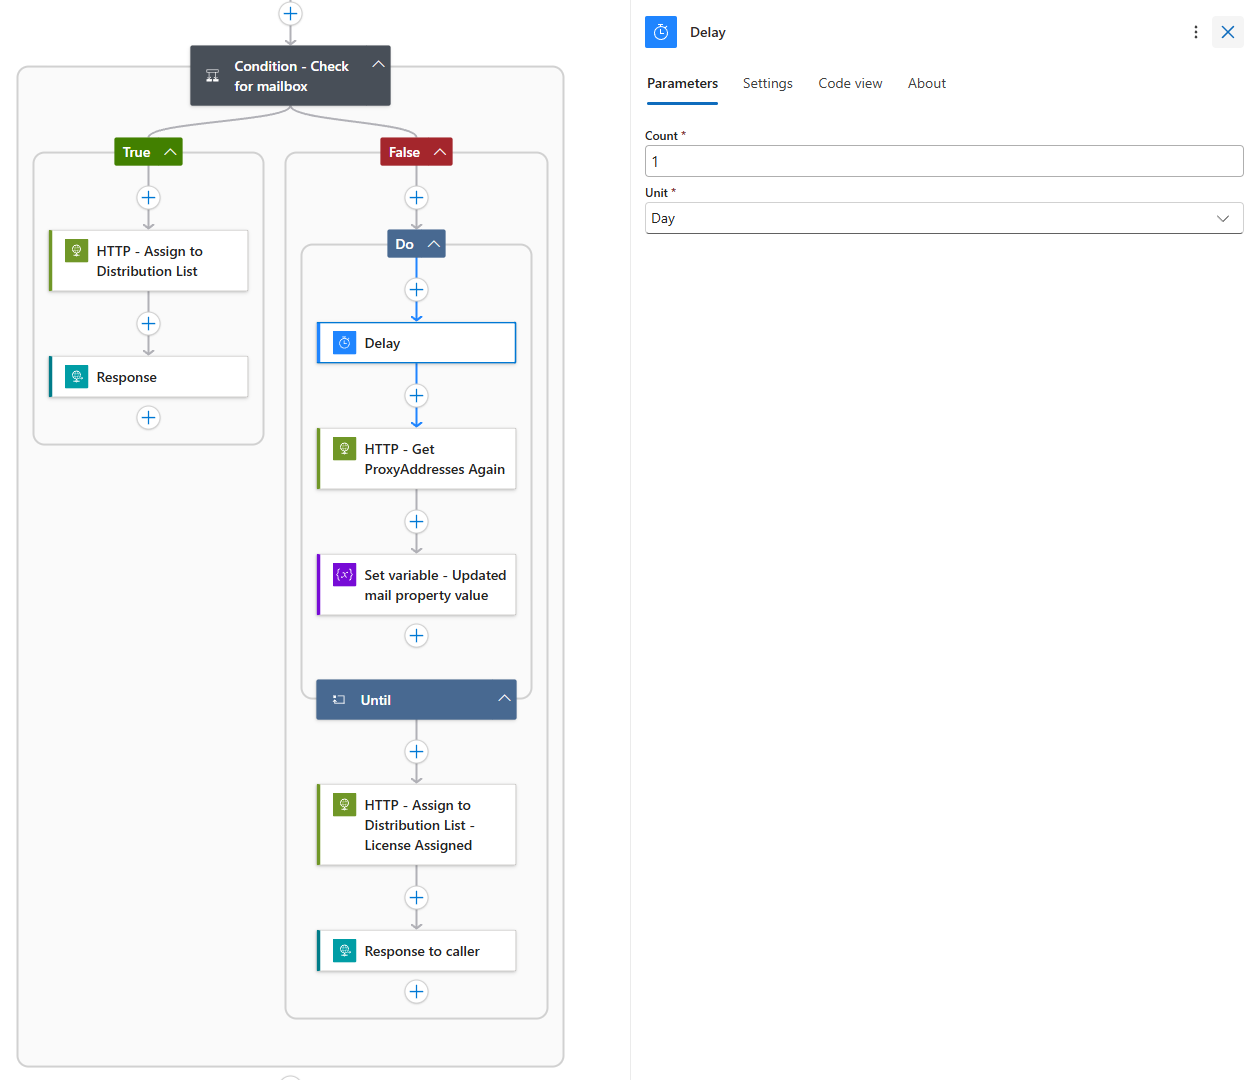
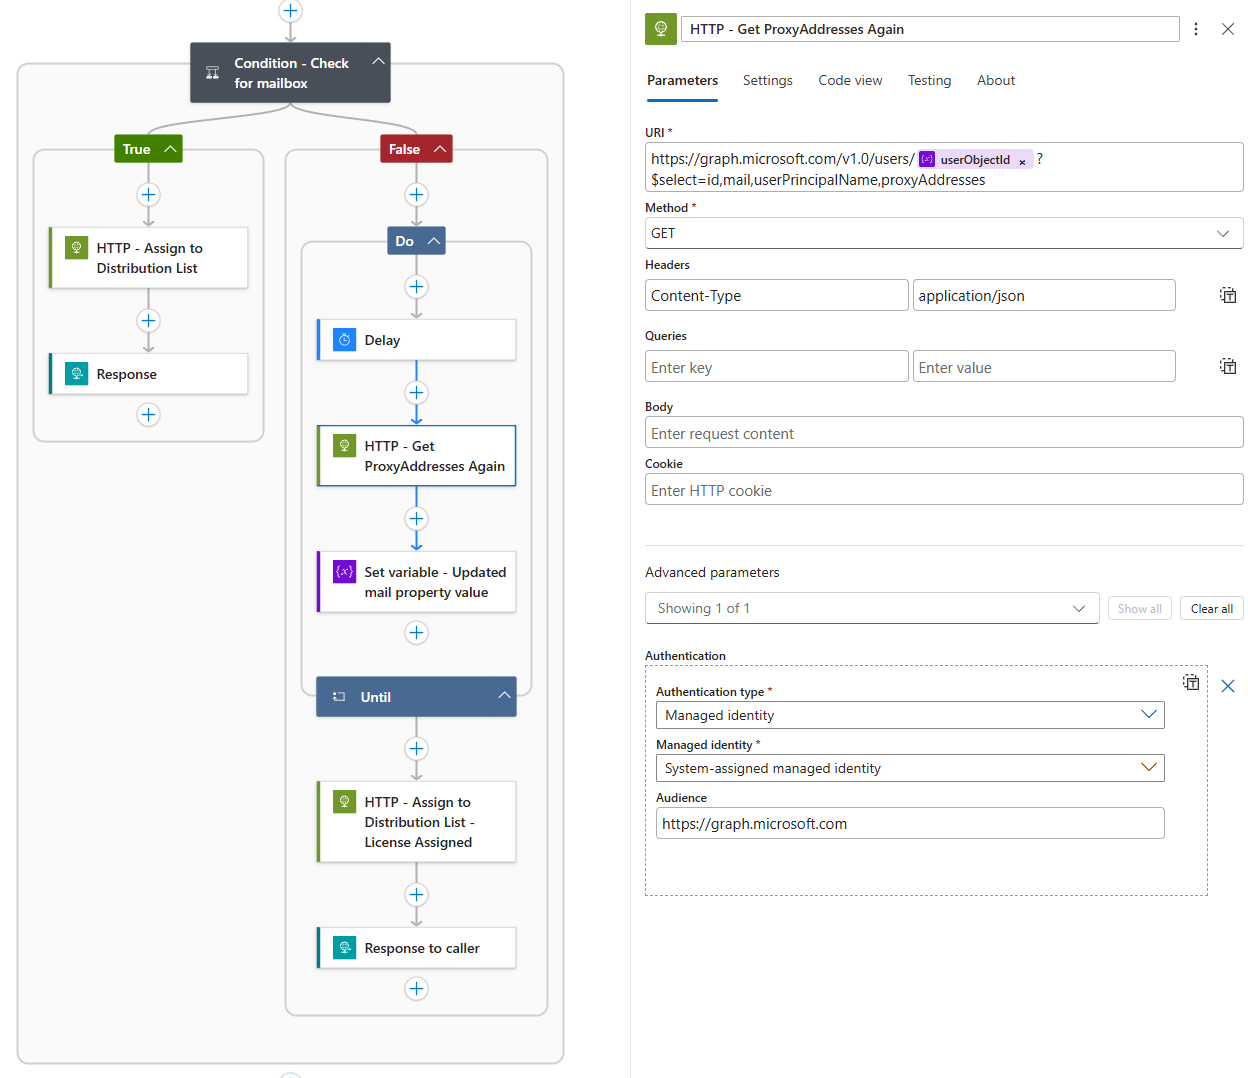
The loop continues until length(variables(‘proxyAddresses’)) > 0. The loop is configured with a limit of 30 iterations and a timeout of 10 days.
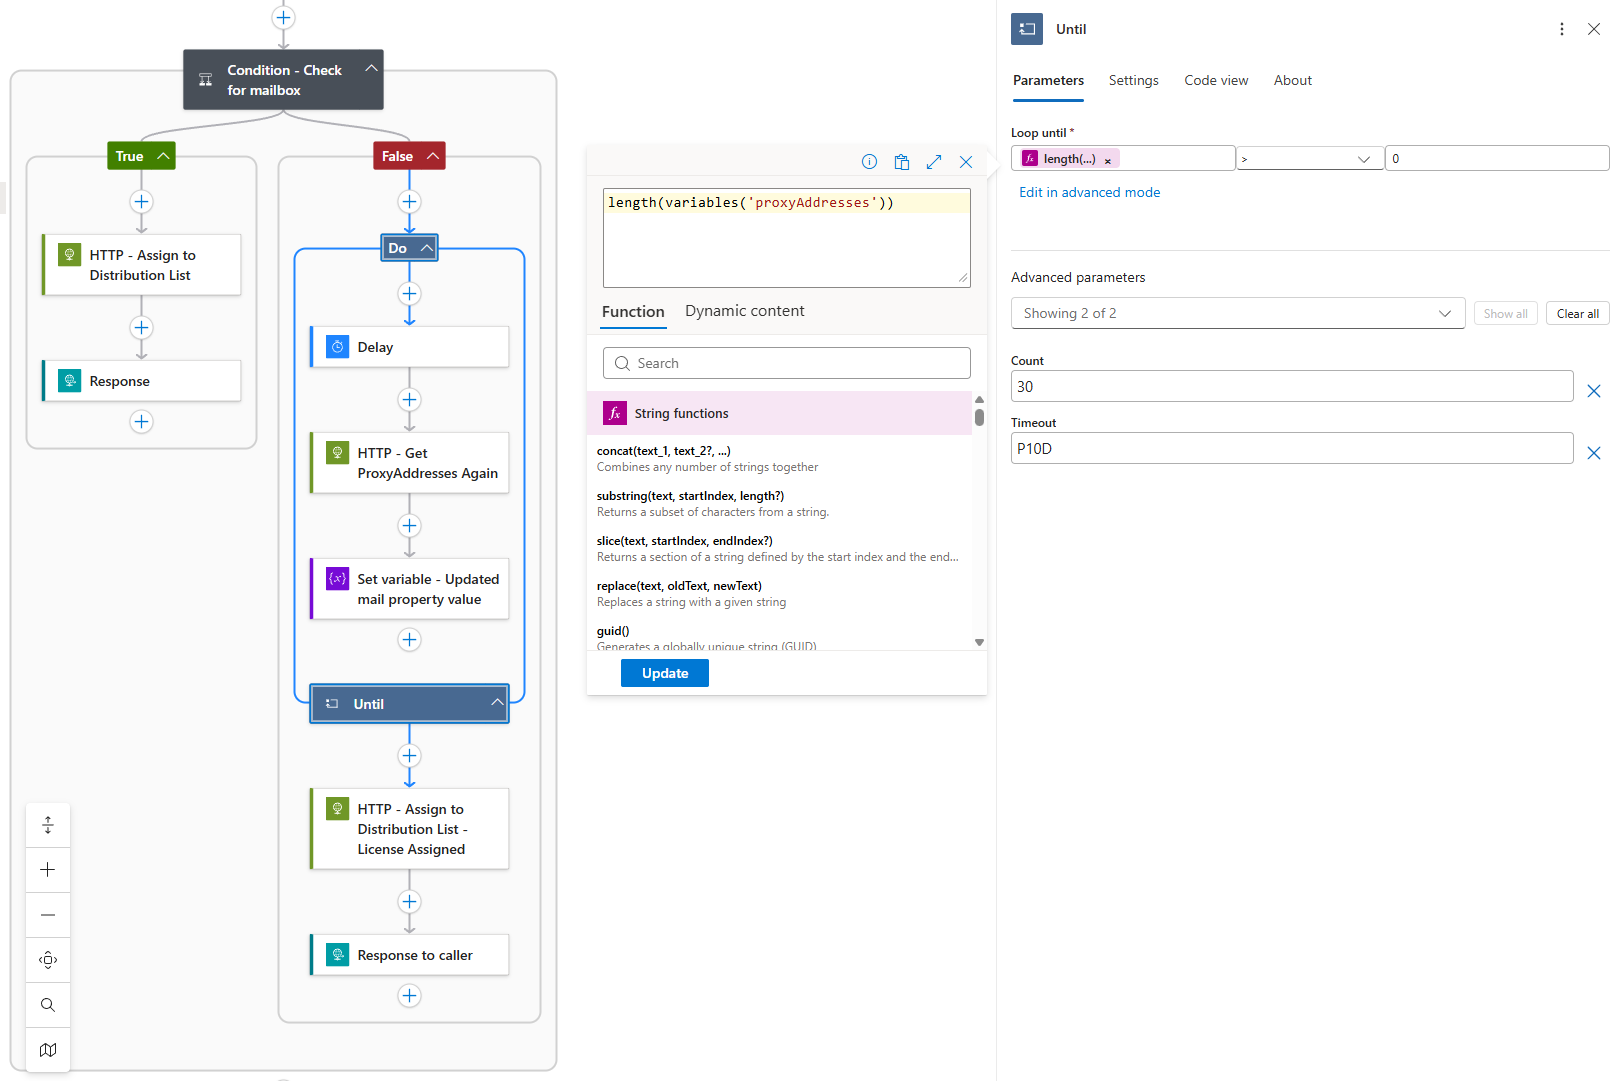
Once the condition is met (mailbox detected), the loop exits and proceeds to:
-
Call the Exchange API to add the user to the distribution list

-
Return a success response
Testing the Solution
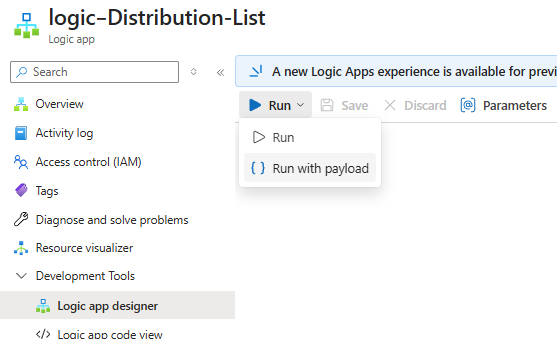
Now with the Logic App created, we can test with the Run with payload function:
Here is a payload for the user Mary Jane who has a mailbox:
Here is the successful run with Mary added to the Distribution List:
Here is an example of a run with the John Smith account, which does not have a mailbox and therefore we are in the Do While loop:

I hope this post provides a good walkthrough of how we can handle adding user accounts into Distribution Lists.