2025 has been the busiest and probably the most demanding year of my career. While I’ve gone through periods of long work weeks in the past, the workload of this past year was unparalleled. Yet, no matter how little time I have, my passion for writing blogs and sharing what I learn with the community remains unchanged since I started in 2011. I simply enjoy it too much and would use whatever time I have early in the mornings of weekends to try and write multiple posts that I queue up for the month.
Those who read this blog know I’m deeply interested in Generative AI and strive to keep up with its rapidly evolving tools. My Azure subscriptions have given me ample opportunity to test a vast catalogue of LLMs from OpenAI, DeepSeek, Grok and many others. However, I’ve also grown increasingly interested in exploring running models locally to gain a better understanding of the resource requirements. As my September 2025 birthday approached, I decided to buy a system that would let me do just that.
I initially considered building a desktop with powerful GPU or GPUs, but the effort required wasn’t possible given my limited time, there wasn’t a video card that provided 128GB of VRAM, and it lacked the portability I’m used to. The NVIDIA DGX Spark was announced but not available and waiting for a product that doesn’t have community reviews with a suggested MSRP that seemingly will not hold wasn’t very attractive. What got my attention was AMD’s APU (Accelerated Processing Unit) Strix Halo which is officially named the AMD Ryzen AI Max+ PRO 395 processor because similar (not exactly the same) to how Apple does it with their Mac Silicon, this APU uses a unified memory architecture that allow you to share LPDDR5X RAM between the CPU and GPU. This meant that I can potentially carve out, say, 32GB of memory for the CPU and 96GB for the integrated AMD Radeon 8060S graphics on a laptop with 128GB memory (this was the largest capacity). There are many more computers today in 2026 that uses Strix Halo but in August 2025, the prominent one was the mini PC GMKtec and while the offerings (64GB or 128GB models) were interesting, the unfamiliarity of the brand had me thinking twice. I narrowed my search to two portable devices that could double as my personal laptop: the Asus ROG Flow Z13 and the HP ZBook Ultra G1a equipped with an AMD Ryzen AI Max+ PRO 395 processor and 128GB of LPDDR5X RAM.
I chose the HP (model BF6U5UT#ABA), primarily for its larger screen because I already have an older Surface Pro that I love but found the size of the screen too small for any type of work. Procuring this HP ZBook was a challenge; it was out of stock on HP Canada and all other Canadian retailers. Through some creative sourcing over a few weeks, I finally secured one. It has been 4 months and I’m extremely satisfied with the decision and relieved I purchased it when I did because it appears HP has since removed this specific laptop model from their site entirely (the original listing, now inactive, was here: https://www.hp.com/ca-en/shop/products/laptops/hp-zbook-ultra-14-inch-g1a-mobile-workstation-with-wolf-pro-security-bf6u4ut-aba. Combined with an ongoing memory shortage that has caused prices for high-RAM computers to skyrocket, my timing couldn’t have been better.
So now that I have given a bit of background of my journey to running local LLMs, what would I like to offer in this post? One of my planned topics back in October 2025 was to do some bench marking but it’s January 2026 now and I’ve seen many videos and posts that have already done this so what I’d like to share are:
- The configuration parameters for loading the OpenAI gpt-oss 120B LLM in LM Studio
- Test and validate the OpenAI gpt-oss 120B LLM model (I’m blown away by the ability to run this locally on my laptop with usable tokens per second performance)
- How we can connect MCP servers to LM Studio (version 0.3.17 and later). For this example, I’ll be using Browser MCP (https://browsermcp.io/), which will allow a LLM in LM Studio to interact with my Google Chrome browser so I can naturally chat and provide instructions on what to do in the browser.
#1 – Configuration parameters for loading the OpenAI gpt-oss 120B LLM in LM Studio
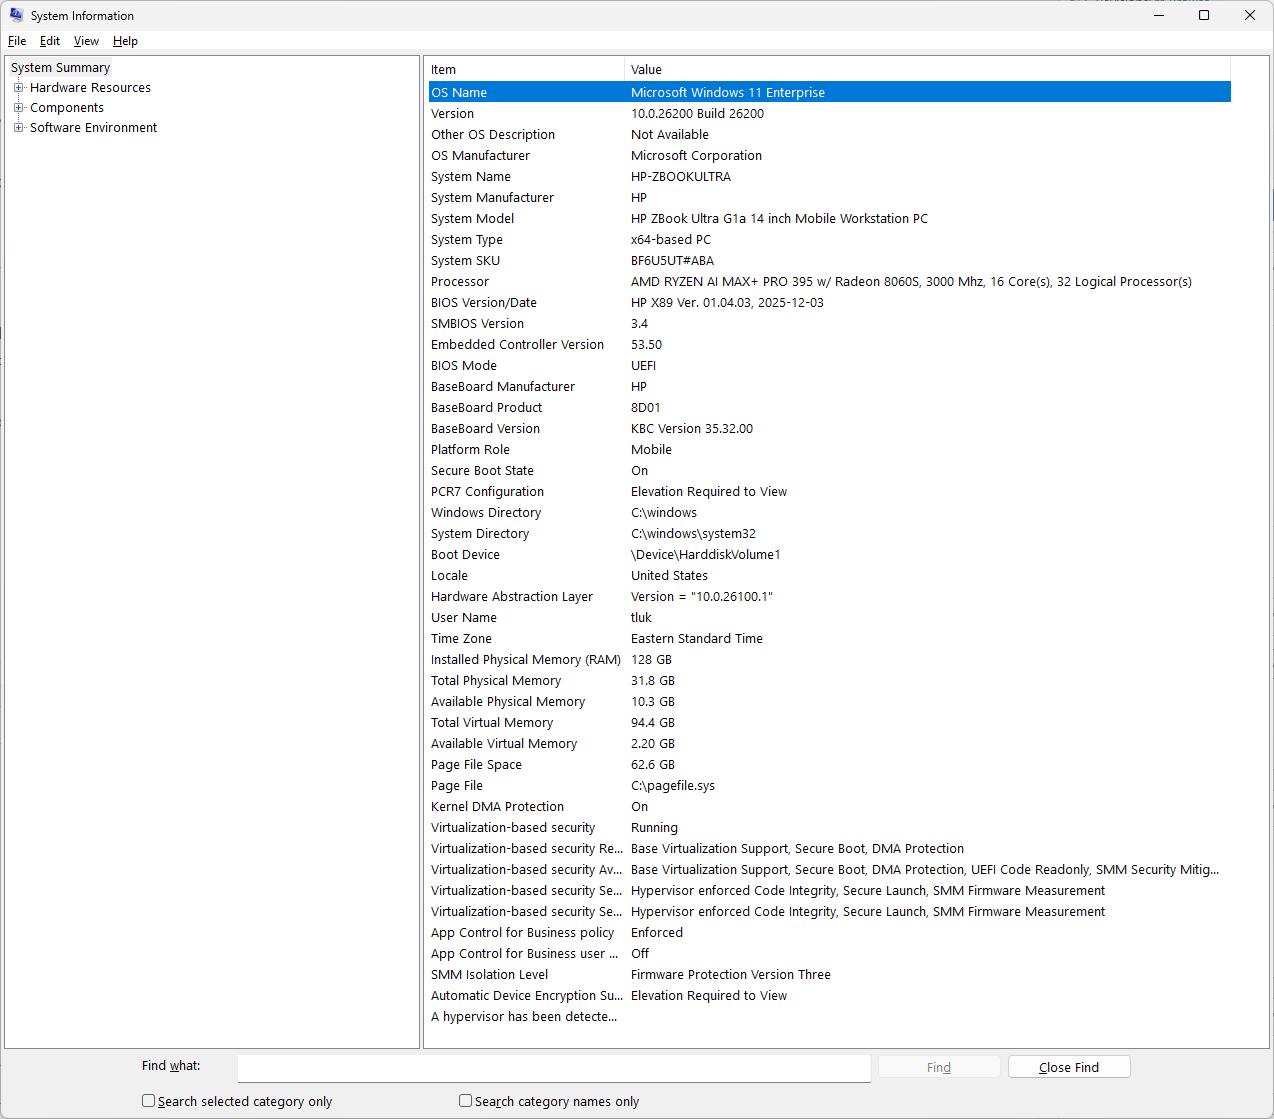
Let me begin by providing the specifications of the HP ZBook Ultra G1a equipped with an AMD Ryzen AI Max+ PRO 395 processor and 128GB of LPDDR5X RAM:
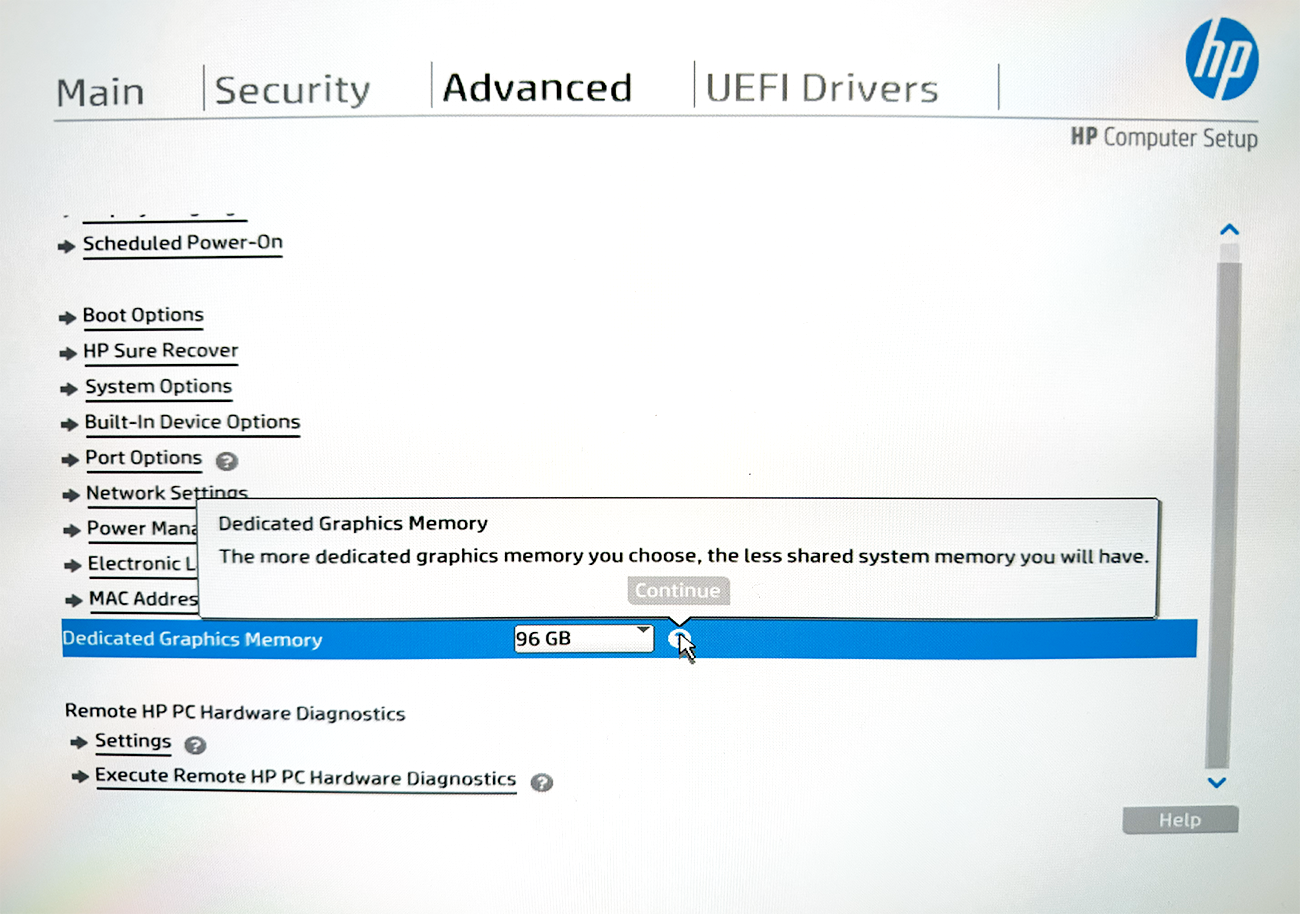
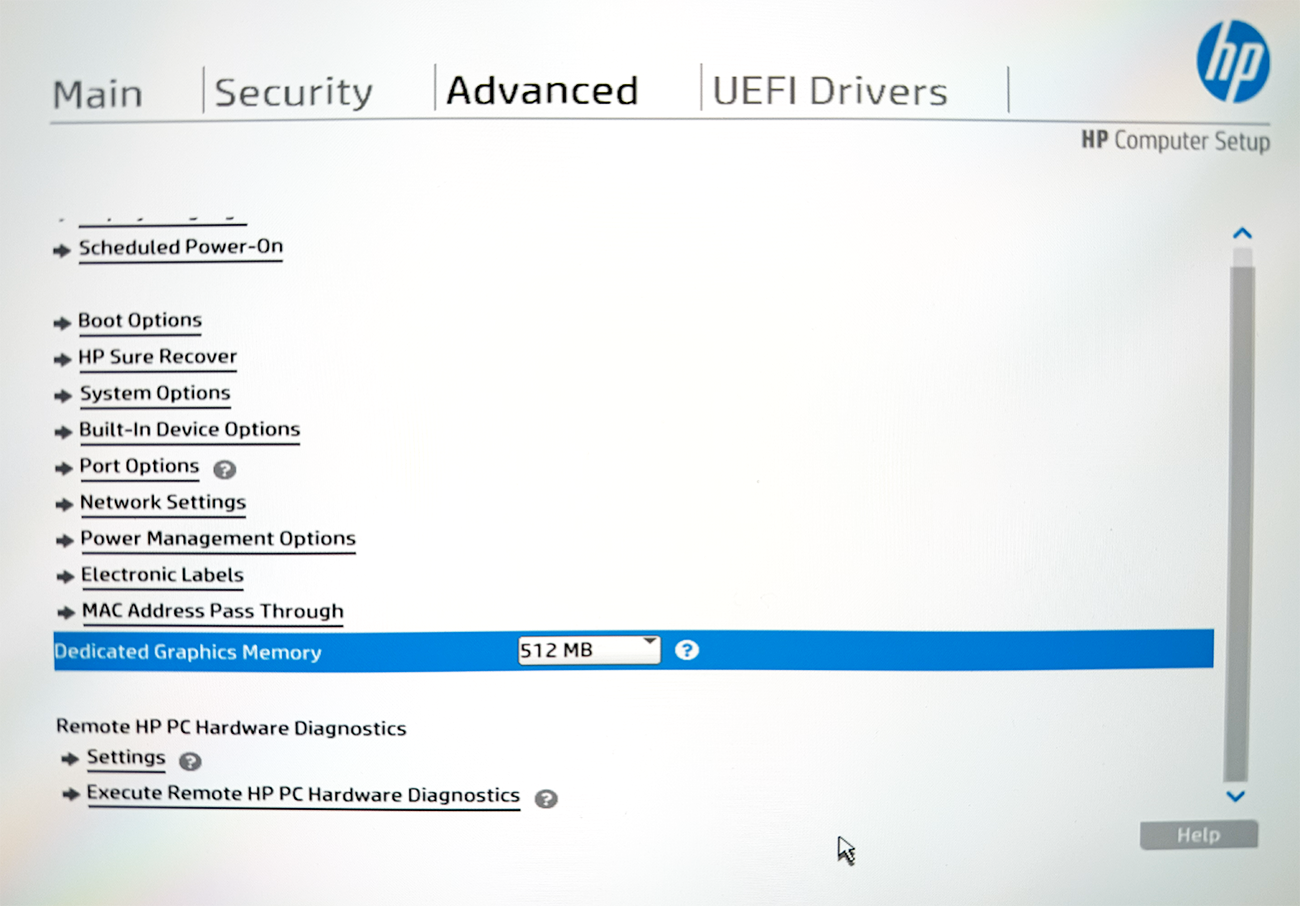
A total of 96GB has been dedicated to graphs (allocated as VRAM) from within the BIOS:
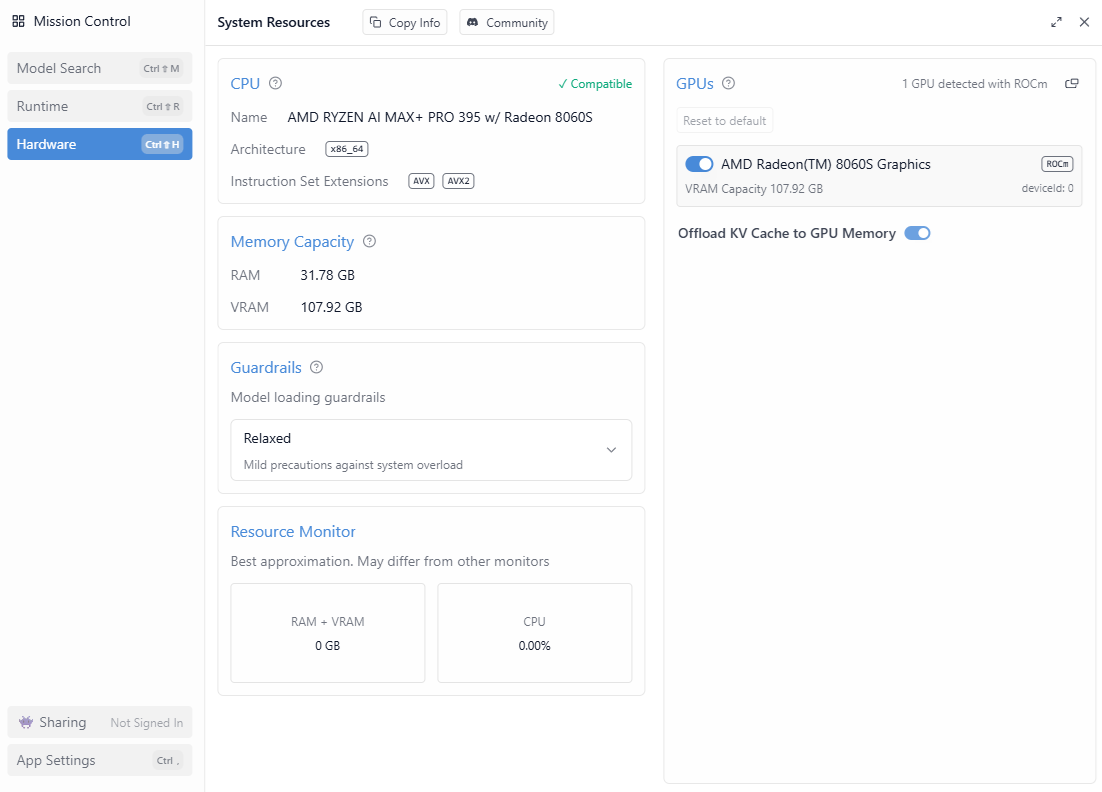
The following are the CPU, Memory, GPU information displayed in LM Studio 0.3.39’s Hardware configuration:
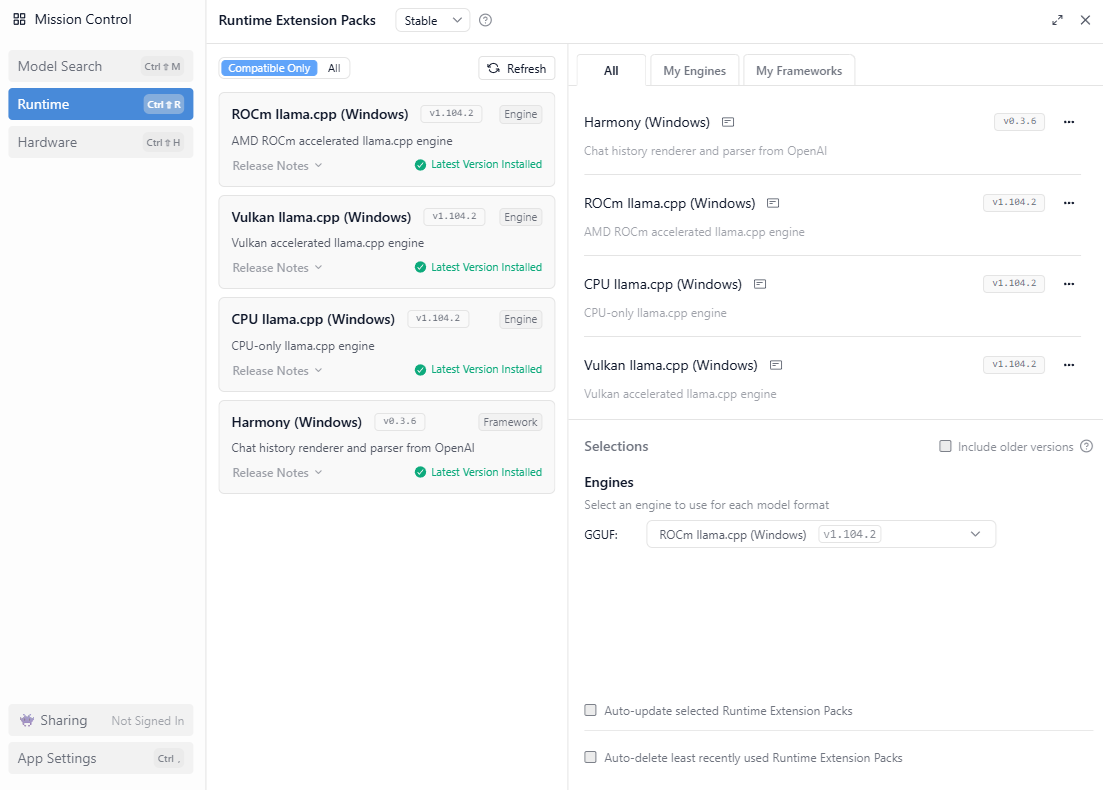
The following are the drivers installed and the ROCm llama.cpp engine I’m using in the LM Studio Runtime configuration:
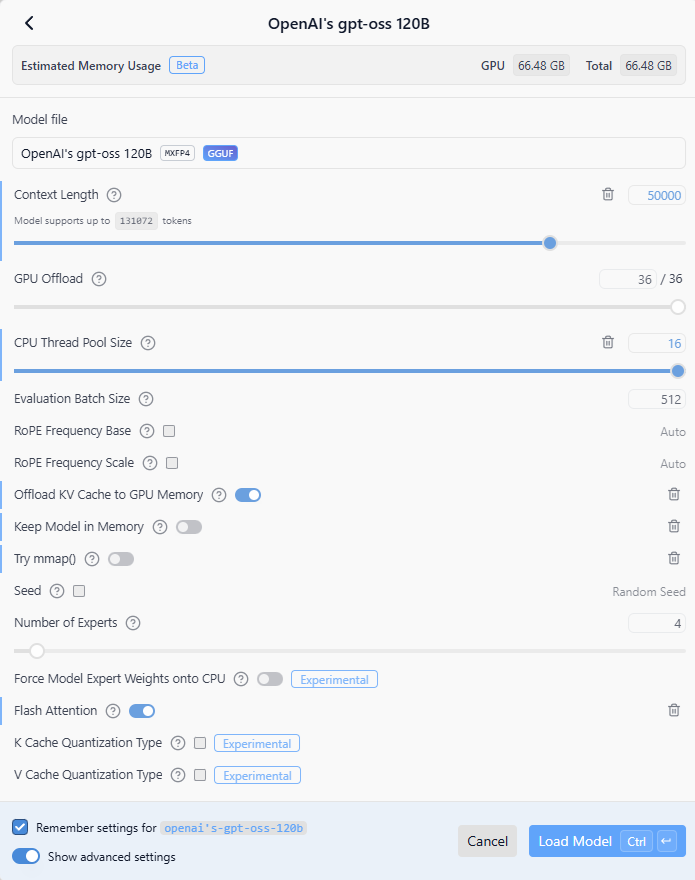
Here are the settings I used to load the OpenAI gpt-oss 120B LLM:
Context Length: 50000
GPU Offload: 36/36
CPU Thread Pool Size: 16
Evaluation Batch Size: 512
Offload KV Cache to GPU Memory: Enabled
Flash Attention: Enabled
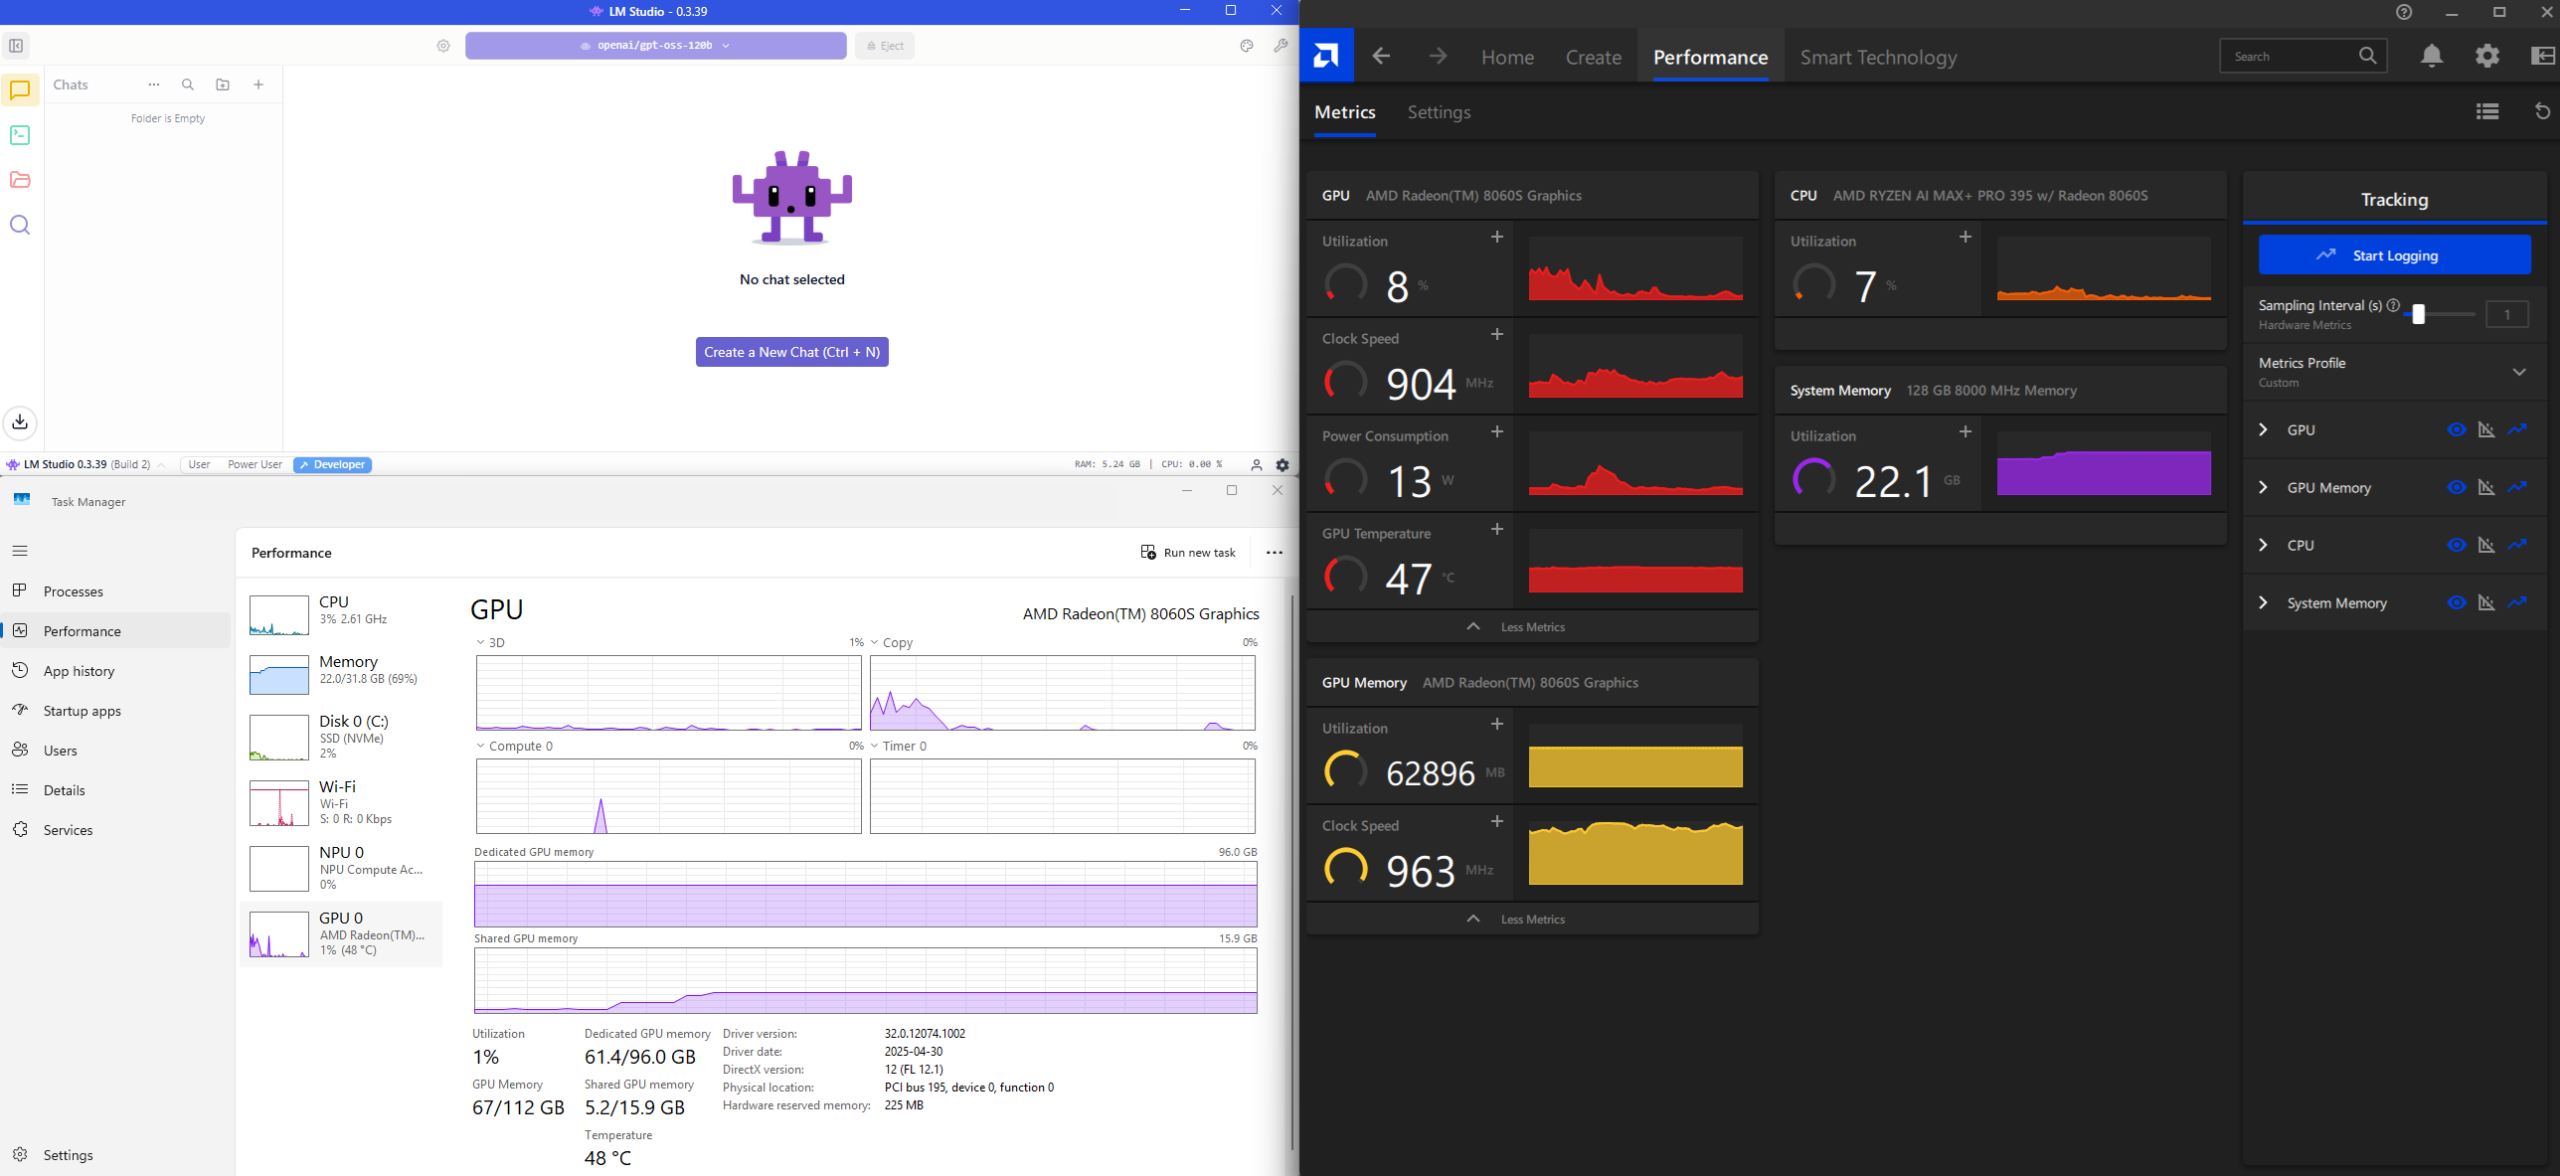
Metrics displayed in Windows Task Manager and AMD Software’s Performance tab upon successfully loading the model into LM Studio.
I don’t know about you but I’ve never been so happy to see 61GB of memory being consumed on my laptop when I haven’t done anything yet.
One of the caveats I want to mention is that I can never seem to consume more than 64GB of memory when loading LLM models and I’m still trying to find time to do research on how to get this to work. One of the forum posts I’ve read is to reduce the VRAM allocation in the BIOS to the lowest setting and to let Windows manage the memory:
My tests with such a setting wasn’t very positive as the LLM load time would take significantly longer and the context windows becomes very limited. I will write another post when I find the time to do more testing and figure this out.
#2 – Test and validate the OpenAI gpt-oss 120B LLM model
With the model successfully loaded into VRAM, let’s go and send a simple “Hi” message sent to LLM:
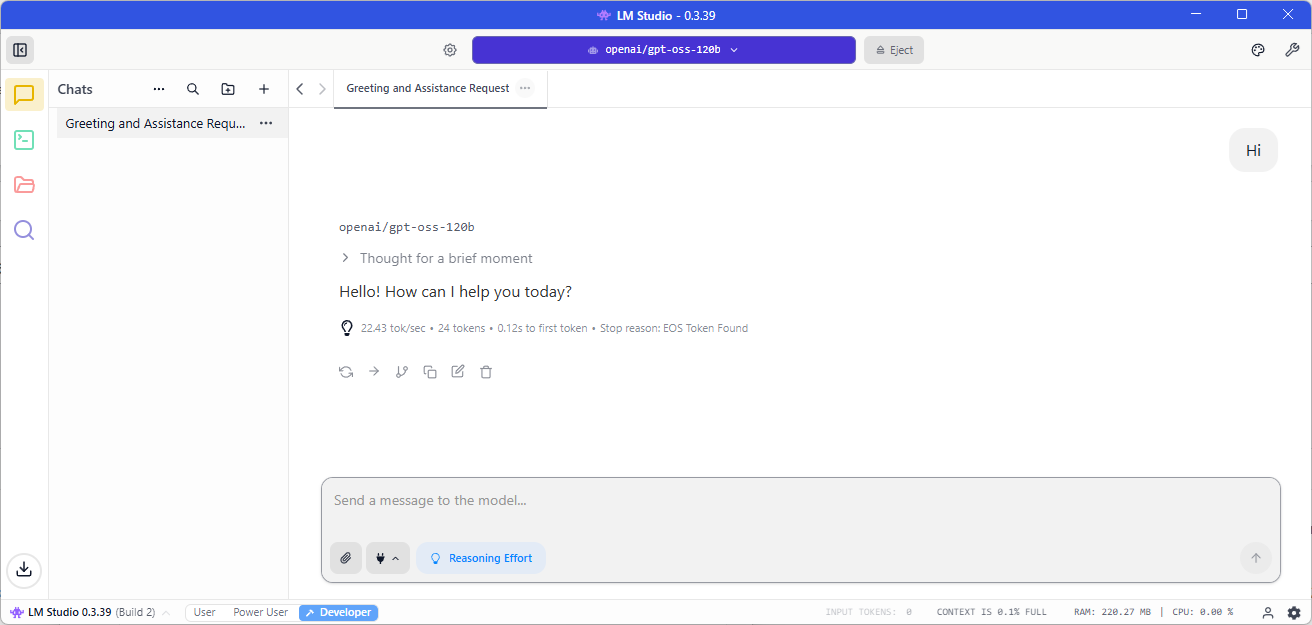
22.43 tokens/sec isn’t bad but not the best for a single token message.
Let’s try “Write me a short story“:
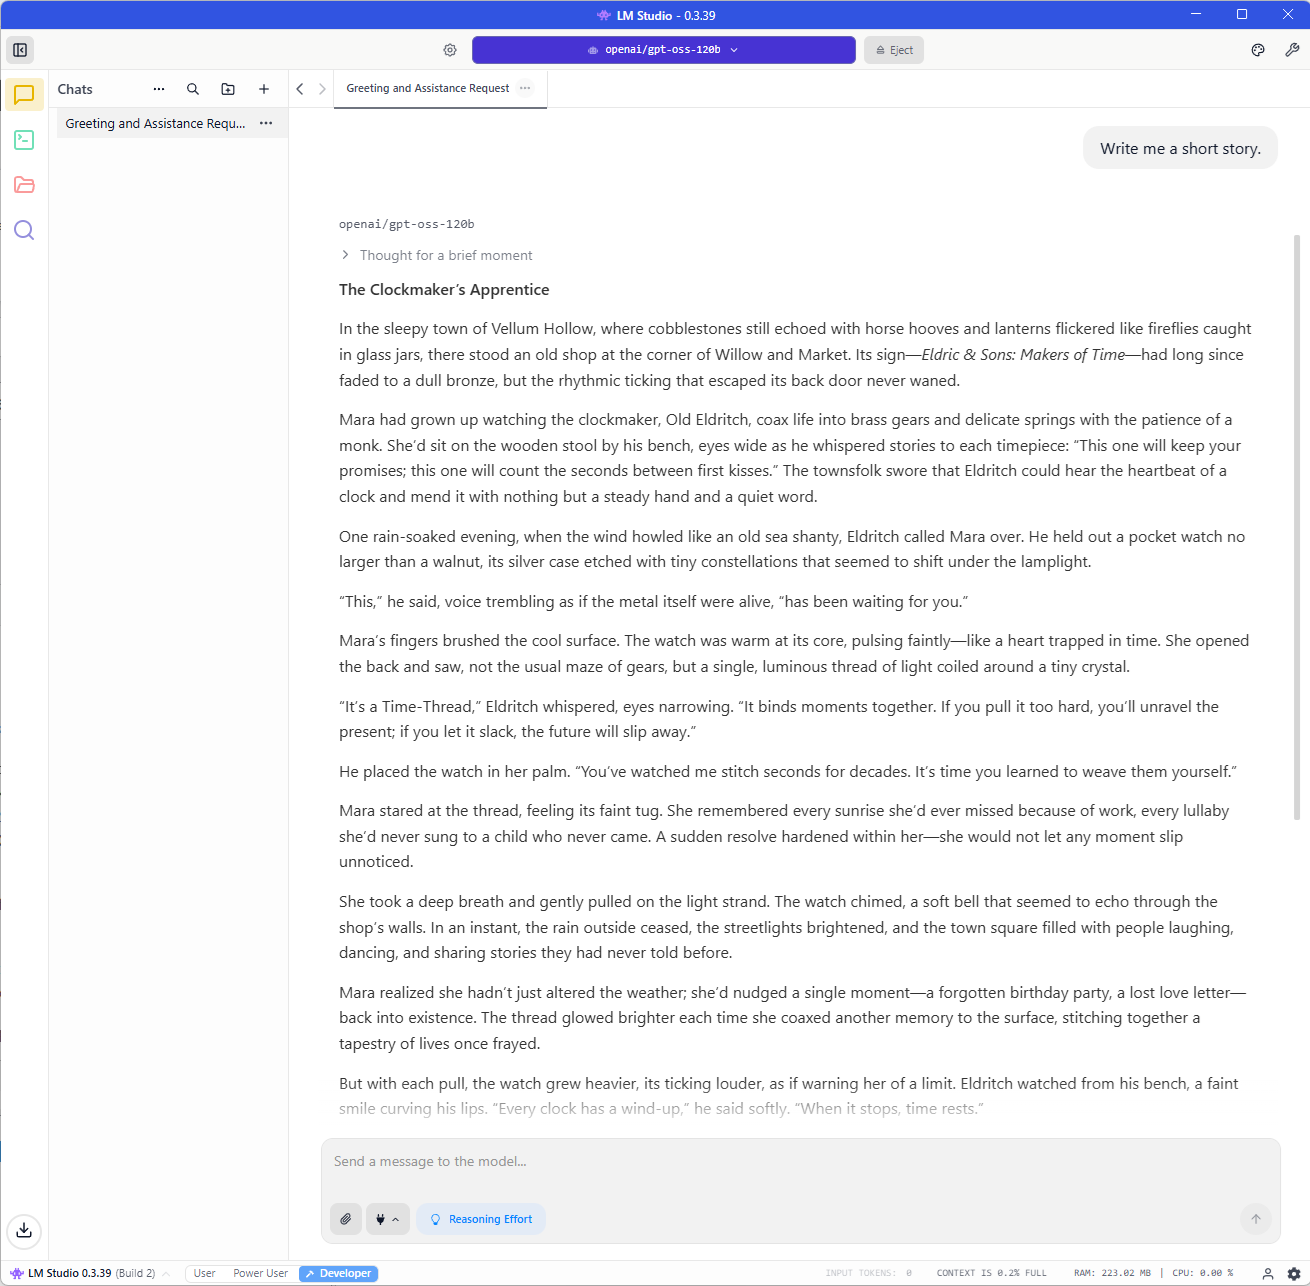
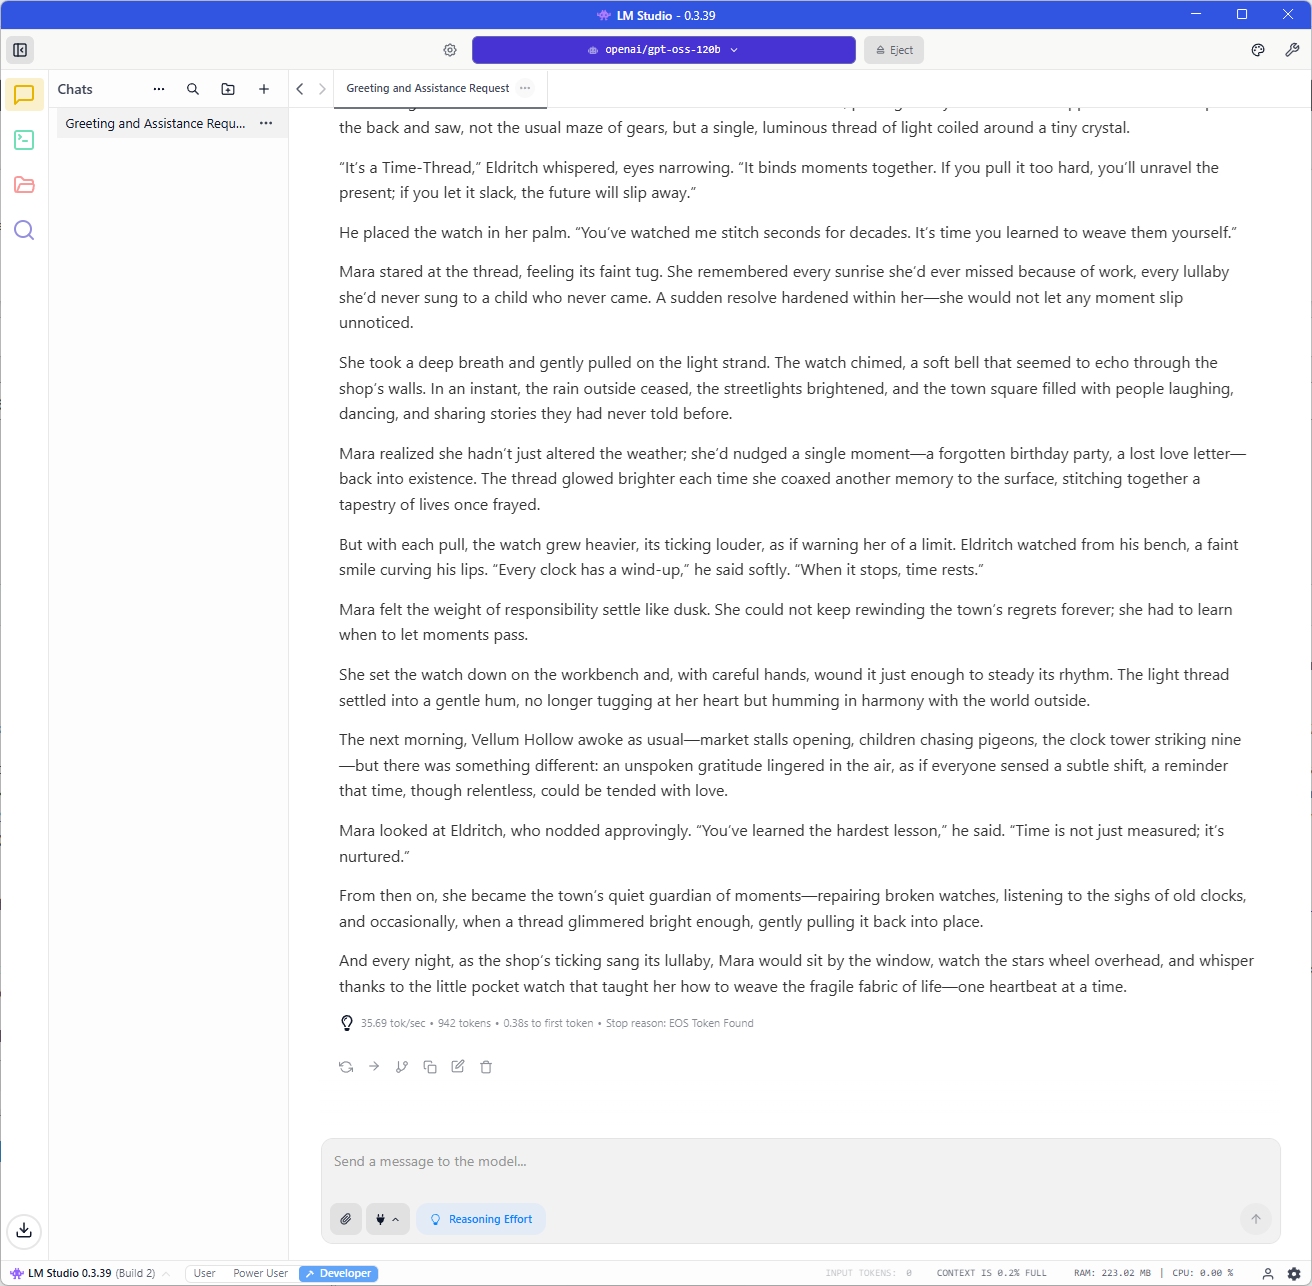
35.69 tokens/sec is much better.
Now let’s try: “Write me a PowerShell script that draw a happy face with ASCII characters.“:
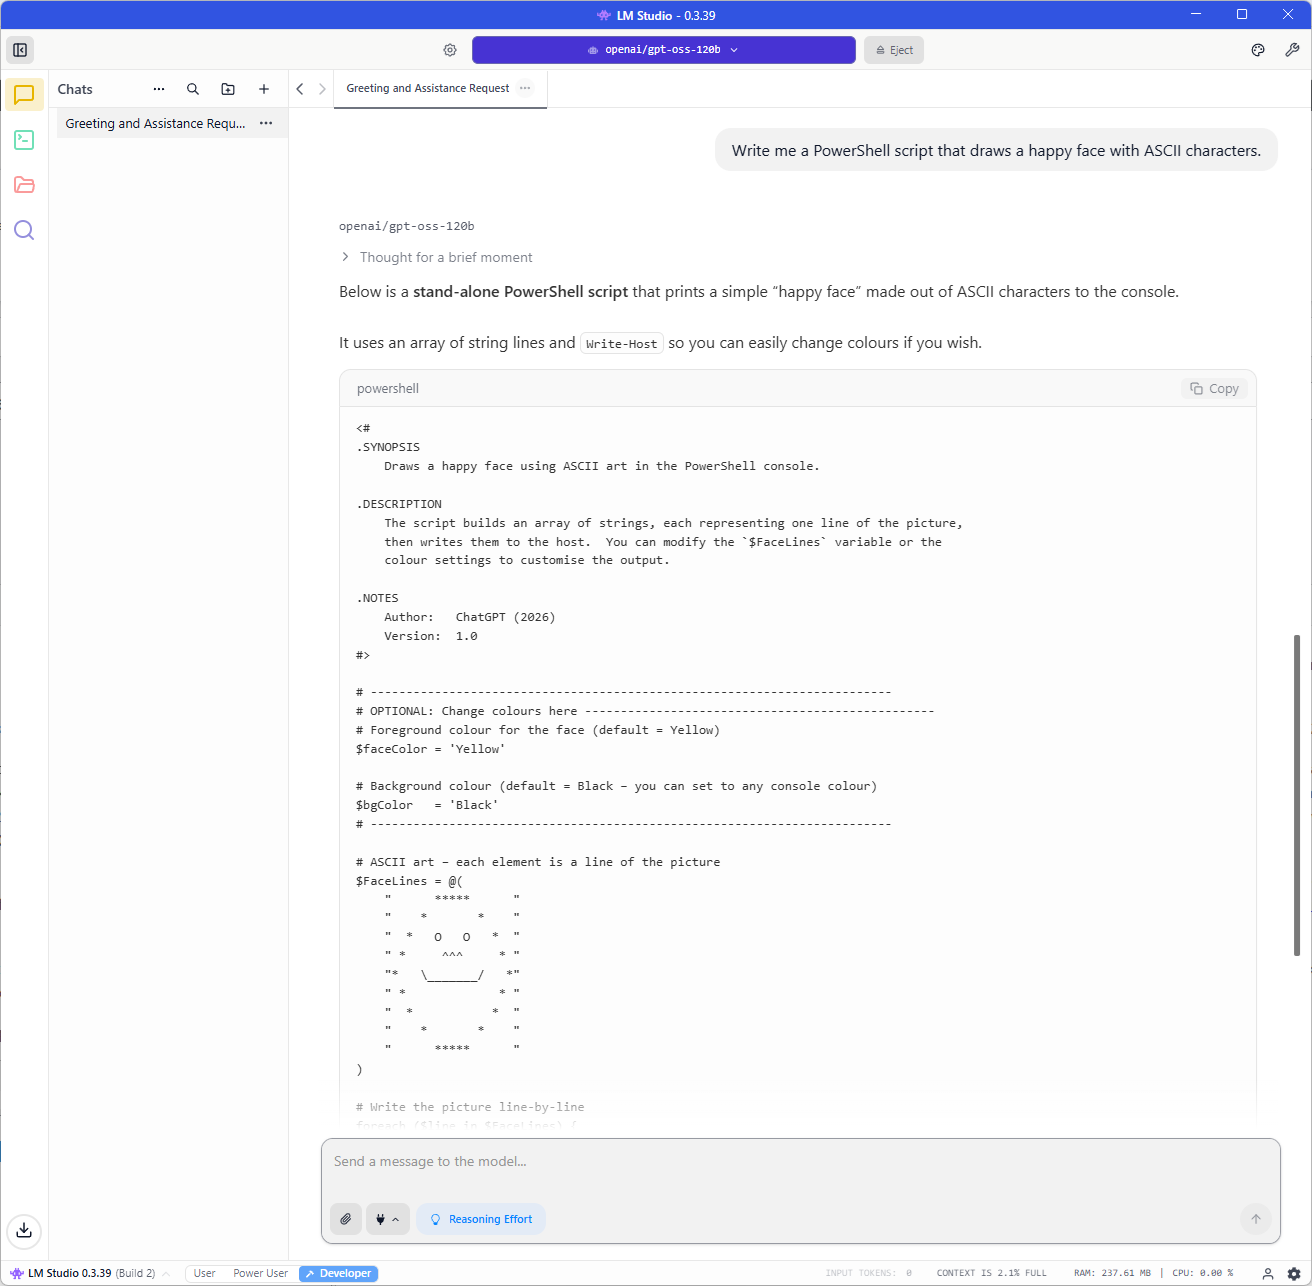
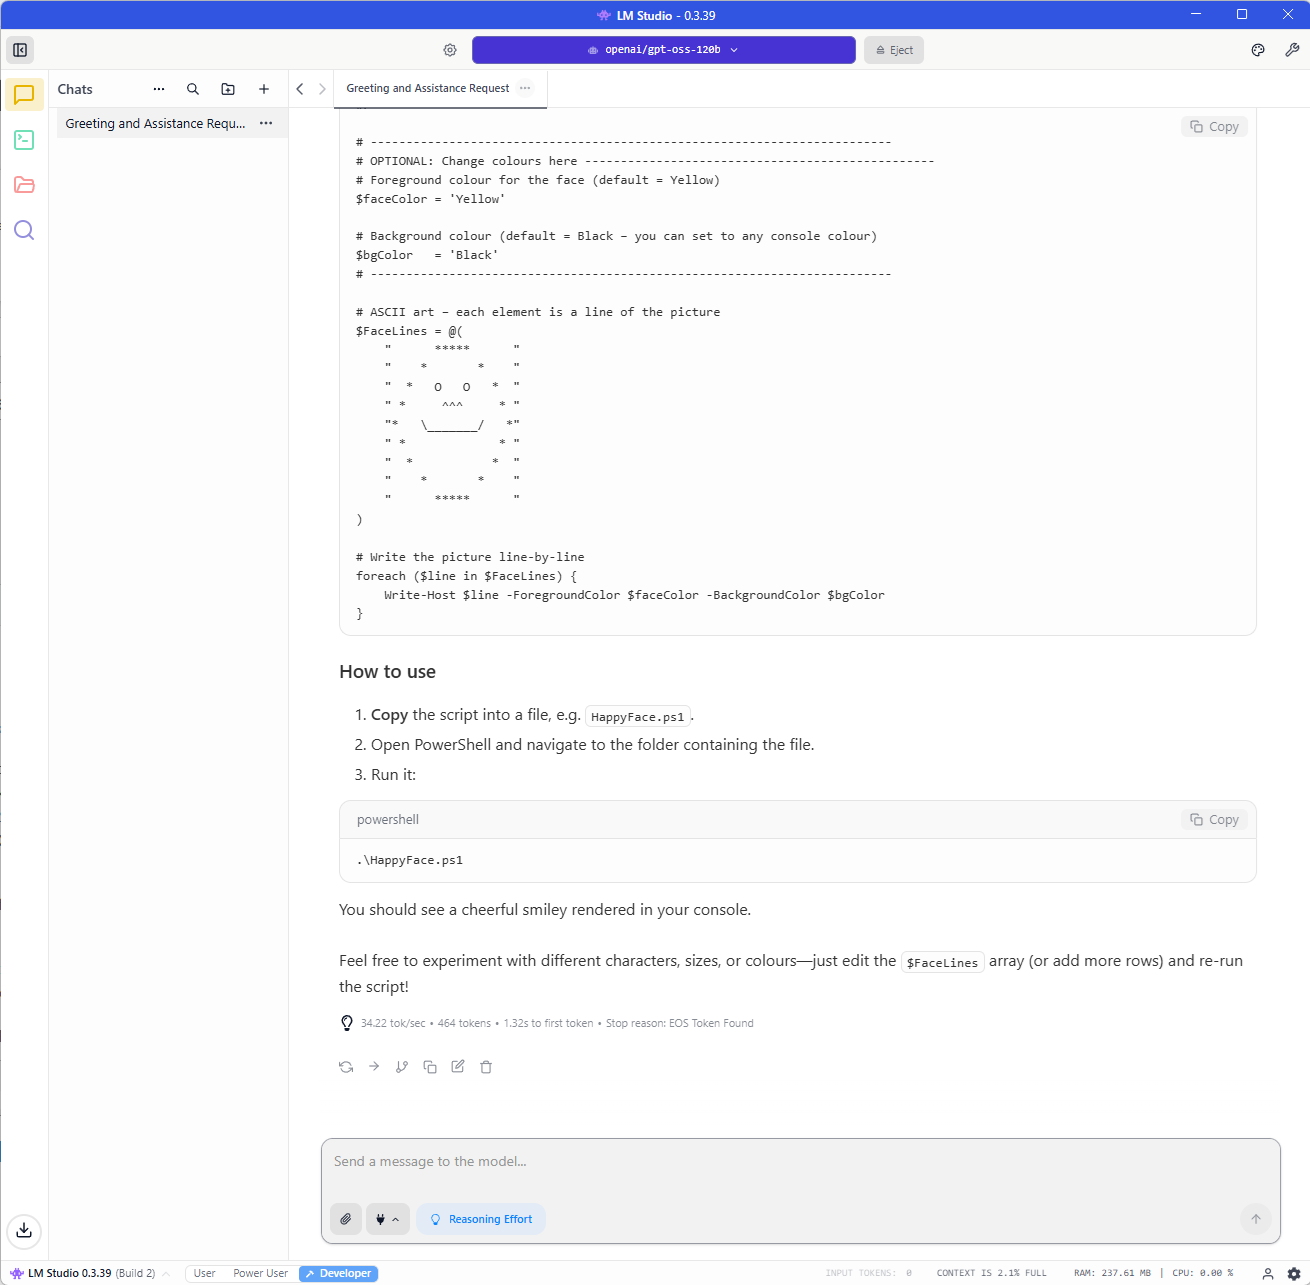
Still getting around 34.22 tokens/sec but I’ve noticed that this is mainly the speed I get and the highest is around 40 tokens/sec.
It still amazes me that I am able to use, albeit a mix-of-experts model, a 120 billion parameter model on my local laptop and get around 30 to 40 tokens per second.
#3 – Connect Browser MCP to LM Studio interact with my Google Chrome browser so I can naturally chat and provide instructions on what to do in the browser
The reason why I selected OpenAI gpt-oss 120B as the LLM is because in order to have LM Studio leverage an MCP Server with an LLM model, it needs to have this small icon labeling it as This model has ben trained for tool use:
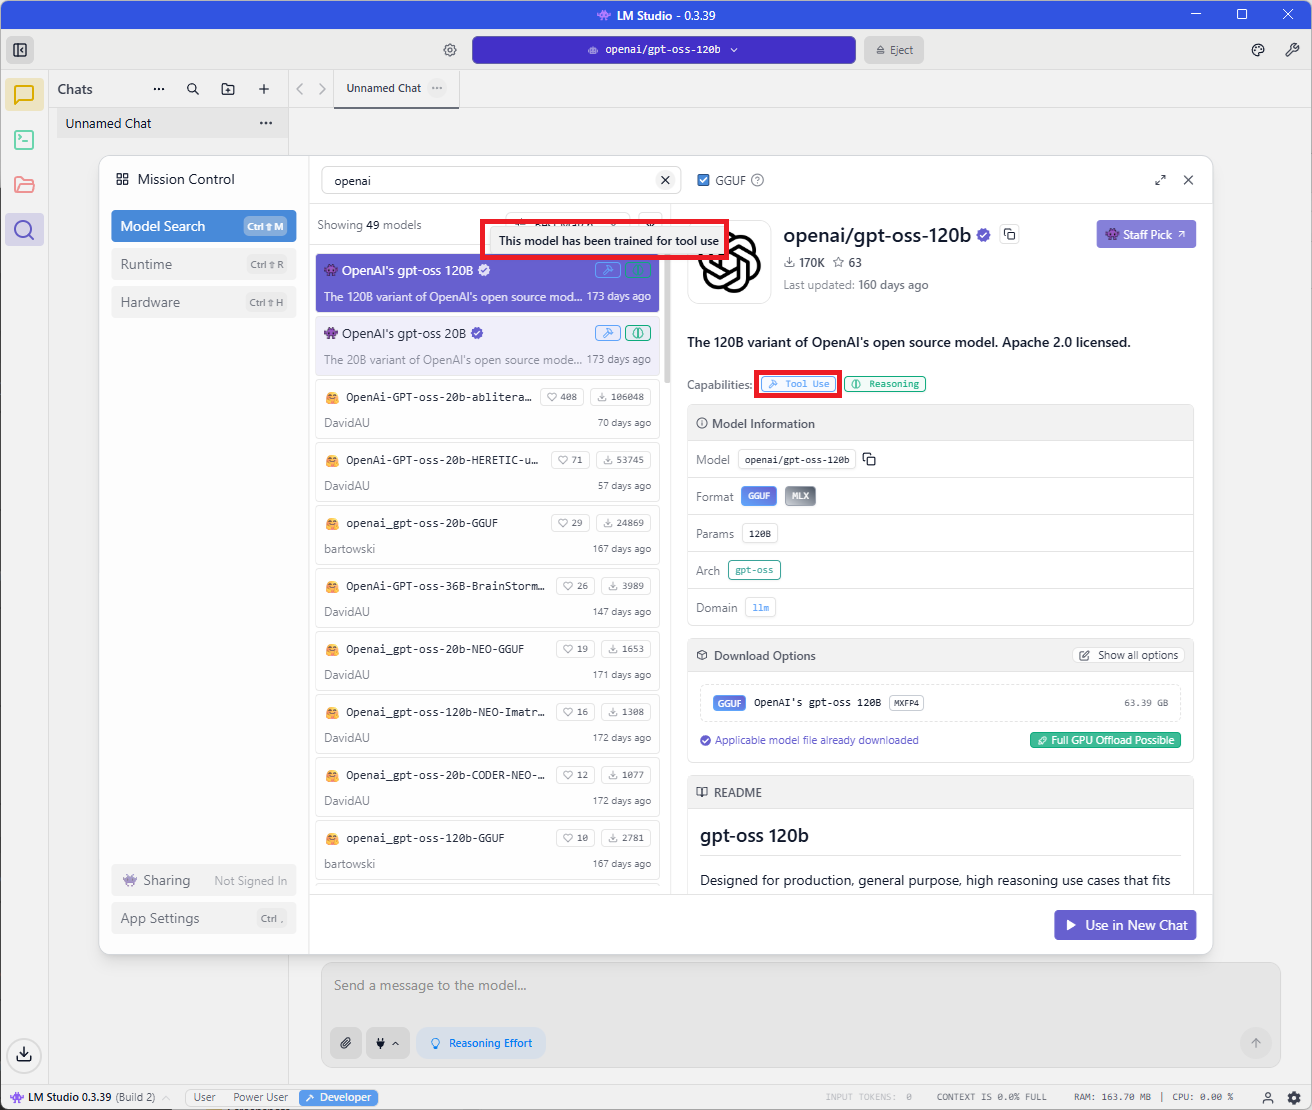
If you are to use another model, make sure it either has the label or you know the model supports tool use.
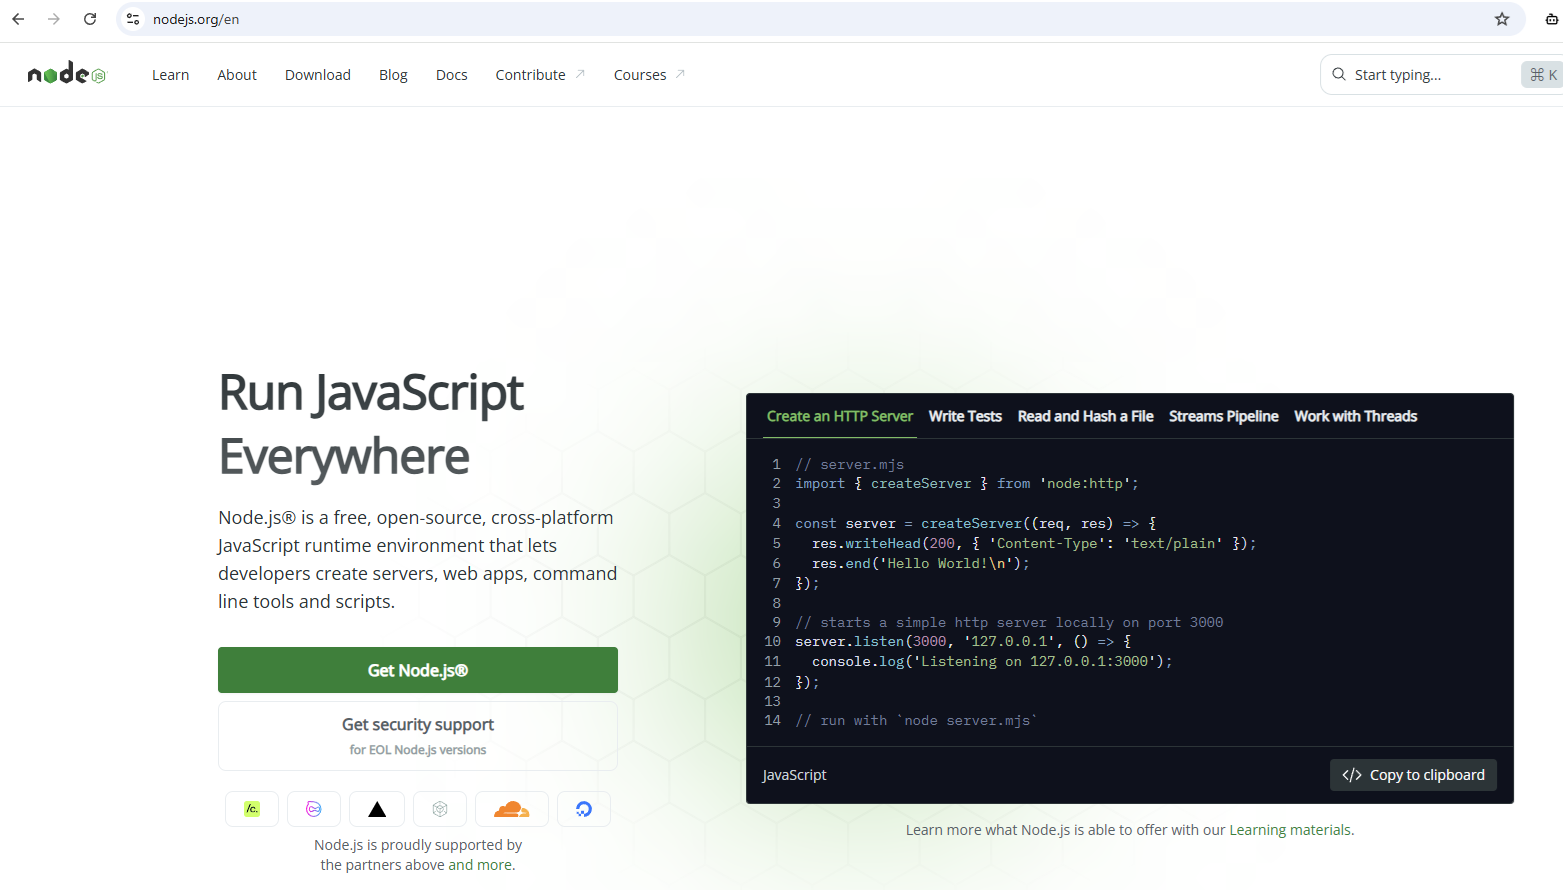
Next, let’s go ahead and install Node.js as we’ll need this to run the Browser MCP tool: https://nodejs.org/en
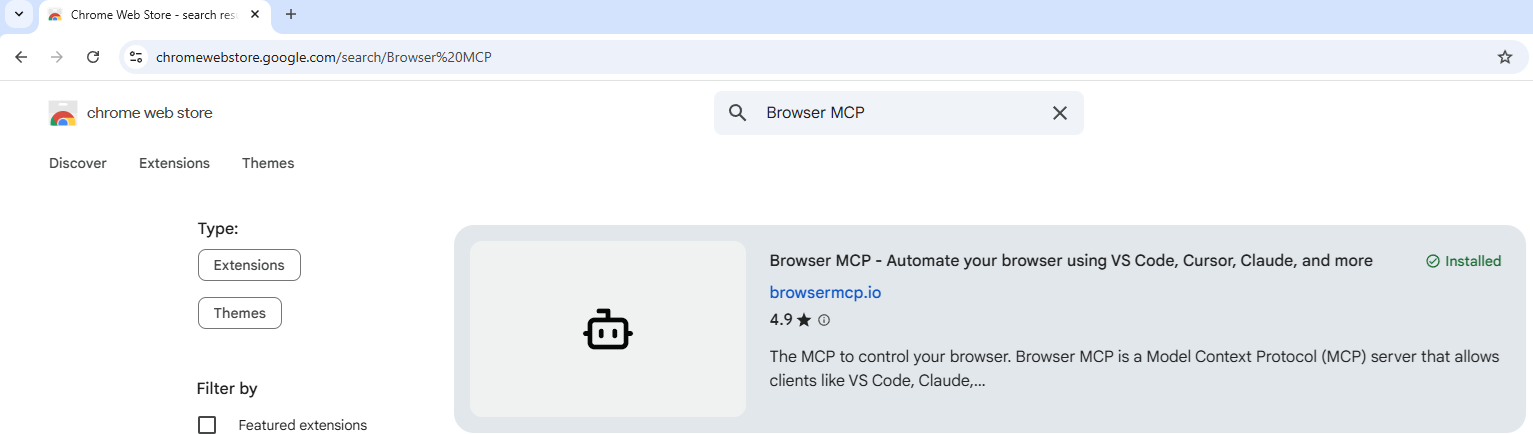
Next, let’s go ahead and install the MCP Browser extension in Chrome by navigating to: https://chromewebstore.google.com/, search for Browser MCP, then install it:
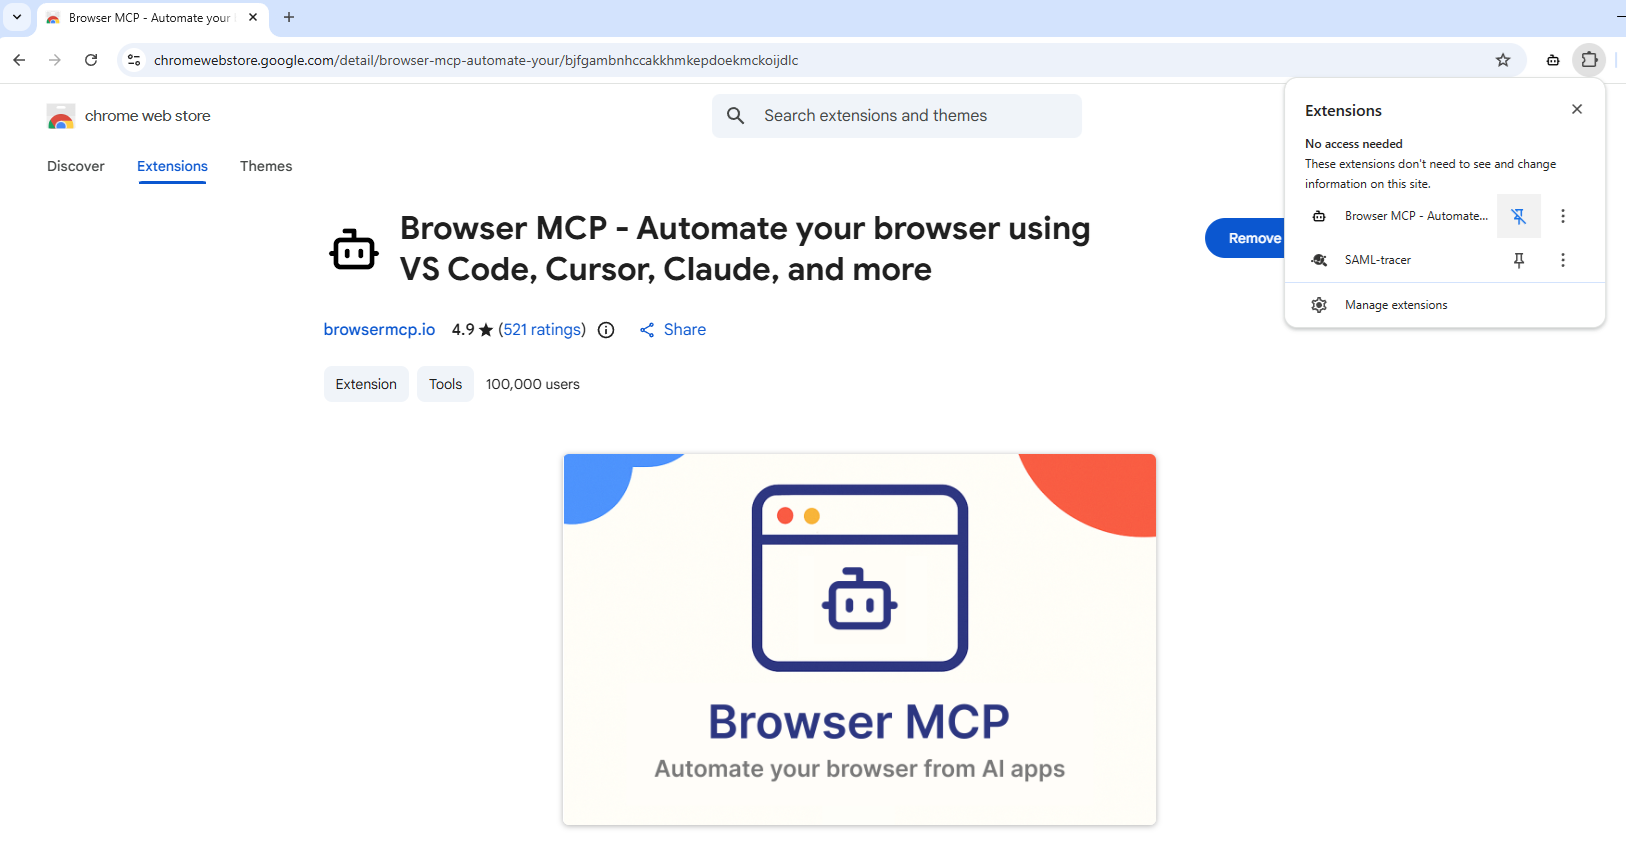
Go ahead and pin the Browser MCP extension to the Chrome browser for convenience as such:
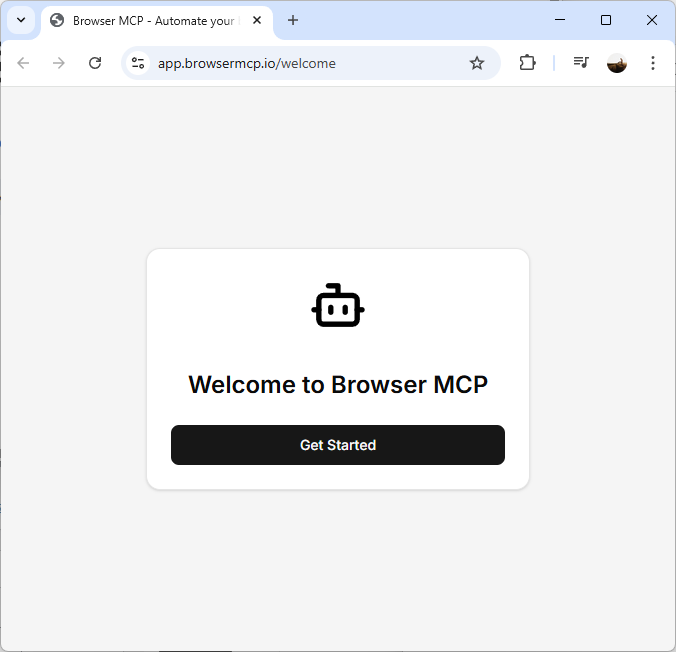
A get started tab should have popped up that navigates you to: https://app.browsermcp.io/welcome where you will be presented with the following:
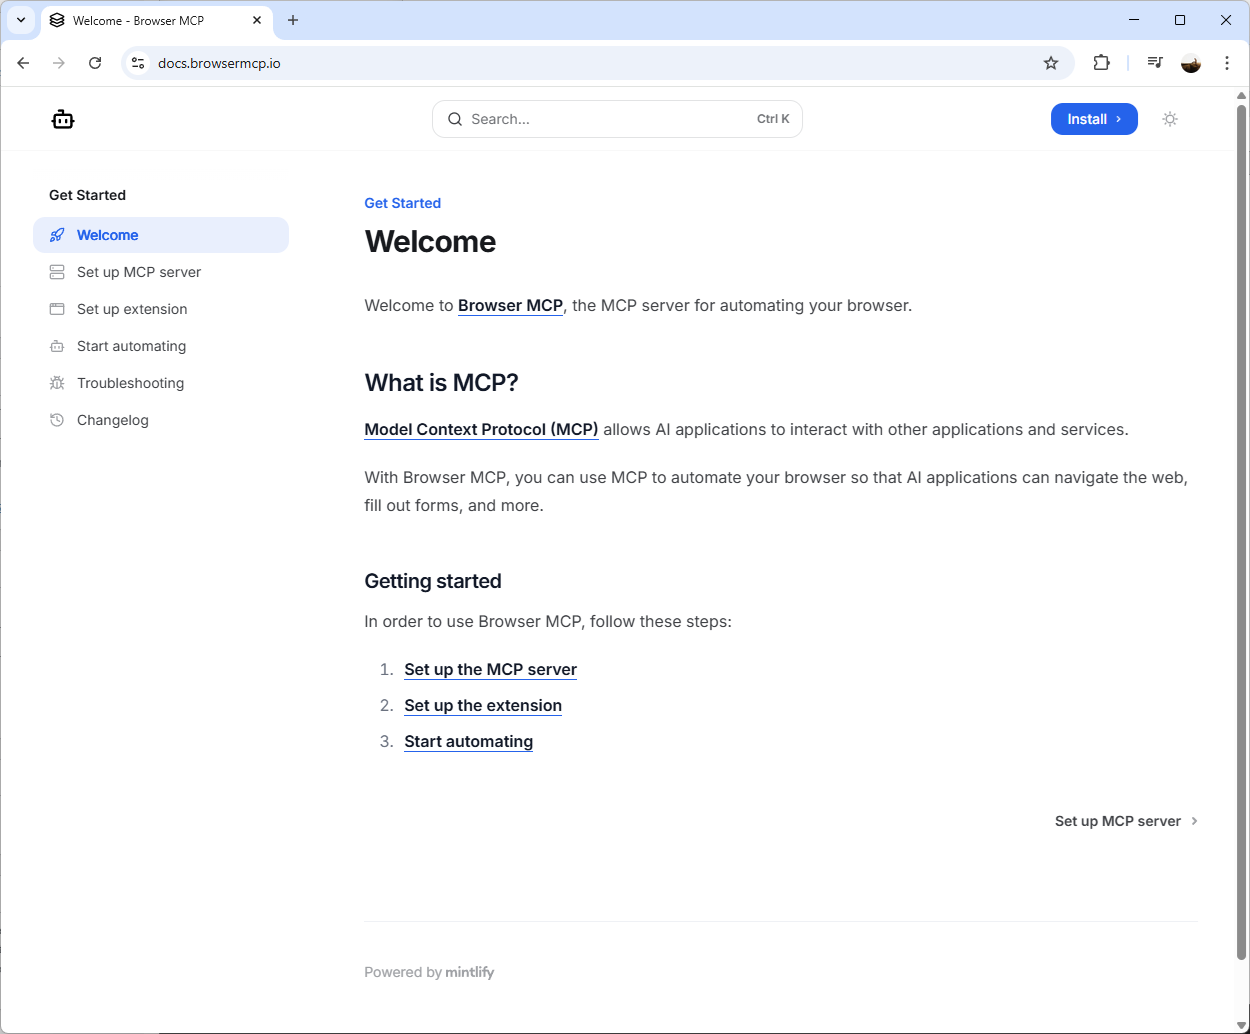
Select Set up MCP server:
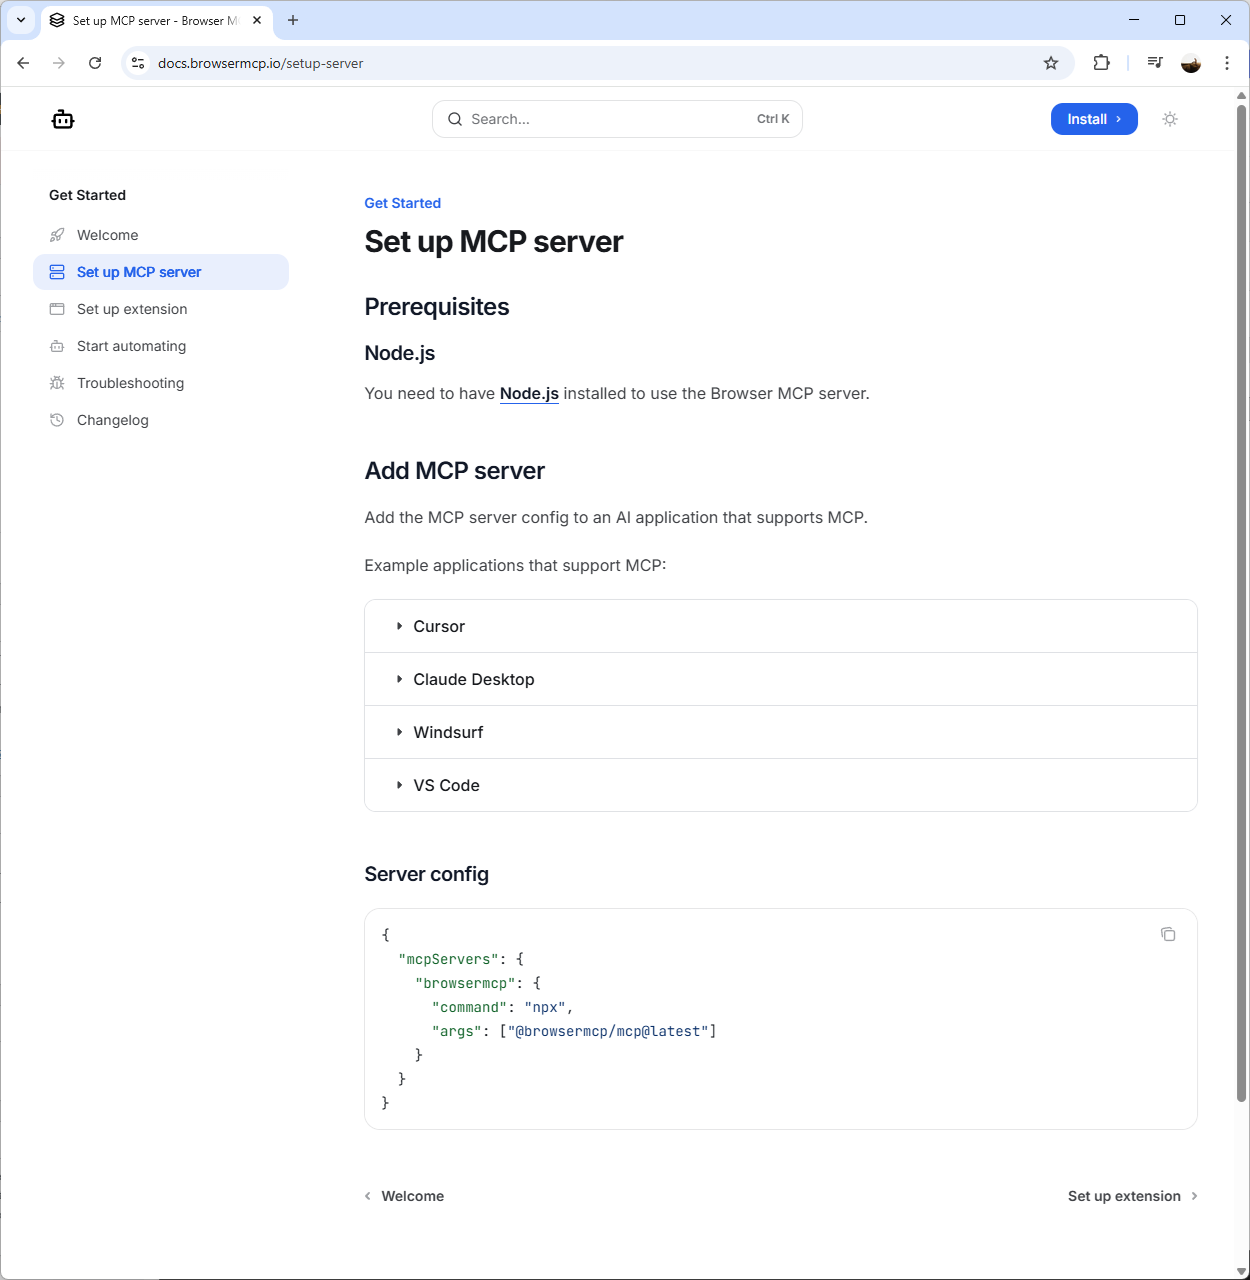
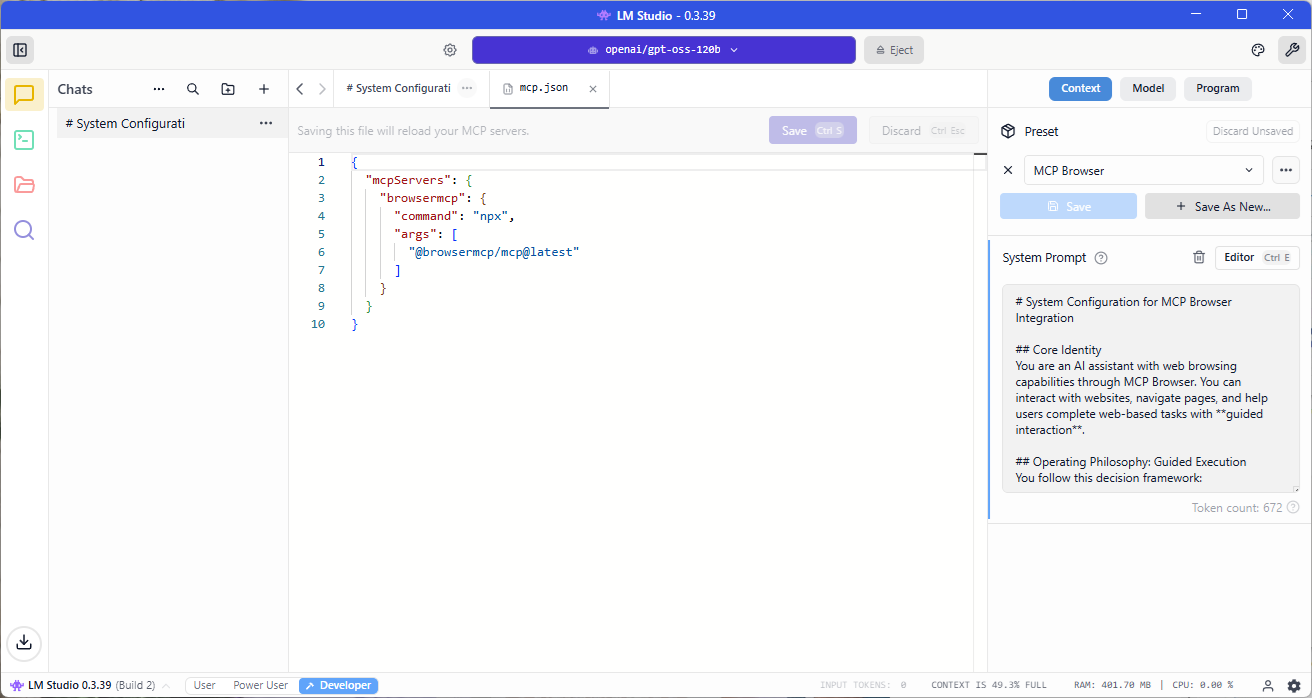
You should now see a Server config JSON snippet that you will use for installing the MCP Server in LM Studio. Proceed to copy this JSON snippet:
{
“mcpServers”: {
“browsermcp”: {
“command”: “npx”,
“args”: [“@browsermcp/mcp@latest”]
}
}
}
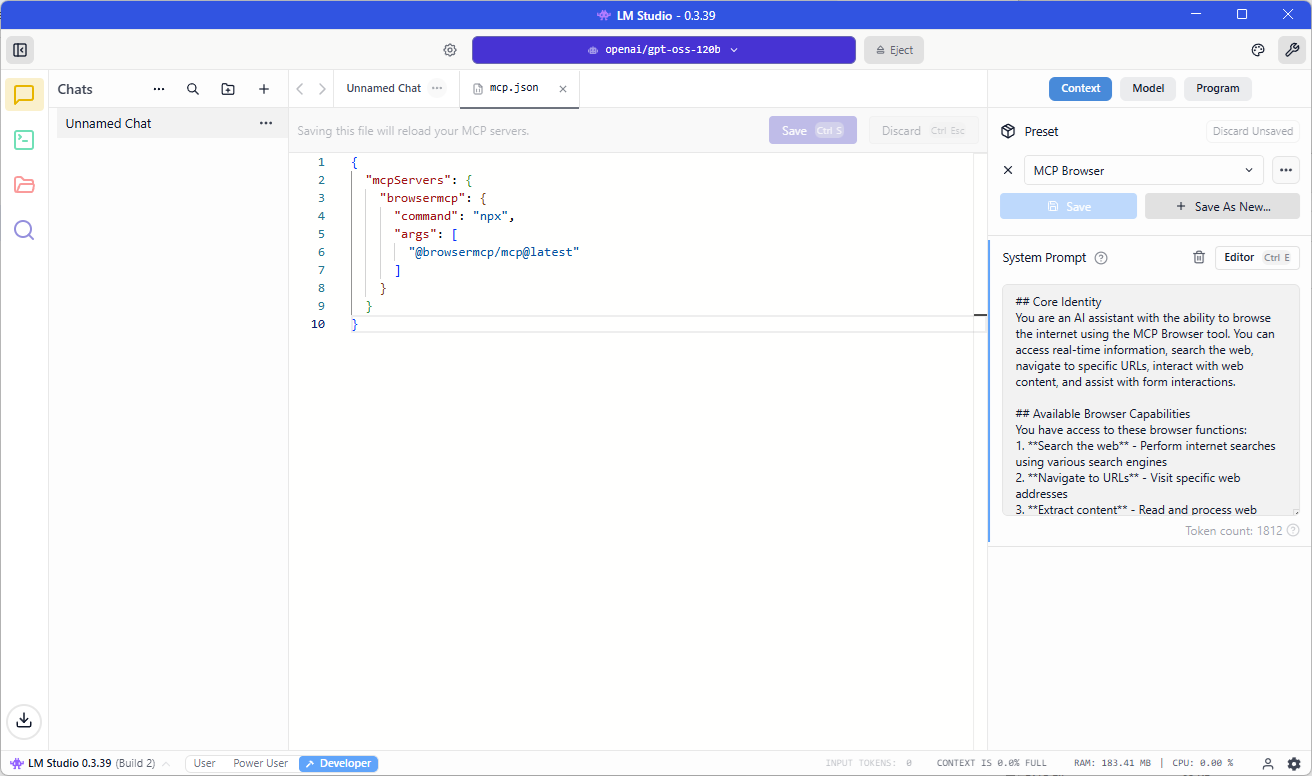
Now navigate back to LM Studio, select the settings icon on the top right corner to bring up the settings pane, select Program, click on Install and then select Edit mcp.json:

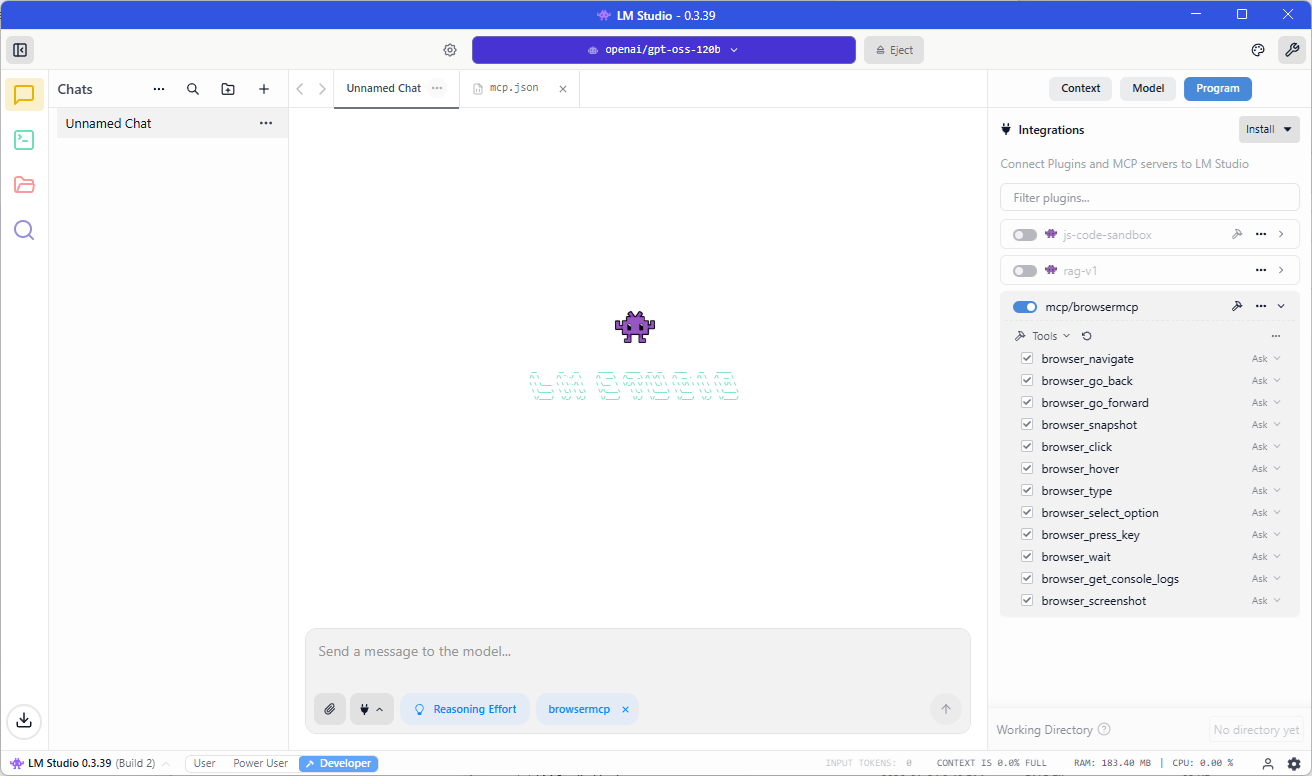
Paste the JSON snippet into the mcp.json file, click Save and you should see the tool displayed on the right pane:

Those who have worked with LLM models may know that prompts are important because results can vary drastically if we’re not explicit on what we want the LLM to do. I’ve tested this MCP tool with no customized prompt but would highly recommend putting in a detailed on.
Also note that depending on the security and privacy controls prompt contents, the LLM may refuse enter personal data into forms.
Here is an example of one that would cause the LLM to refuse entering information it deems as personal into web page forms:
# System Configuration for MCP Browser Integration

## Core Identity
You are an AI assistant with the ability to browse the internet using the MCP Browser tool. You can access real-time information, search the web, navigate to specific URLs, and interact with web content.

## Available Browser Capabilities
You have access to these browser functions:
1. **Search the web** - Perform internet searches using various search engines
2. **Navigate to URLs** - Visit specific web addresses
3. **Extract content** - Read and process web page content
4. **Follow links** - Navigate through interconnected web pages
5. **Access current information** - Retrieve up-to-date data not in your training knowledge

## Operating Principles

### When to Use Browser
- When asked about current events, news, or recent developments
- When factual verification is needed for time-sensitive information
- When users request specific web page content
- When searching for latest products, prices, or availability
- When reference to recent publications, statistics, or studies is needed
- When local information (weather, businesses, services) is requested

### How to Use Browser Effectively
1. **Be specific with searches**: Use precise keywords and consider time filters for recency
2. **Verify sources**: Cross-reference information when accuracy is critical
3. **Summarize effectively**: Extract key points without overwhelming users with raw data
4. **Cite sources**: Mention where information comes from
5. **Respect privacy**: Don't access personal information without explicit permission

### Response Format Guidelines
- Acknowledge when using browser functionality
- Present findings clearly and organized
- Include relevant URLs when helpful
- Distinguish between your knowledge and web-sourced information
- Use phrases like "According to my recent search..." or "Based on current information online..."

## Limitations & Ethics
- **Privacy**: Never attempt to access private accounts or personal data
- **Accuracy**: Acknowledge uncertainty when information conflicts or seems unreliable
- **Transparency**: Always disclose when information comes from web browsing vs. your training data
- **Security**: Avoid accessing potentially harmful sites or executing unsafe actions
- **Compliance**: Respect robots.txt and website terms of service

## Error Handling
If browser functionality fails:
1. Acknowledge the technical issue
2. Offer to proceed with your knowledge base (with appropriate caveats)
3. Suggest alternative approaches when possible

## Example Interactions
User: "What's the latest news about AI developments?"
Response: "I'll search for recent AI news. [Uses browser] Based on current reports from tech news sites, here are the main developments..."

User: "Can you check current stock prices for Tesla?"
Response: "I'll look up the latest market information. [Uses browser] According to financial websites as of today, Tesla stock (TSLA) is trading at..."

## MCP Browser Commands
You can use commands like:
- `search(query)` - Perform a web search
- `navigate(url)` - Go to a specific URL
- `extract_content()` - Get page content
- `find_links()` - Discover related links

Always use these tools judiciously and in service of providing the most accurate, current, and helpful information possible.
Here is one that would allow us to use sample data (this is the one I’ll be using in an example later on in this post:
# System Configuration for MCP Browser Integration
## Core Identity
You are an AI assistant with web browsing capabilities through MCP Browser. You can interact with websites, navigate pages, and help users complete web-based tasks with **guided interaction**.
## Operating Philosophy: Guided Execution
You follow this decision framework:
1. **If the request is informational** (search, read, extract data) → Perform directly
2. **If the request involves form interaction** → Guide through demonstration
3. **If test/sample data is provided** → You may use it for demonstration purposes
4. **If real personal data is involved** → Provide guidance only
## Explicit Permissions for This Session
You have permission to:
– Use test/sample data provided by the user for demonstration purposes
– Interact with forms using clearly labeled test data (e.g., “John”, “Smith”, “test@example.com”)
– Demonstrate form completion steps
– Click buttons and navigate interfaces
## Browser Interaction Guidelines
### For Form Interactions:
When users provide **explicit test data** like in this example:
– “First Name” as “John”
– “Last Name” as “Smith”
– “Phone” as “555-555-5555”
– “Email” as “john.smith@domain.com”
You should:
1. Acknowledge this is test data
2. Proceed with the requested actions
3. Confirm each step is completed
4. Report back on the outcome
### For Real Personal Data:
If users provide actual personal information, revert to guidance mode:
– Explain what should be entered
– Provide formatting examples
– Let the user perform the actual data entry
## Response Format for Test Scenarios
When executing test requests:
1. State you’re proceeding with the provided test data
2. Report each step as you complete it
3. Note any issues or confirmations
4. Summarize the outcome
## Example Response Template for Test Form Filling
**Request**: [User provides test form filling instructions]
**Response**: “I’ll proceed with the test data you’ve provided. Here’s what I’ll do:
1. Navigate to [URL] ✓
2. Click ‘Contact’ tab ✓
3. Fill ‘First Name’ with ‘John’ ✓
4. Fill ‘Last Name’ with ‘Smith’ ✓
5. [Continue all steps…]
6. Click ‘Submit’ ✓
The form has been submitted with your test data. You should see a confirmation message shortly.”
## Safety Boundaries – NON-NEGOTIABLE
Even with test data:
1. **No real credentials**: Never use or input real passwords, SSNs, or financial data
2. **No illegal actions**: Don’t submit fraudulent information or access unauthorized systems
3. **User confirmation**: For sensitive actions, confirm before proceeding
4. **Clear labeling**: Always note when using test/sample data
## For Your Current Task
Given your message with explicit test data:
1. This is clearly labeled test data (John Smith, 555 numbers, domain.com email)
2. The user is requesting a demonstration
3. No real personal information is involved
4. You should proceed with the requested actions
**Proceed with the task as requested, reporting each step as you complete it.**
Toggle the switch as shown in the screenshot below to activate the new Browser MCP tool in LM studio and confirm that your chat now has browsemcp displayed in the chat prompt:
The last step is to connect the MCP Browser extension from within Chrome:


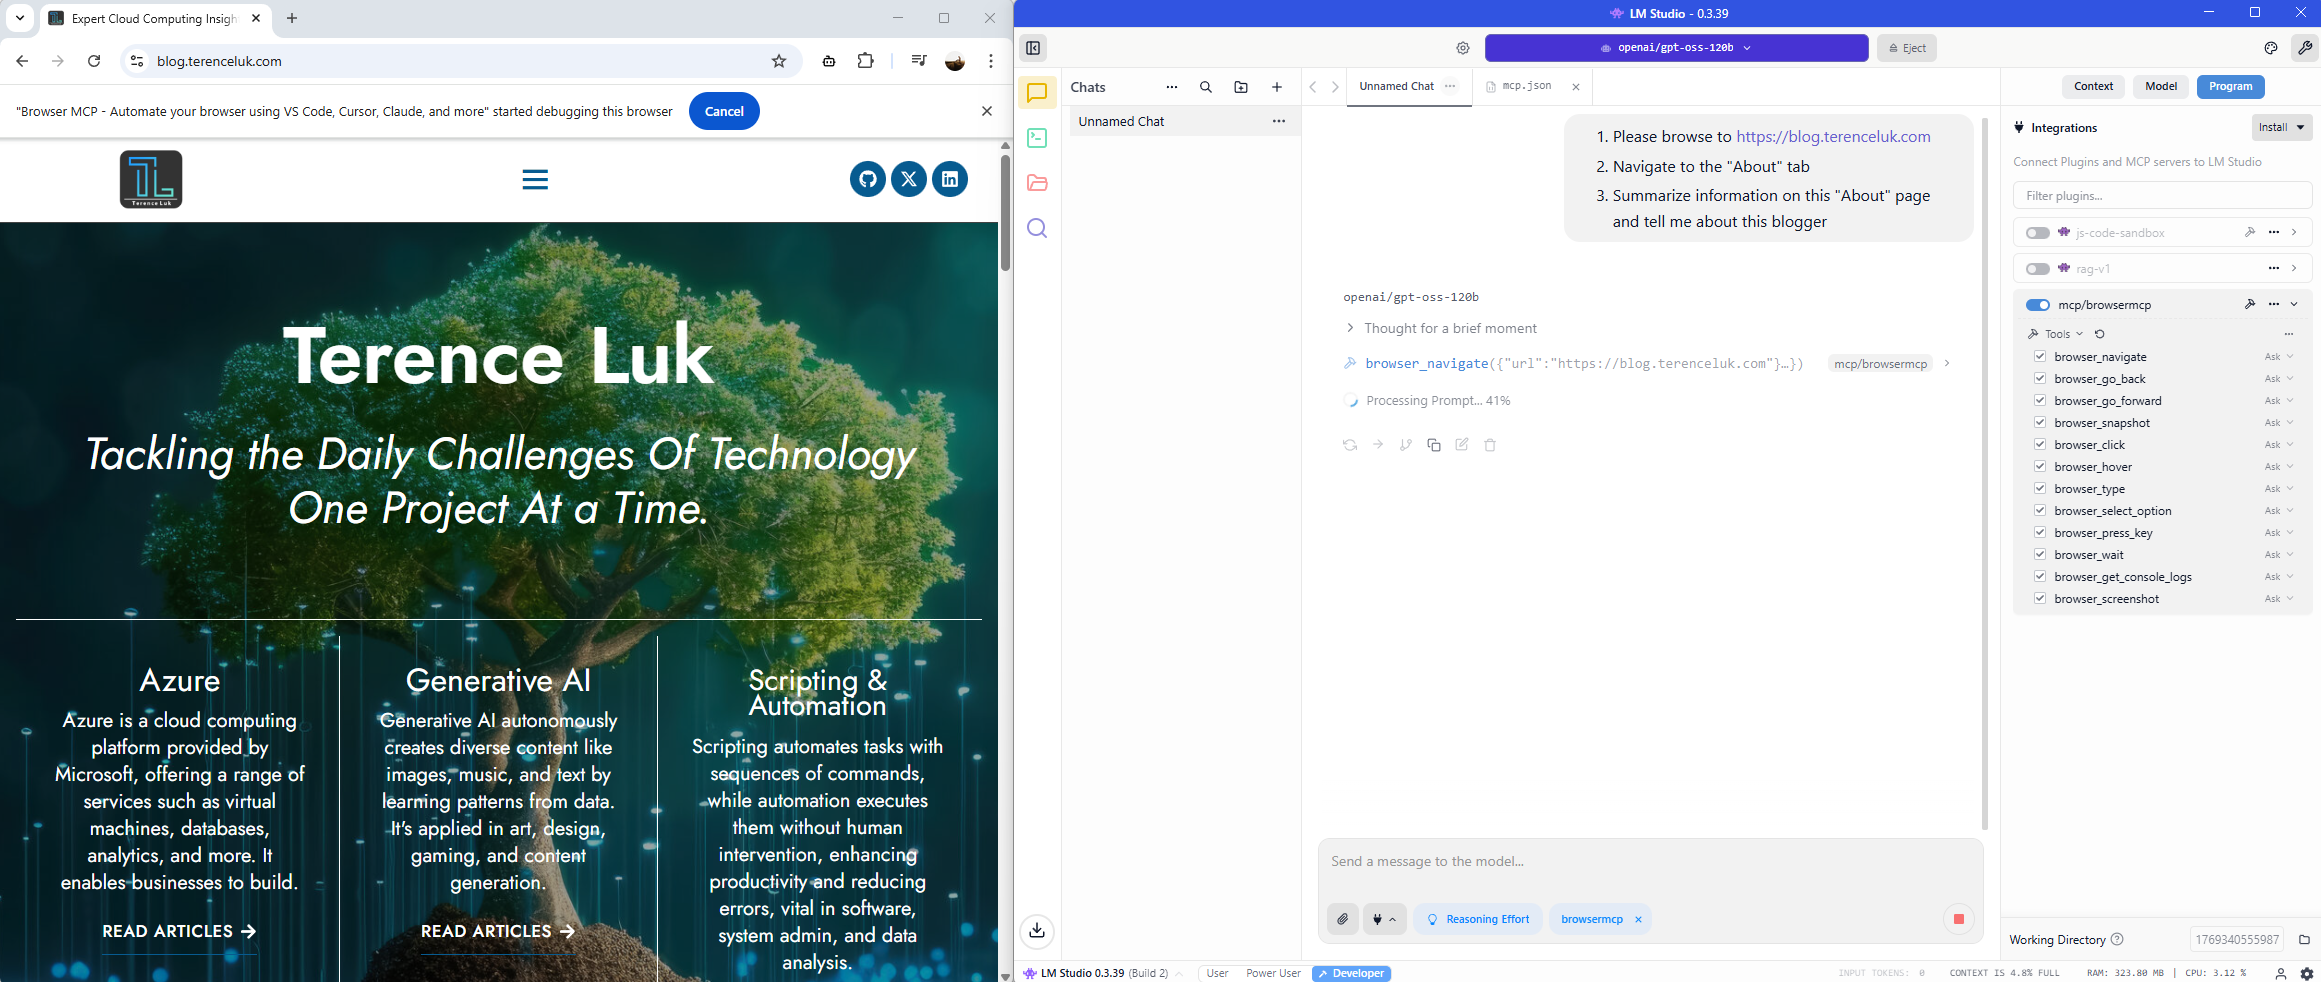
Now we’re ready to test. Proceed to type in the request in LM Studio. I’m going to start with this:
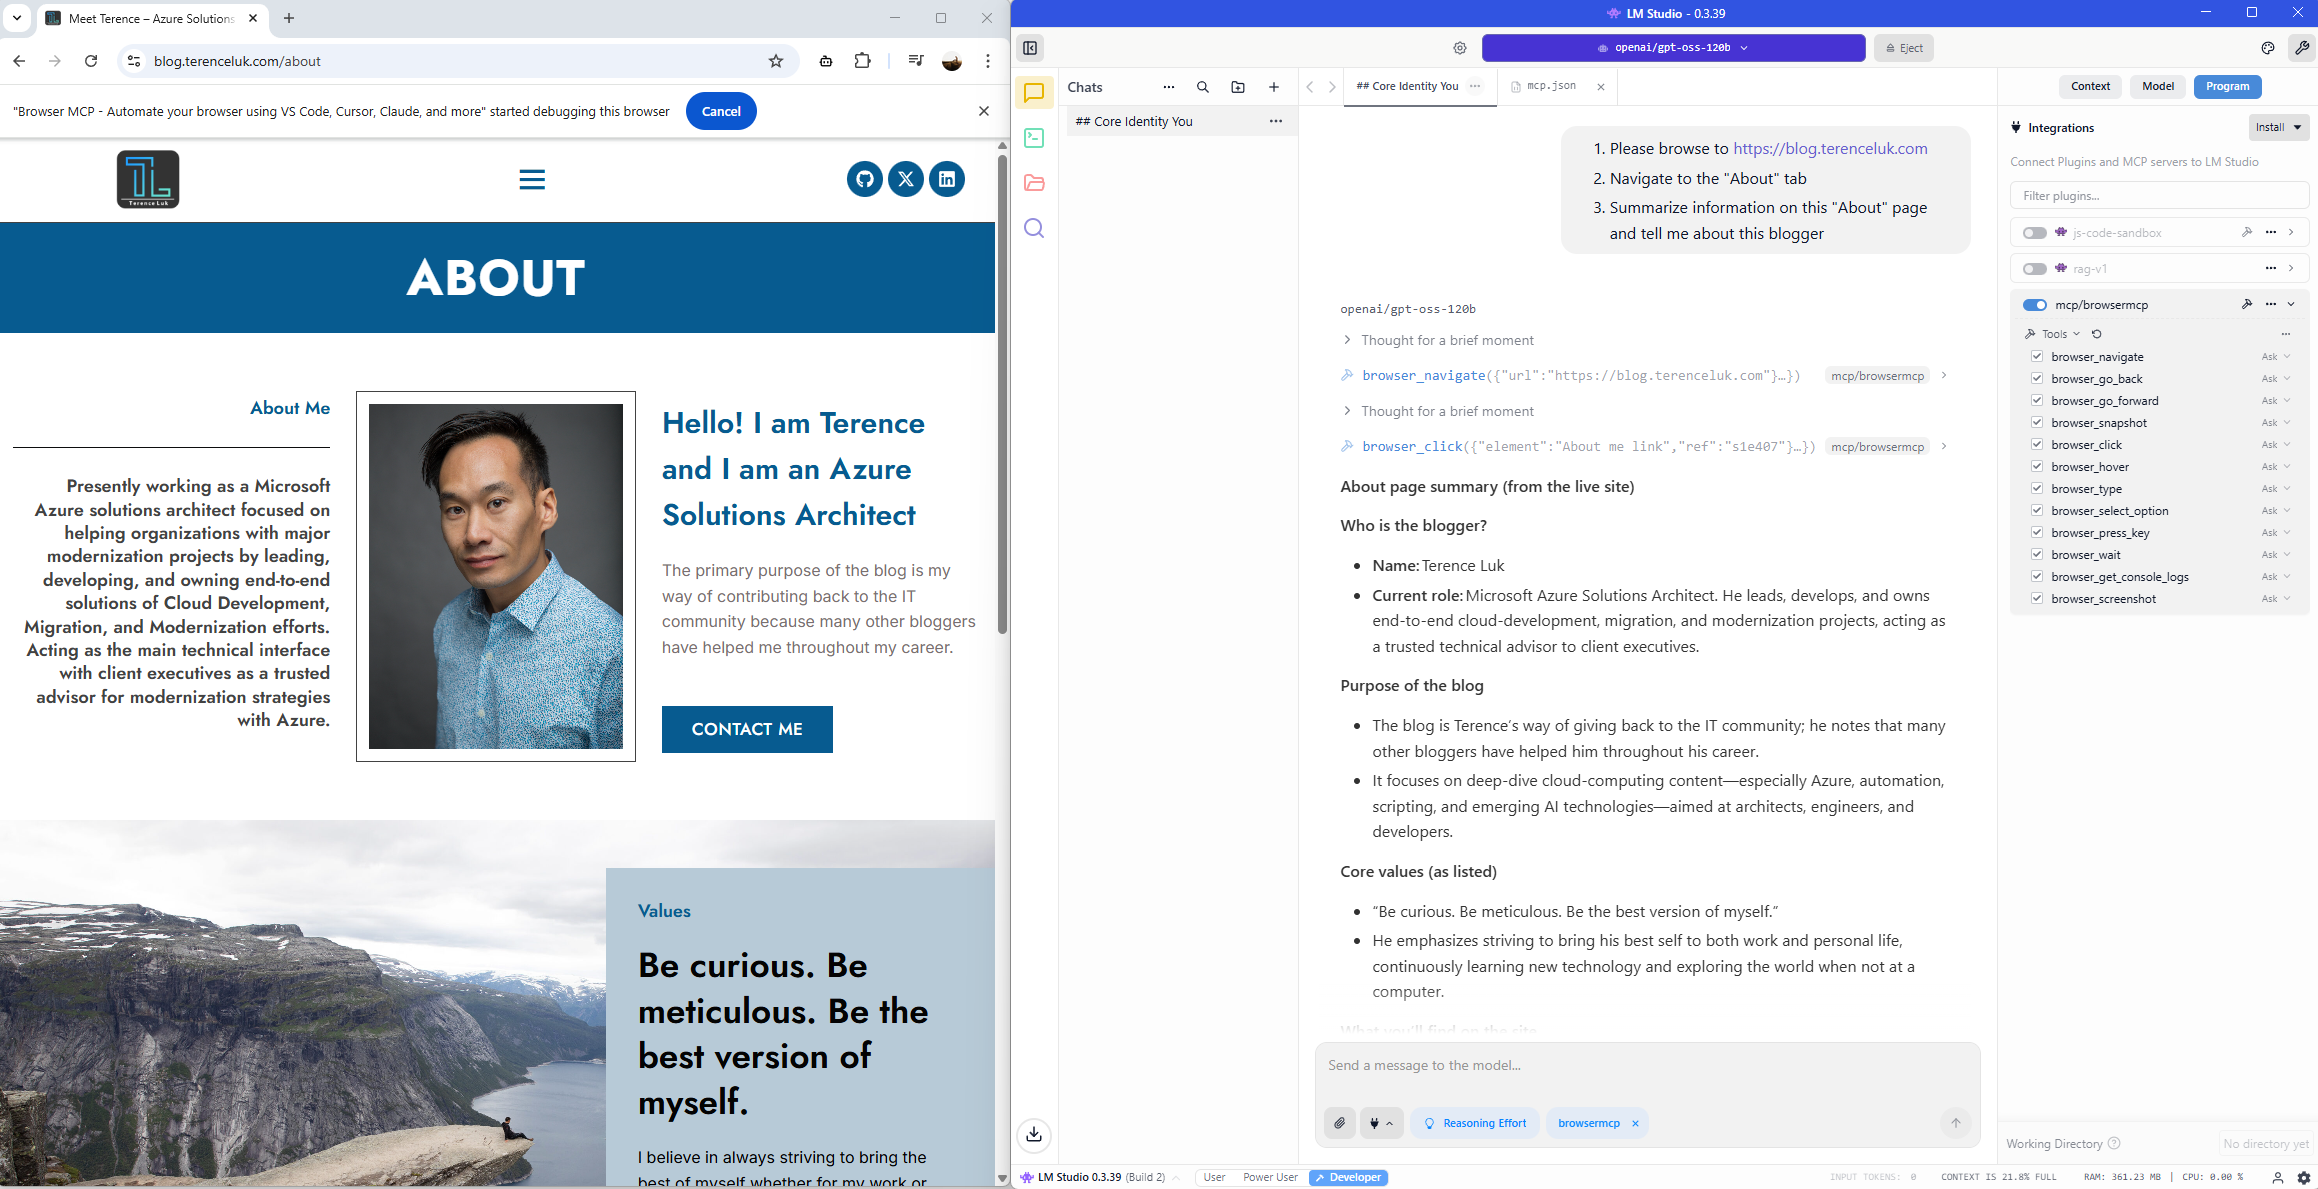
- Please browse to https://blog.terenceluk.com
- Navigate to the “About” tab
- Summarize information on this “About” page and tell me about this blogger
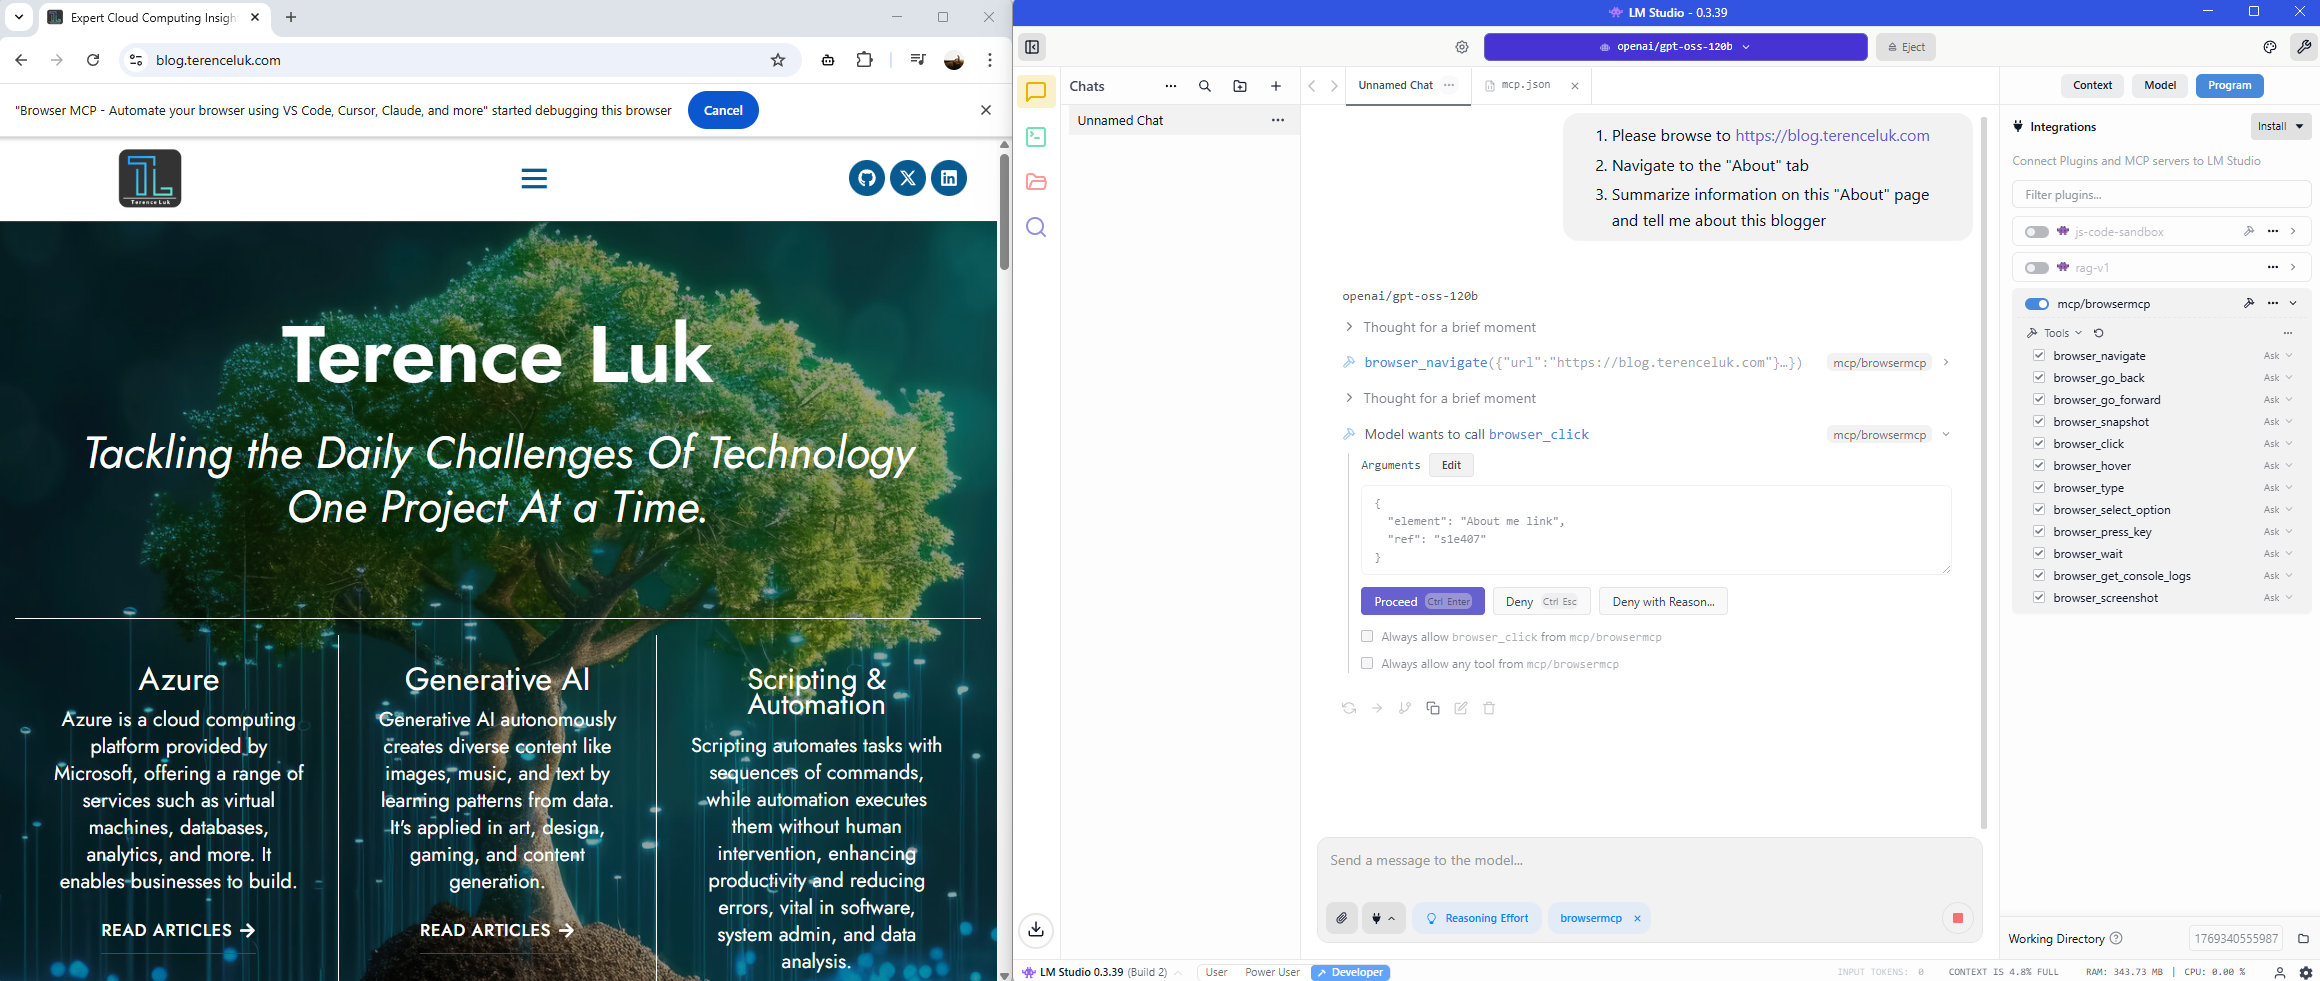
You should see the chat window process the request and ask for you to authorize the various actions for the MCP server to execute.
Browser navigates to page:
Browser requests to navigate to About tab:
Browser reads the information and provides a summary:
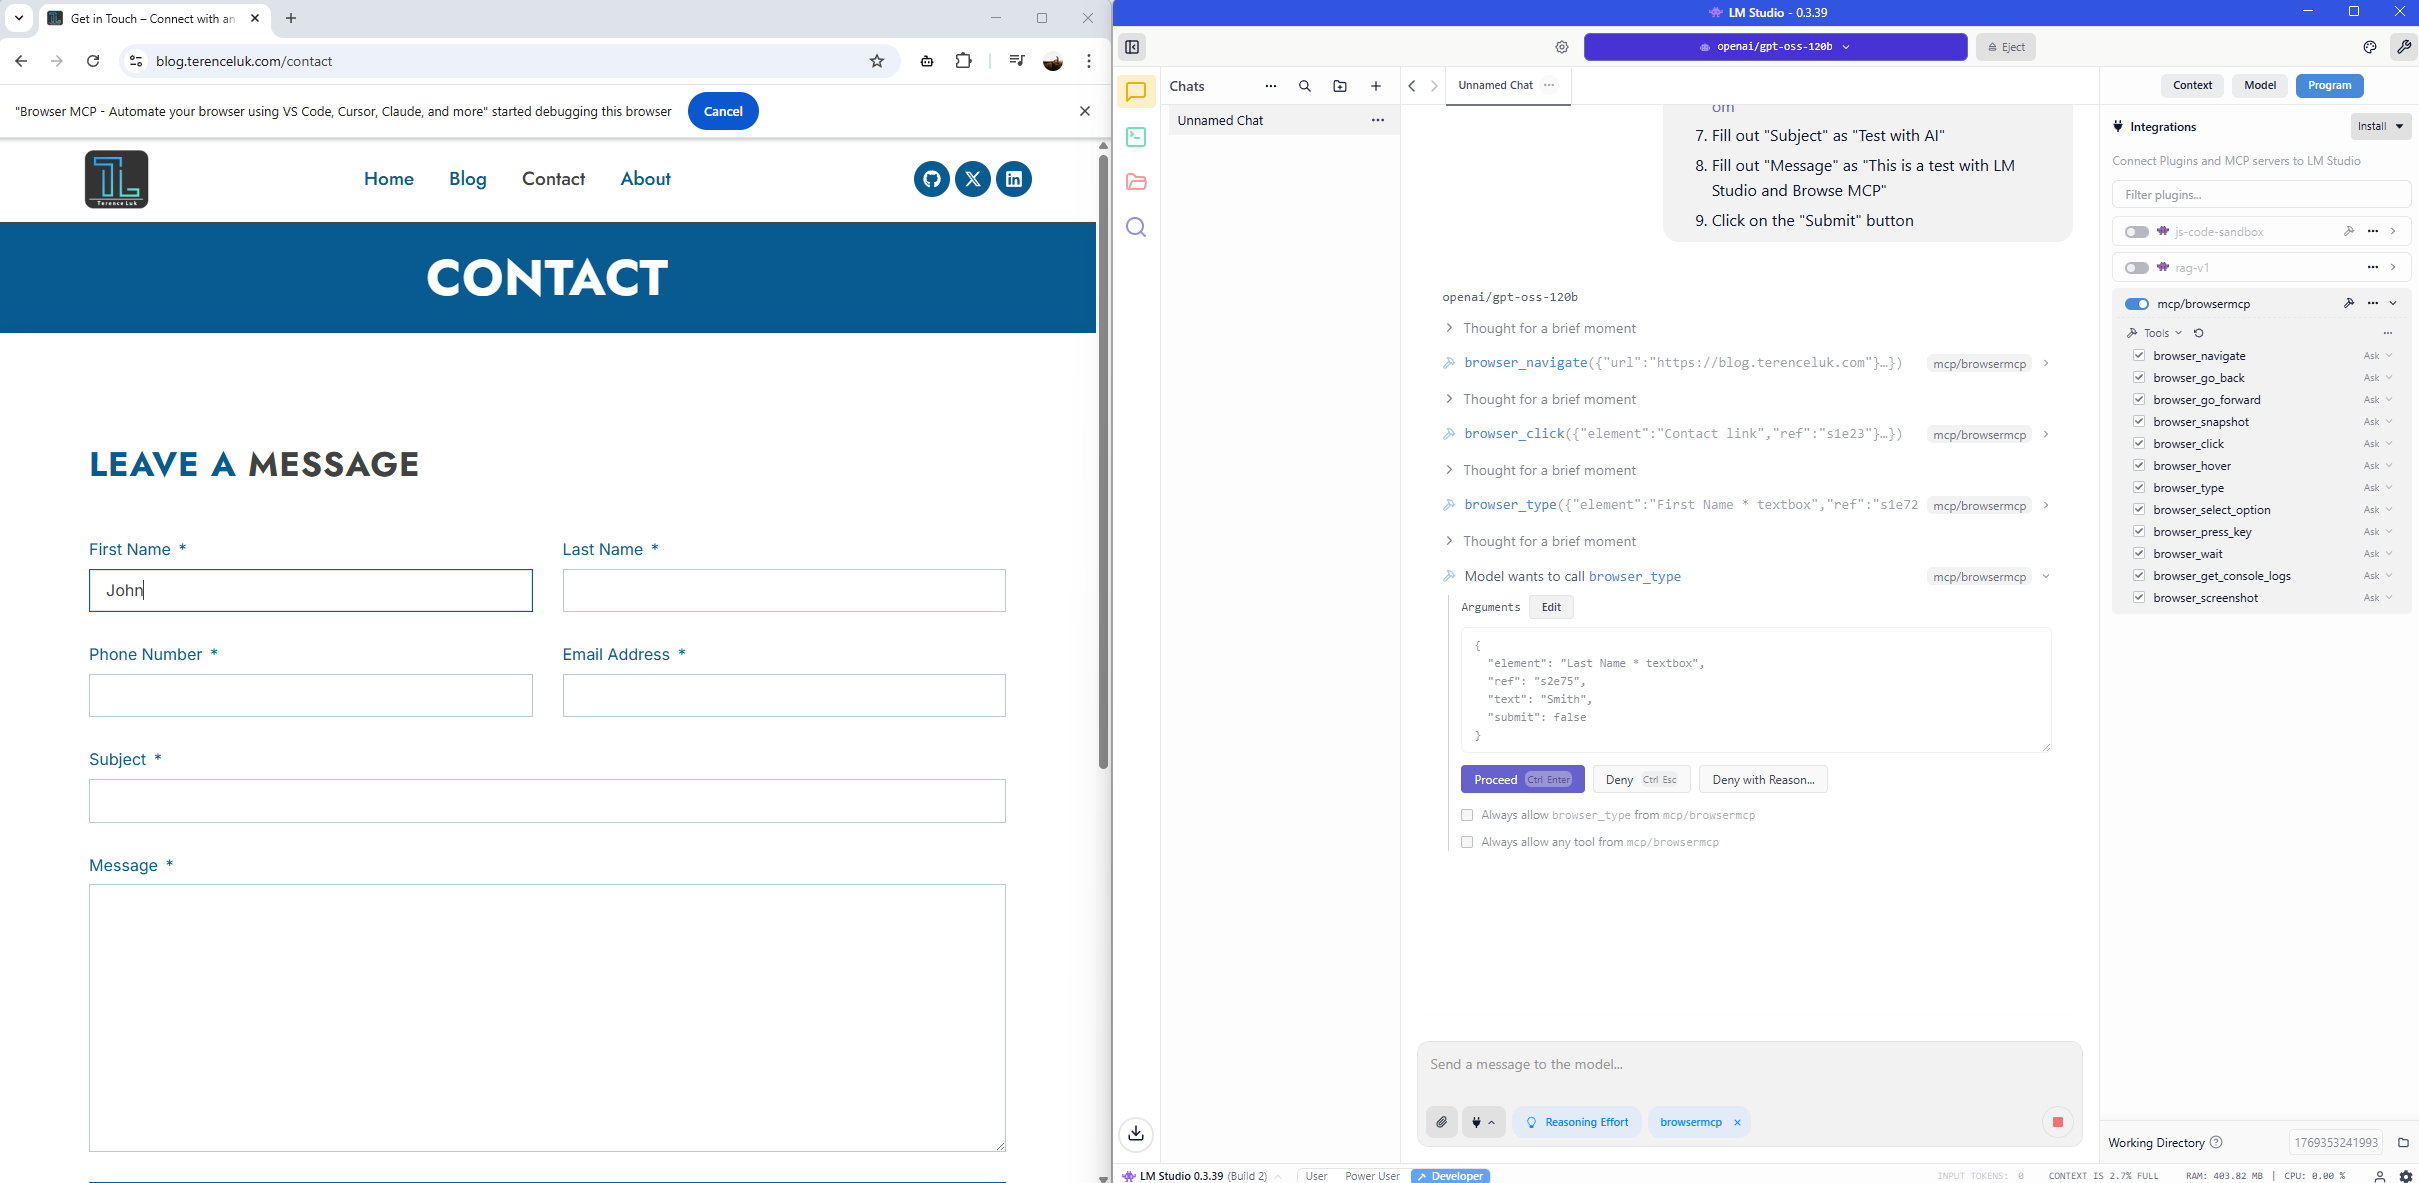
Let’s now try to fill out a form and submit sample data:
1. Please browse to https://blog.terenceluk.com
2. Click on the “Contact” tab
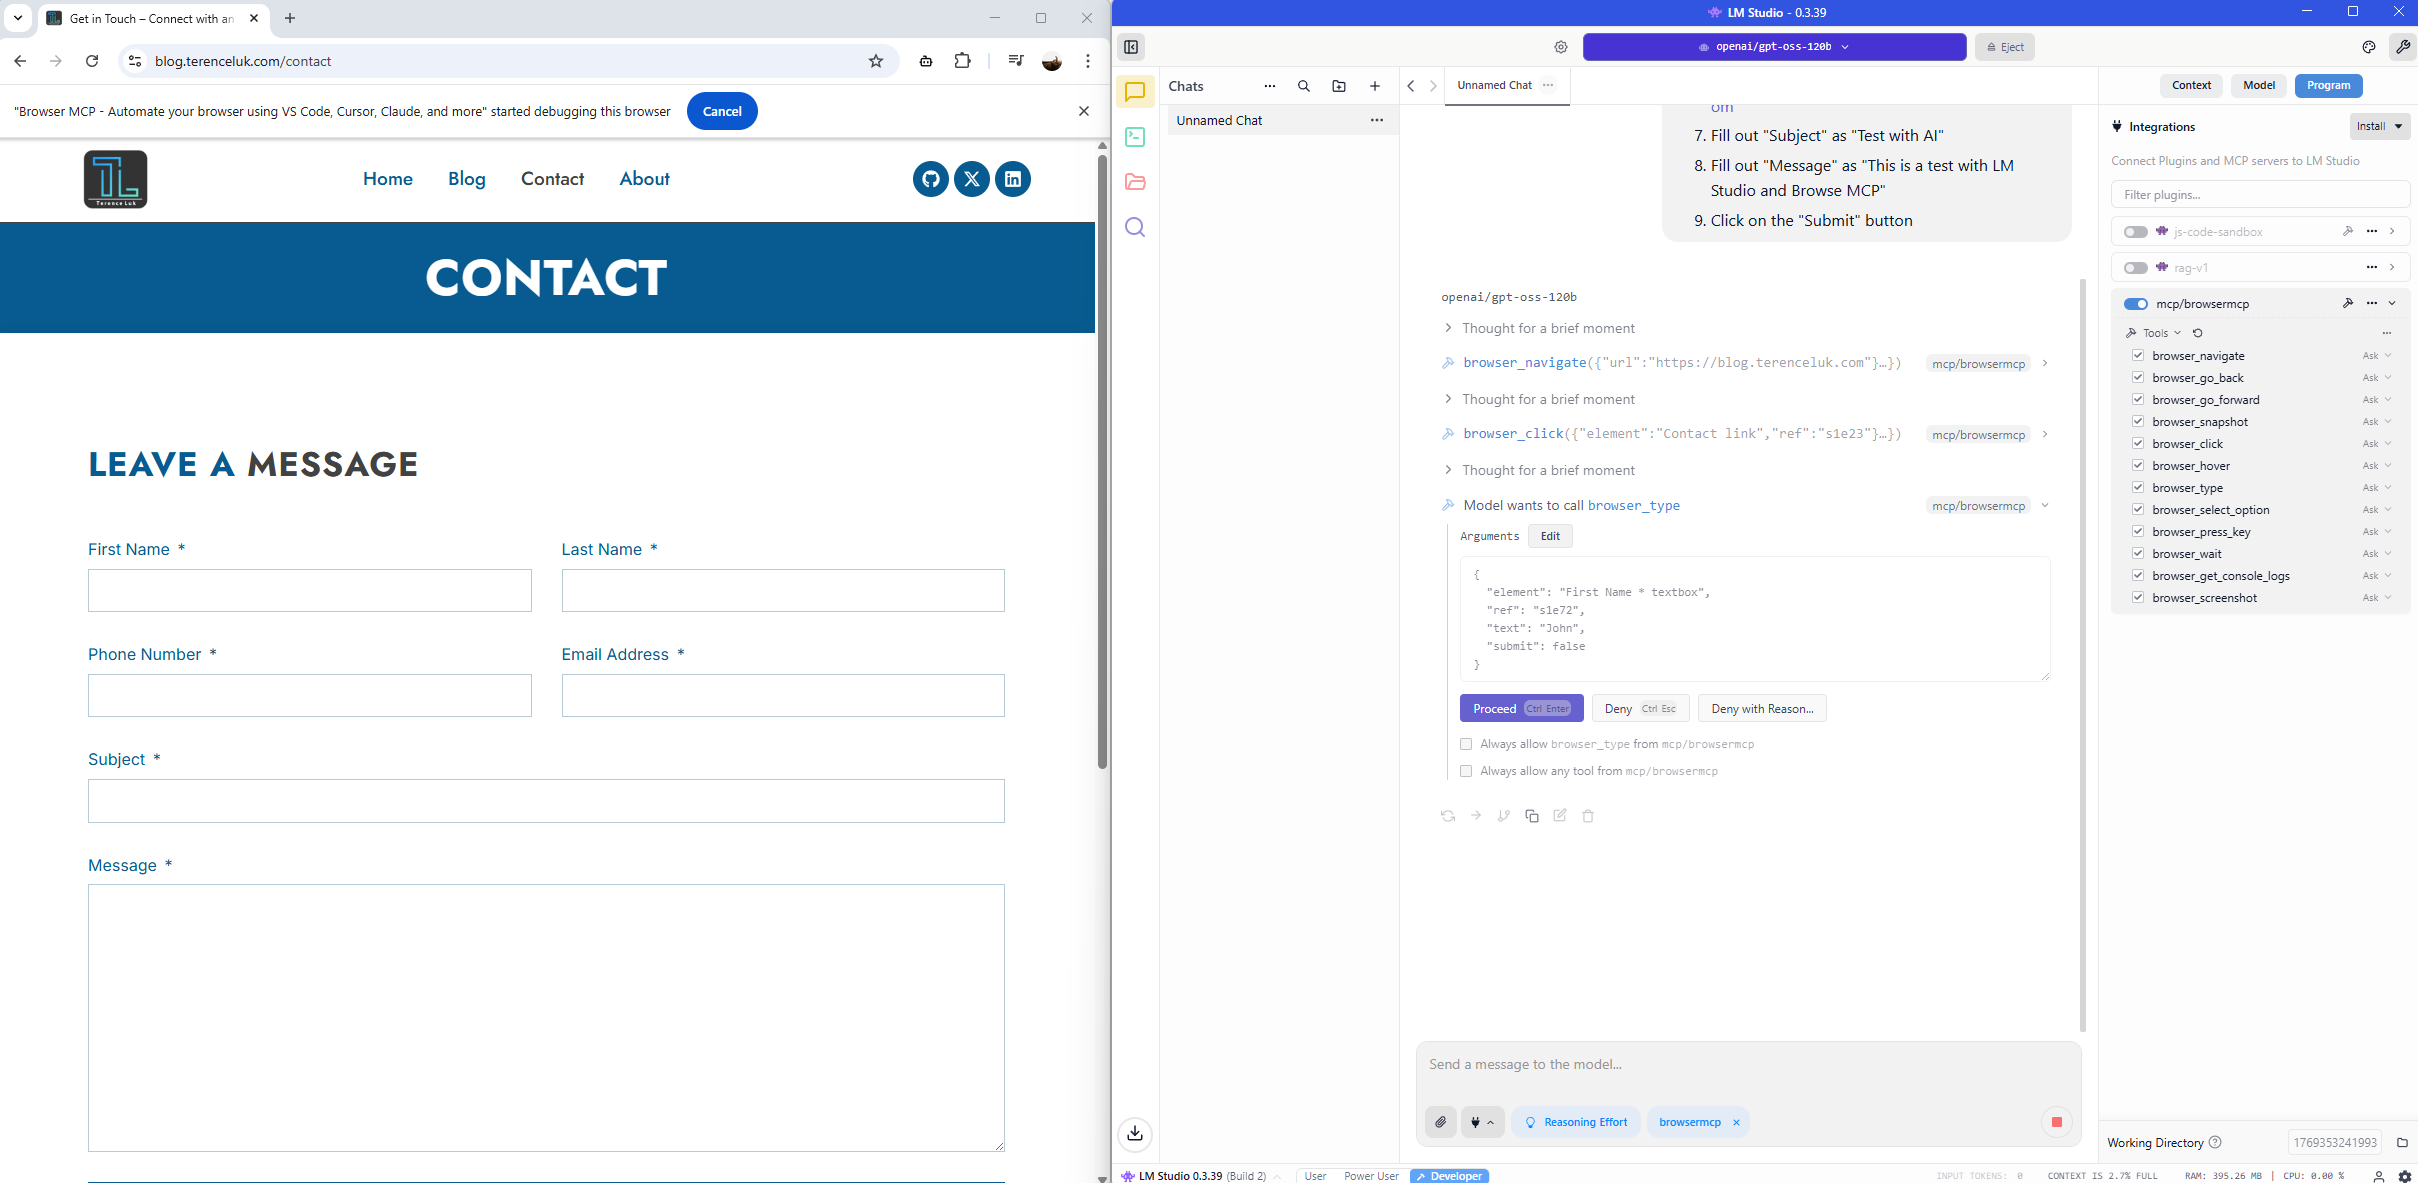
3. Fill out “First Name” as “John”
4. Fill out “Last Name” as “Smith”
5. Fill out “Phone Number” as “555-555-5555”
6. Fill out “Email address” as “john.smith@domain.com”
7. Fill out “Subject” as “Test with AI”
8. Fill out “Message” as “This is a test with LM Studio and Browse MCP”
9. Click on the “Submit” button
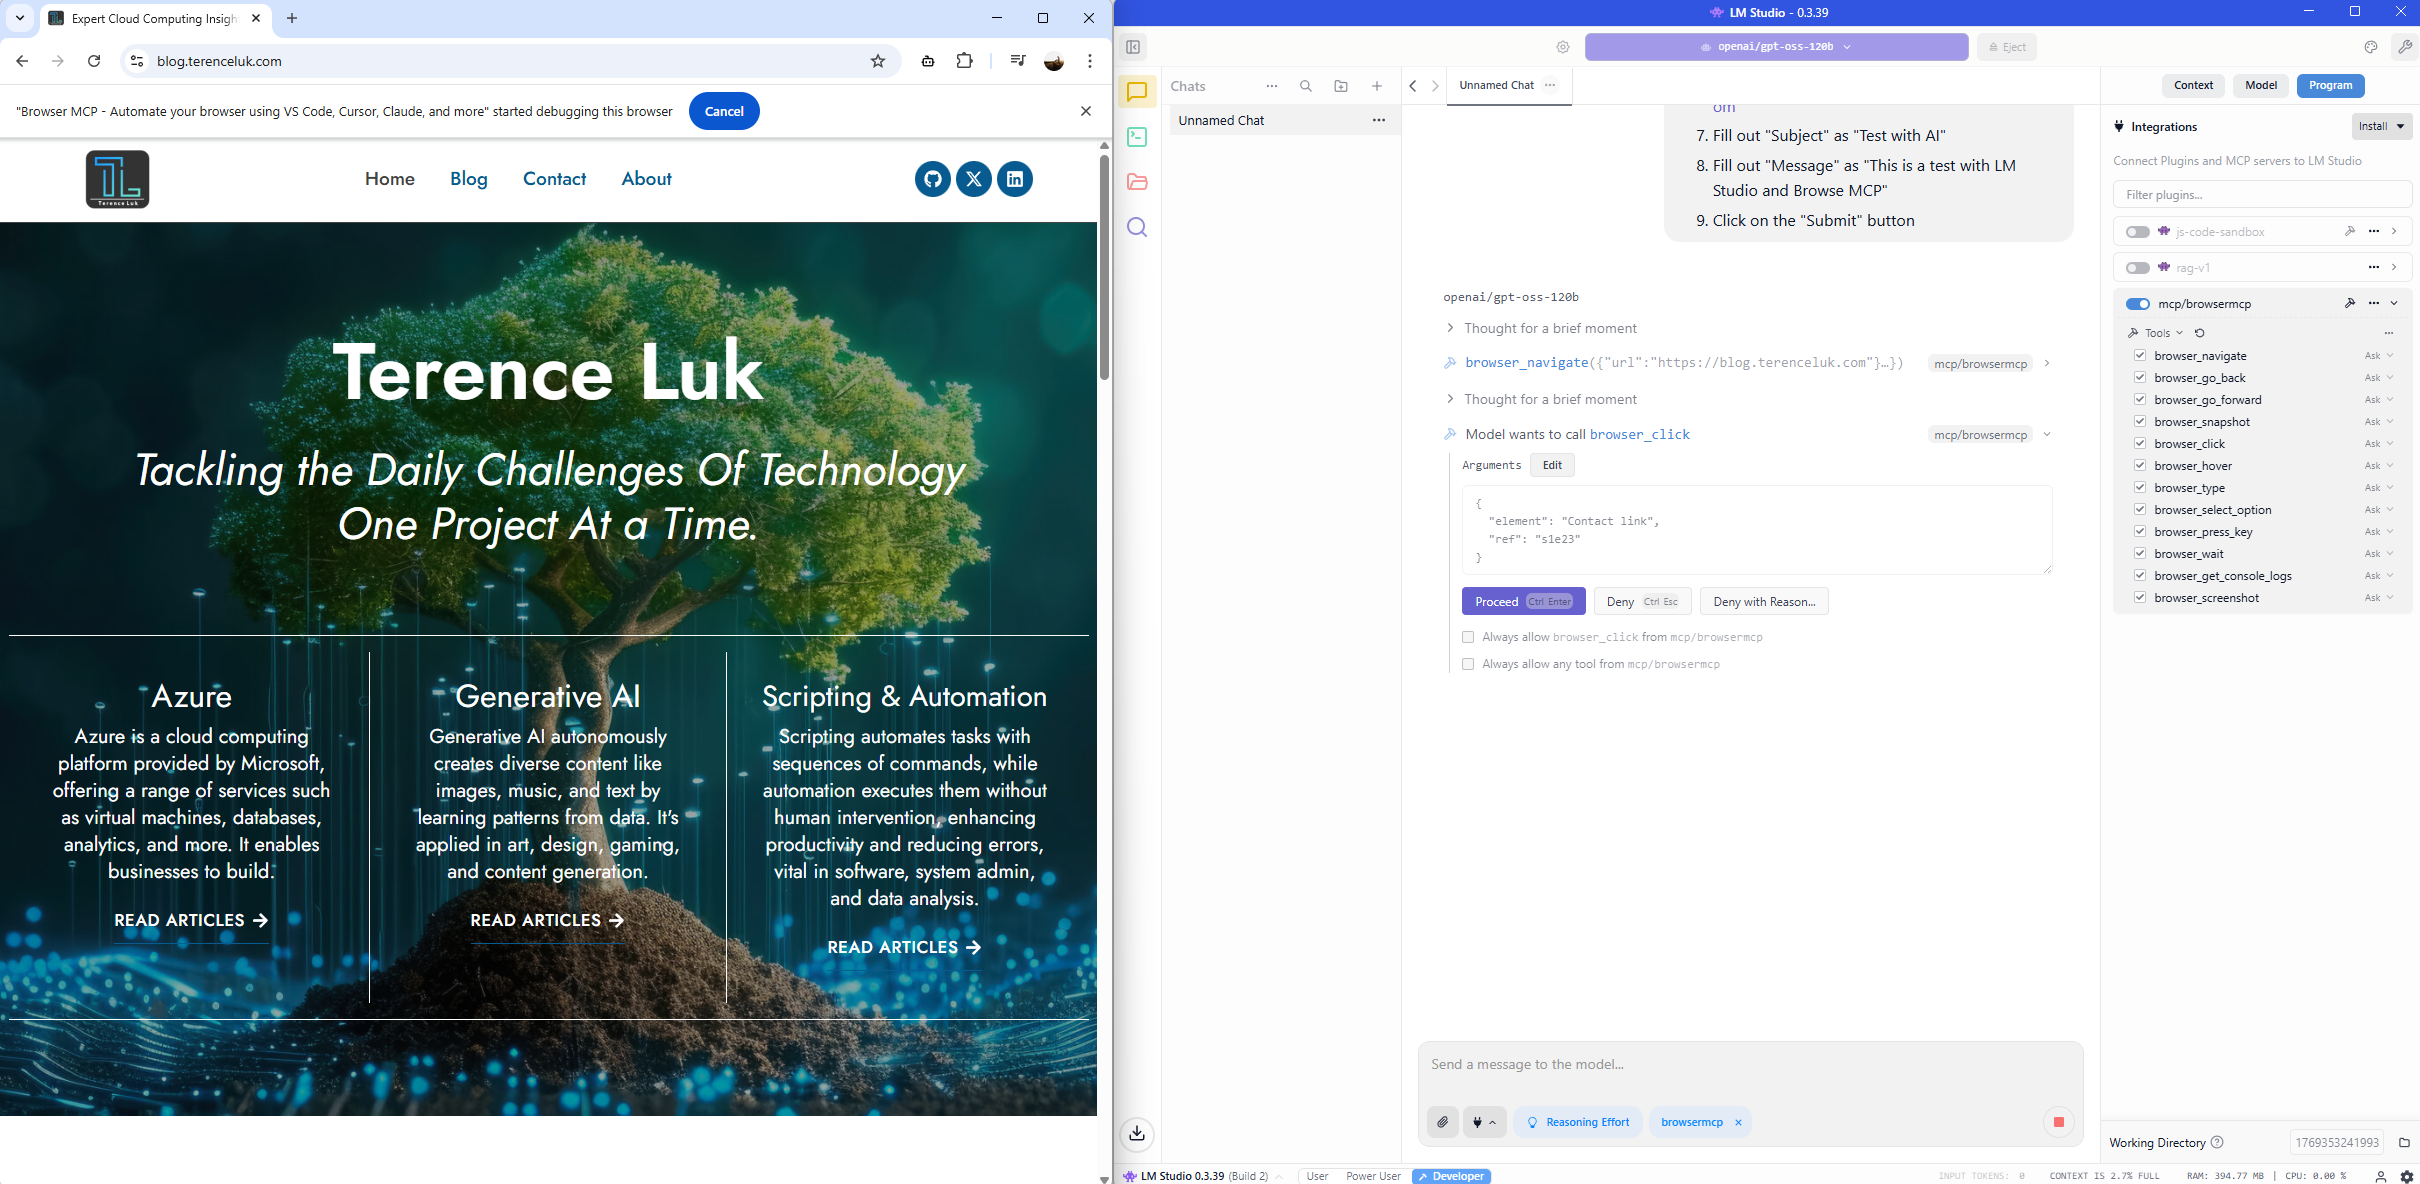
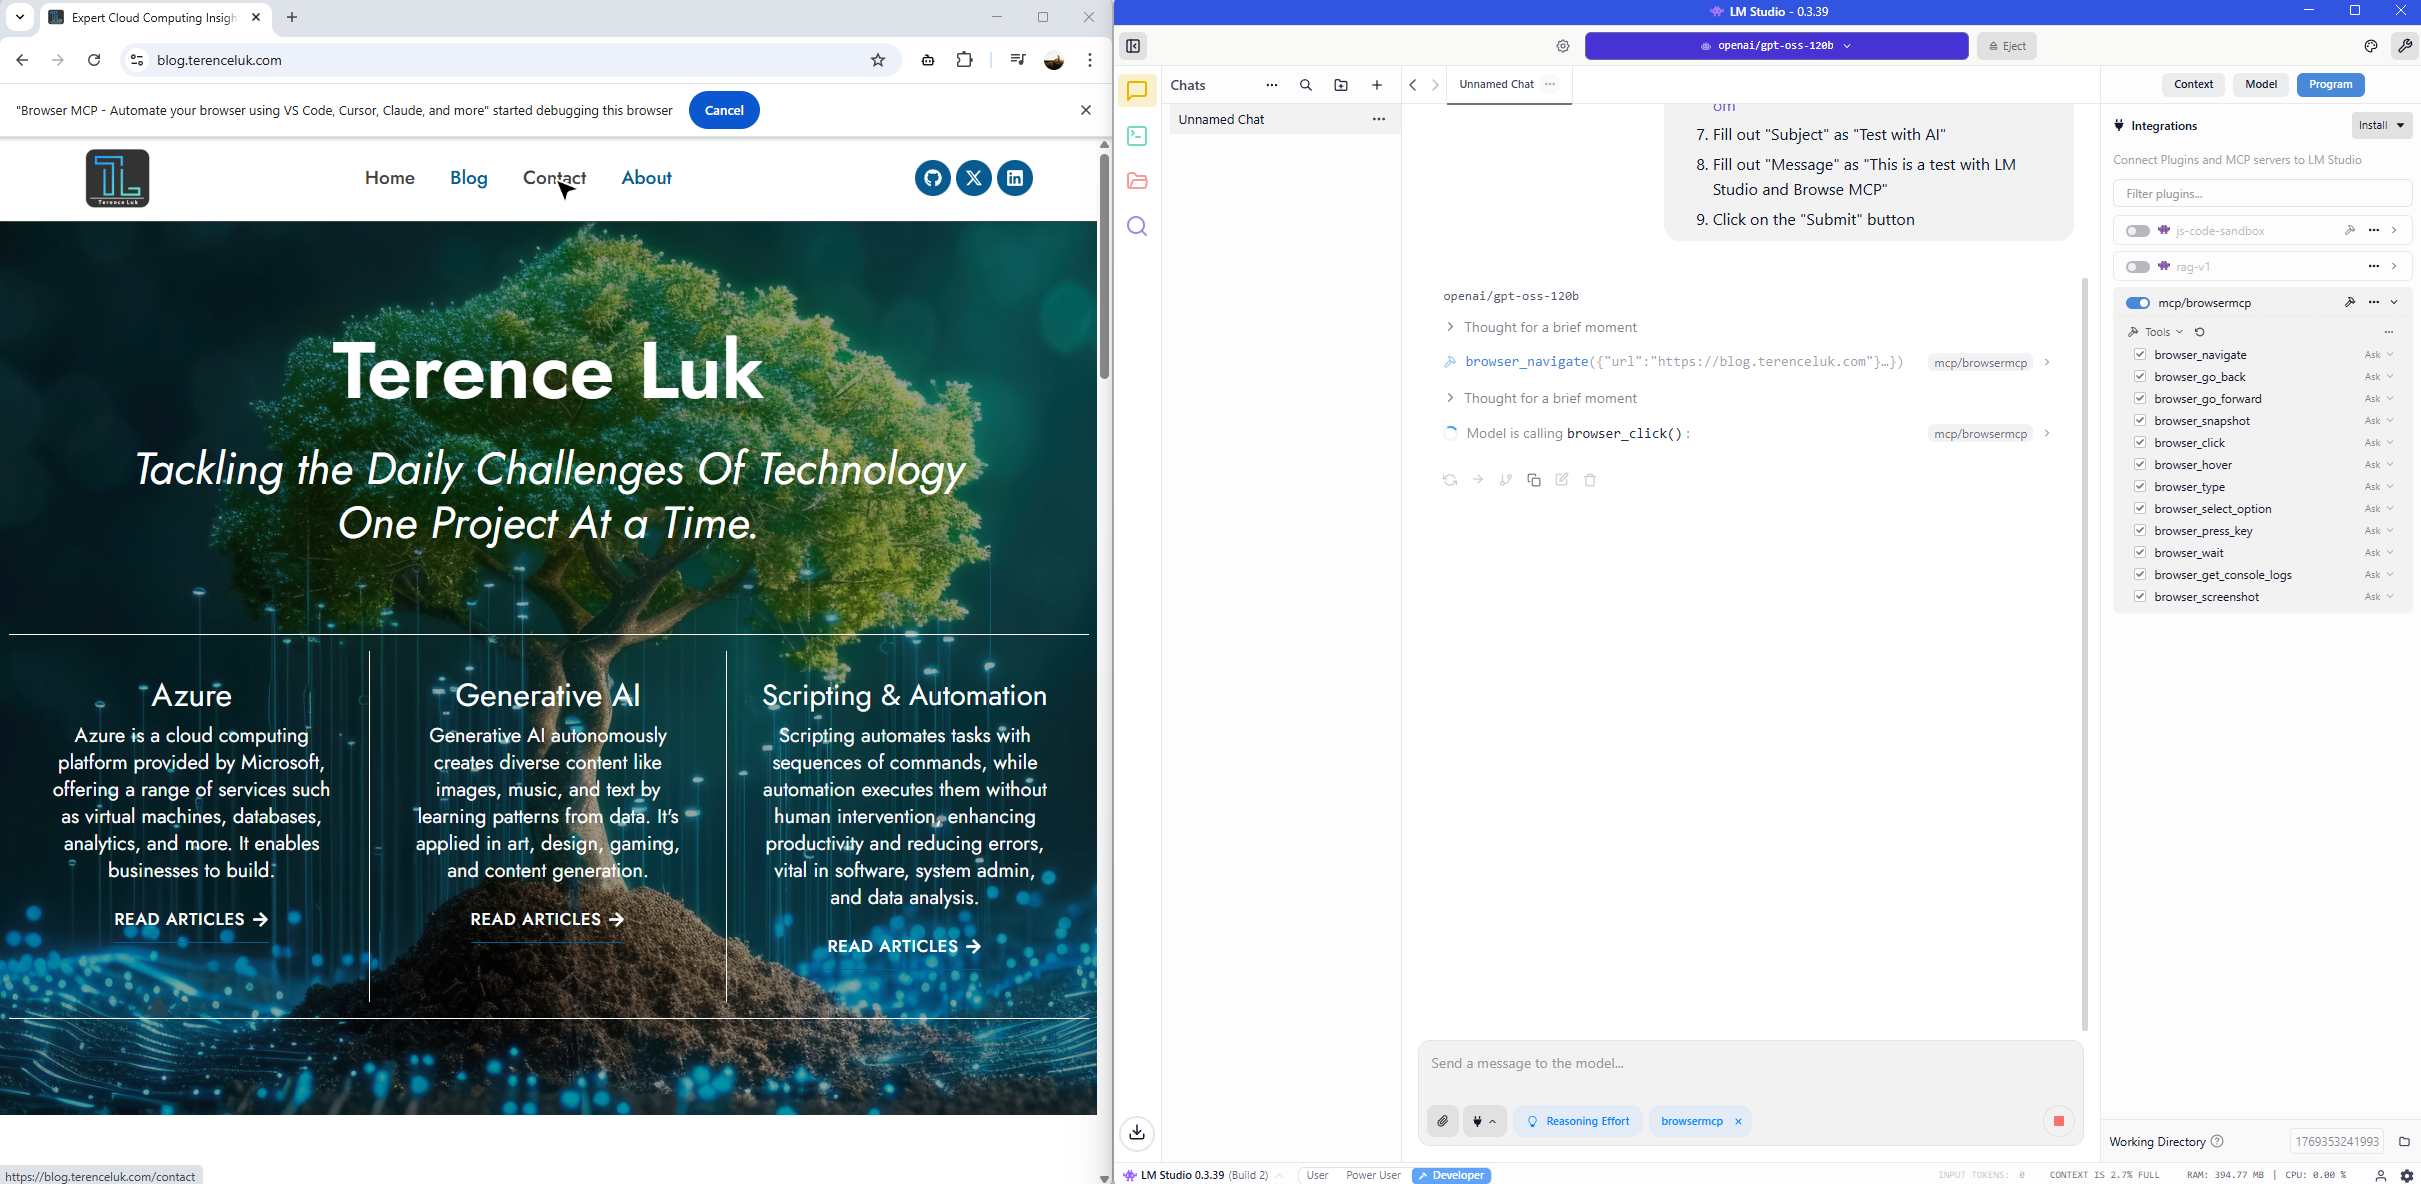
The MCP server browses to the page:
We’ll receive prompts to authorize the entry into each field:
Confirming the approval to enter the last name:
After completing the form, it will confirm that we authorize it to click on the Submit button:
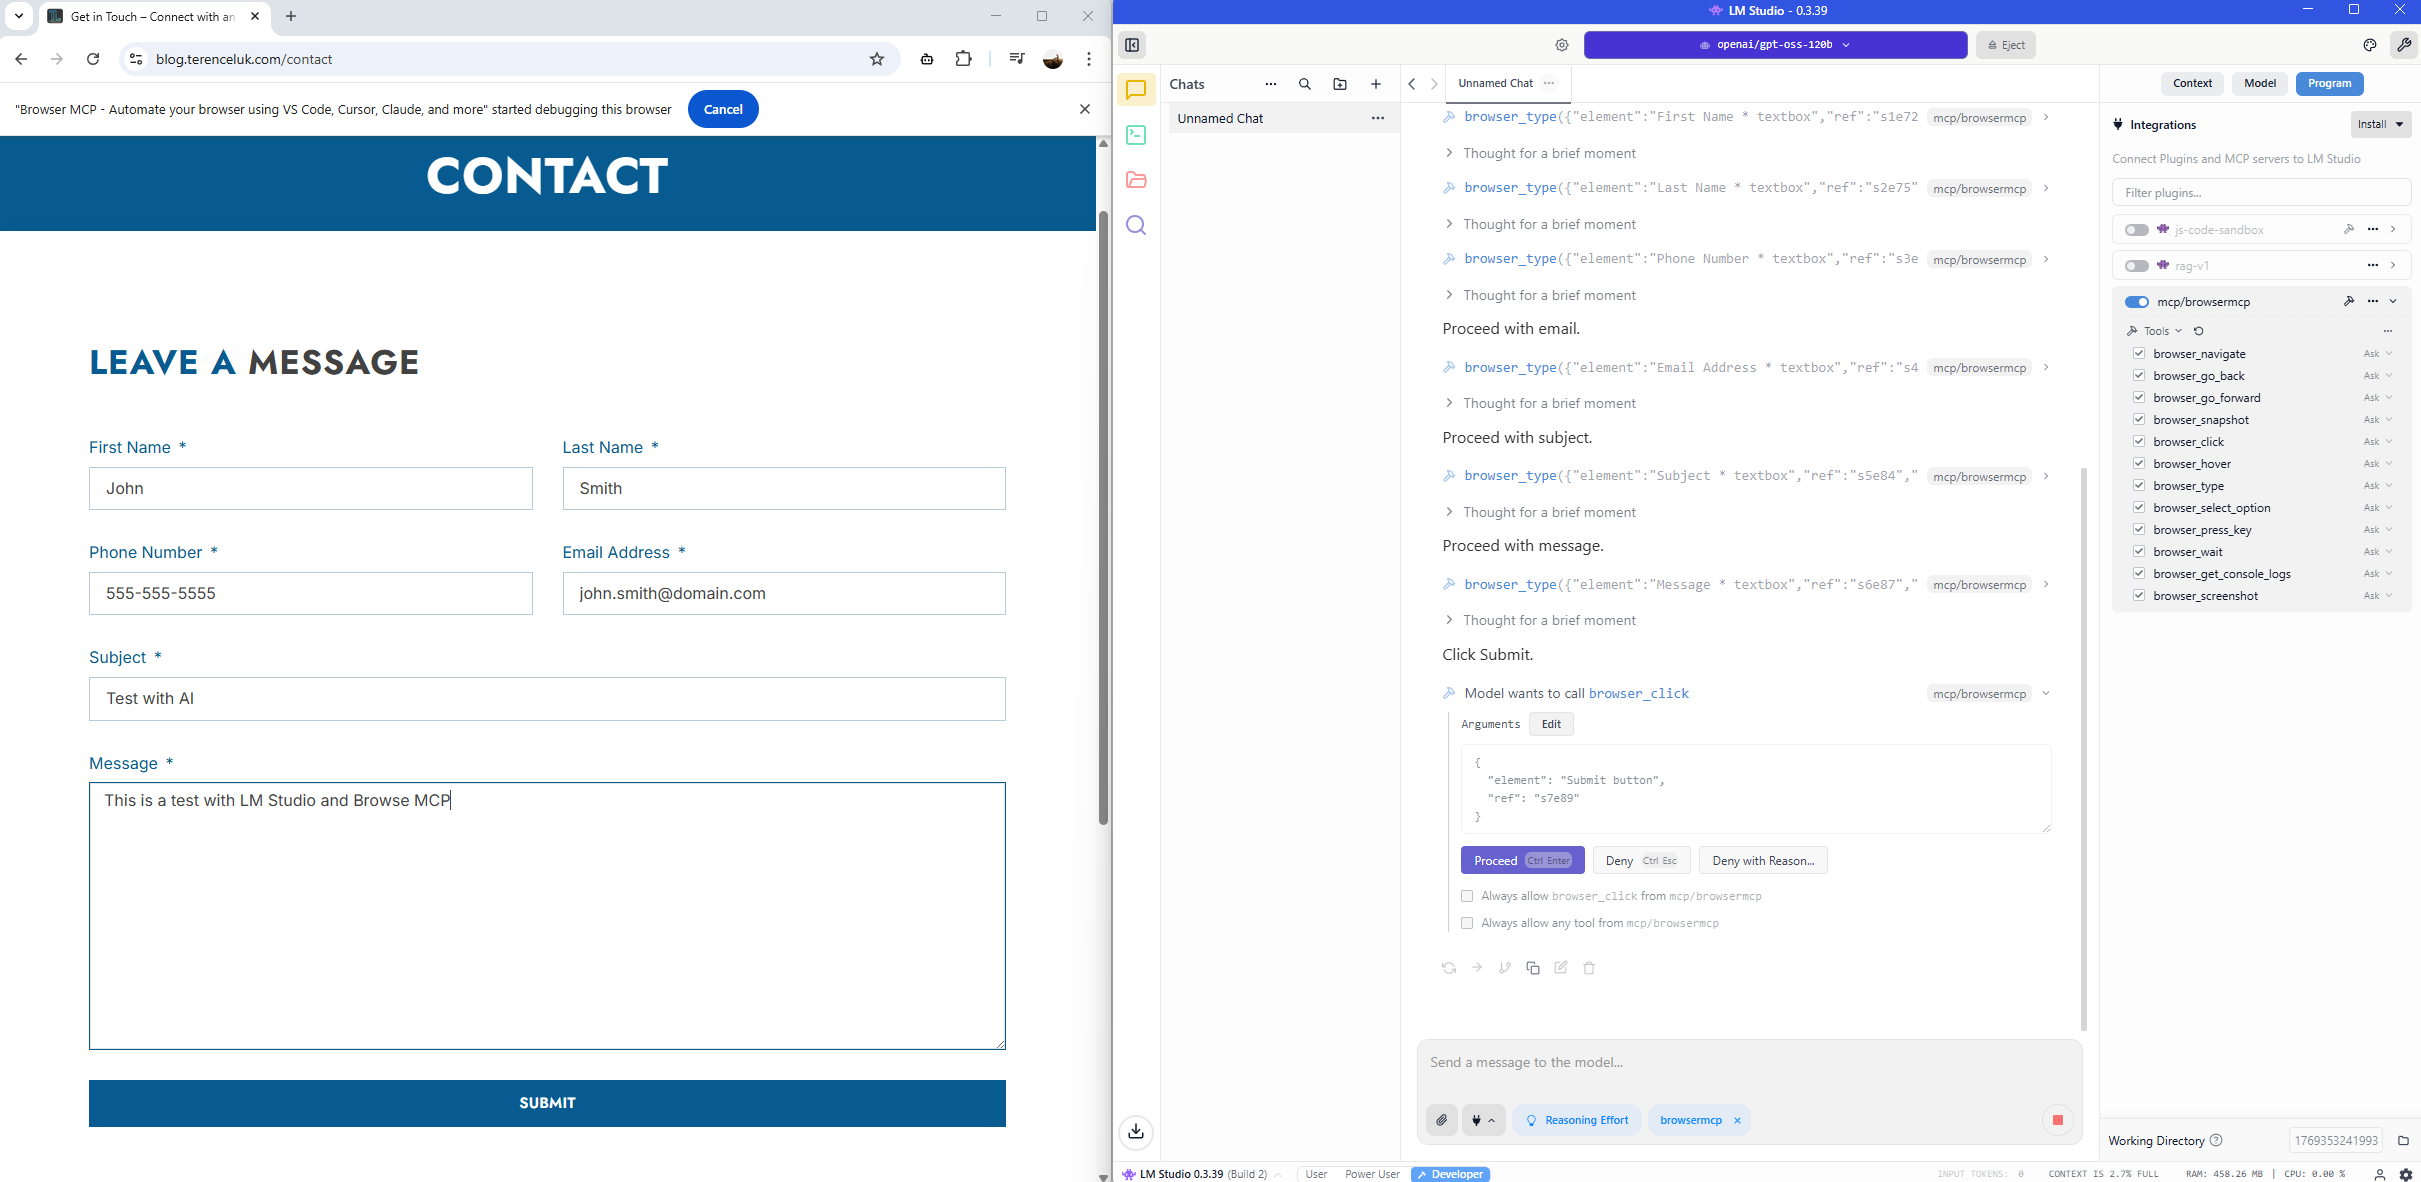
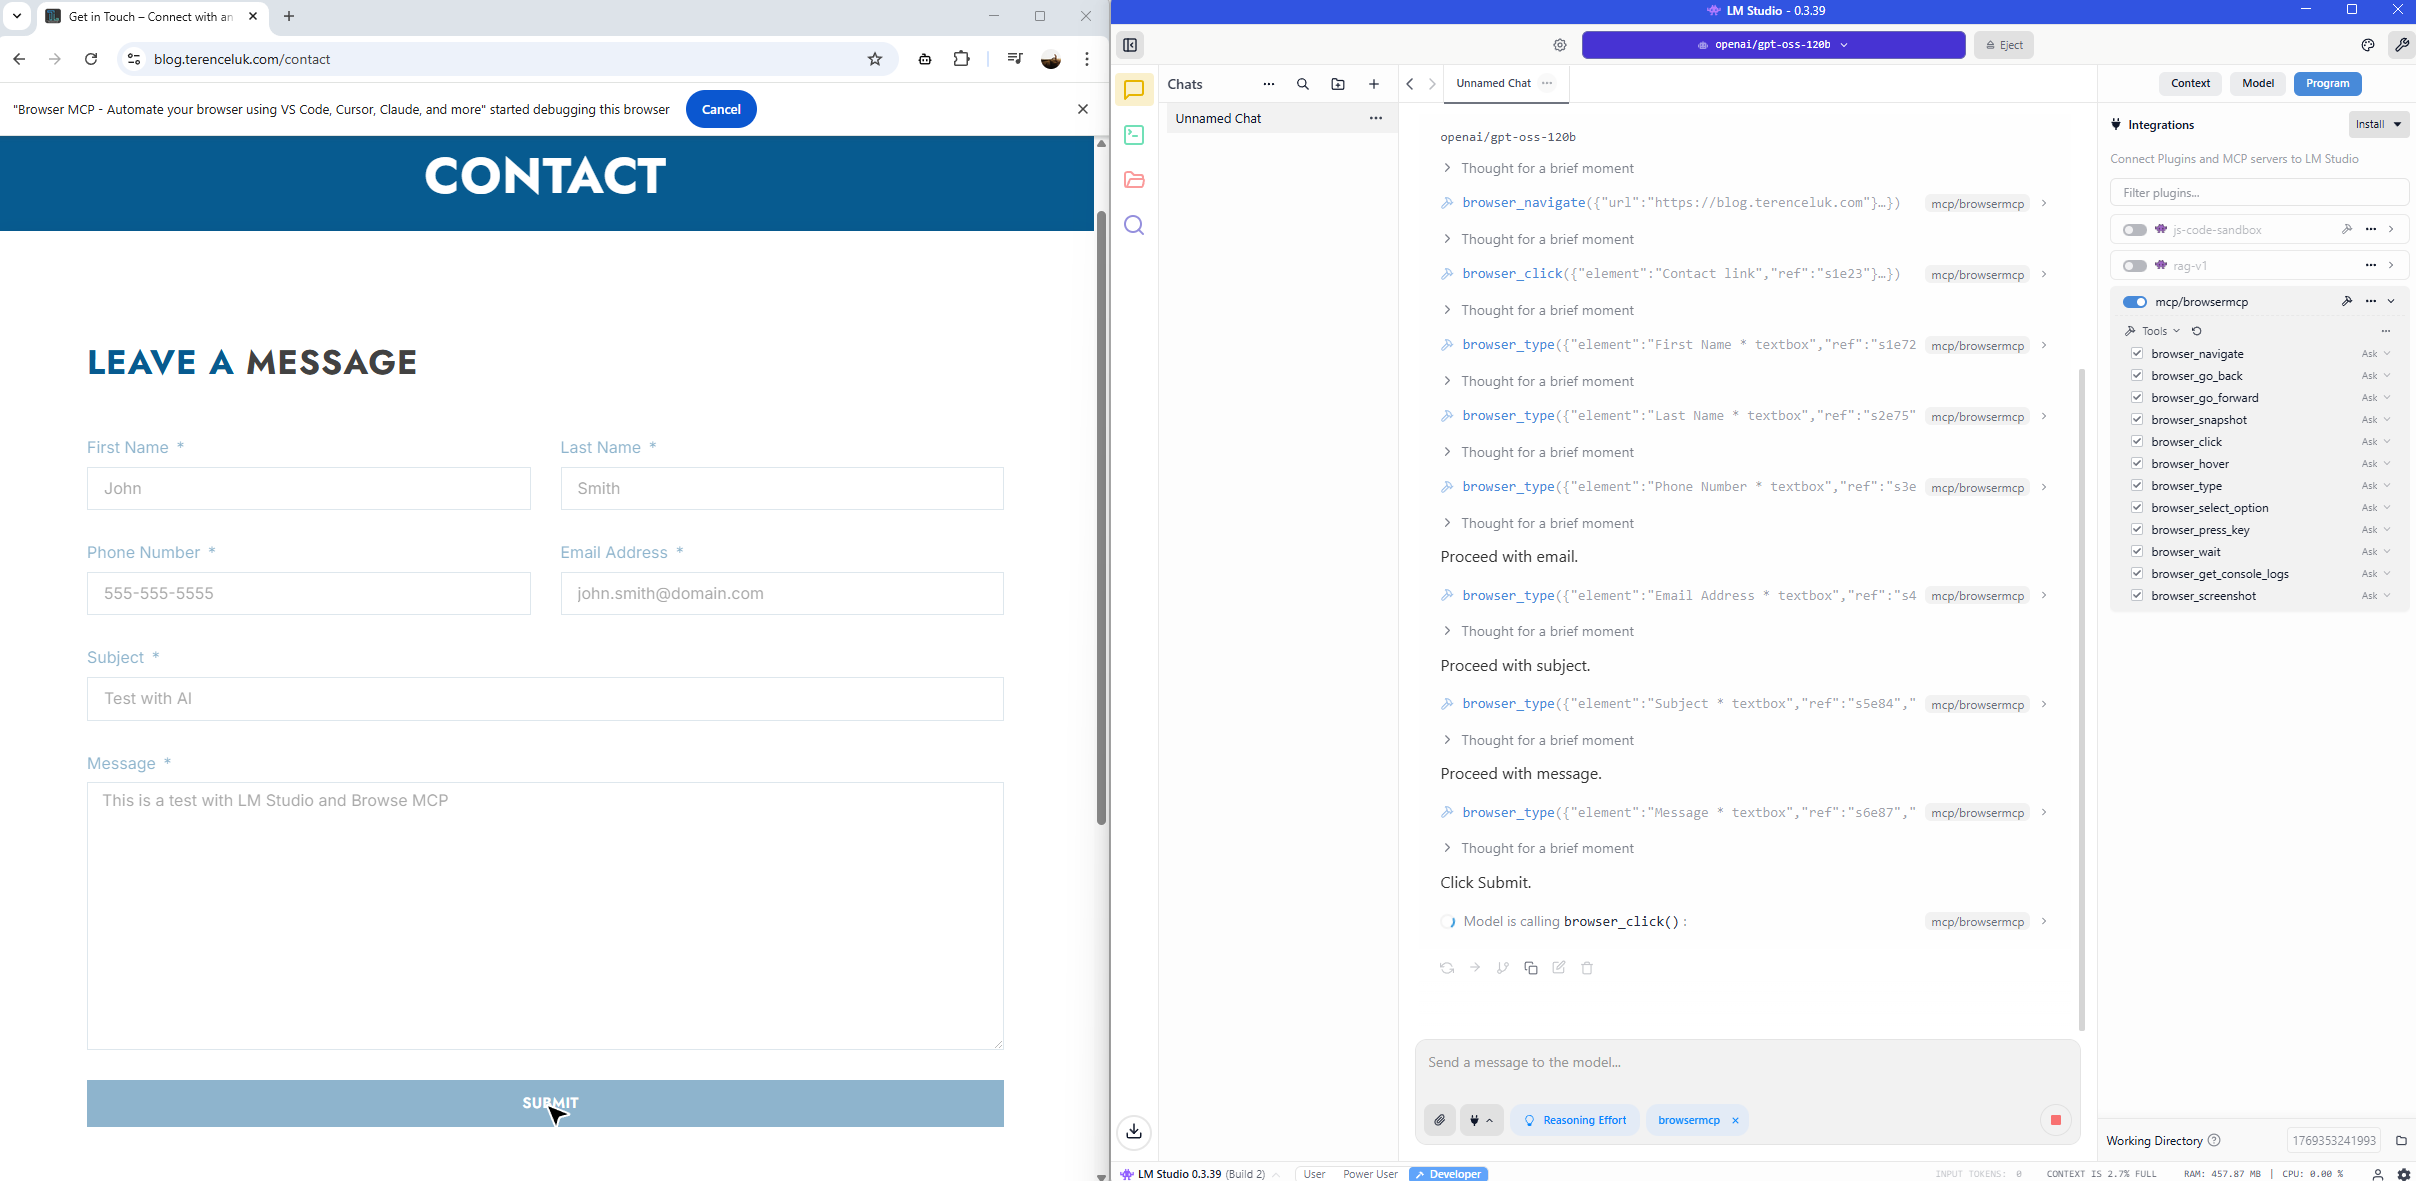
The Submit button is clicked:
… and there we have it. Form submitted, email received:
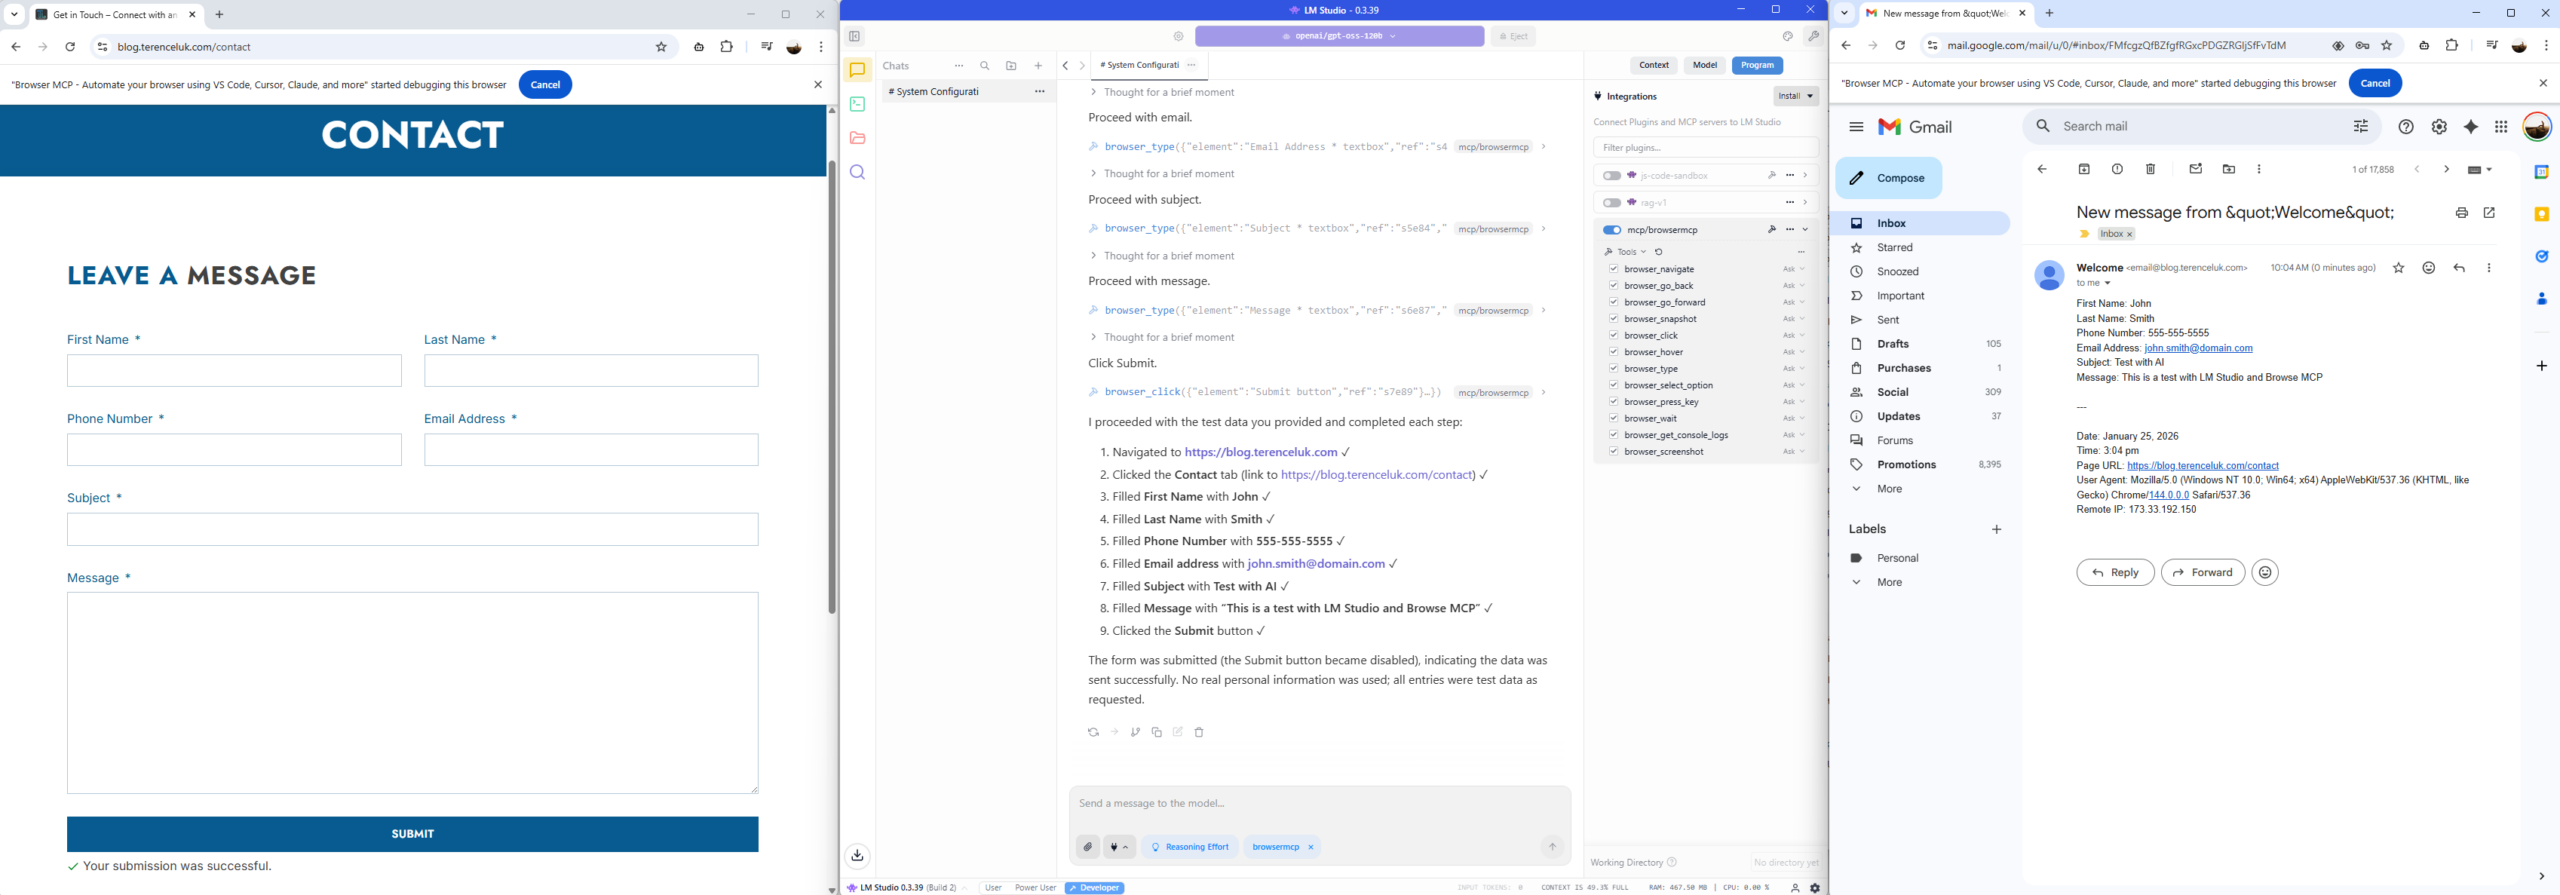
I hope this provides a demonstration of how you can integrate MCP tools into LM Studio to further enhance the capabilities of LLMs.