As a follow up to my previous post:
https://blog.terenceluk.com/using-defender-for-storage-to-scan-for-malware-in-a-storage-account-event-grid-to-publish-details-and-trigger-logic-app/
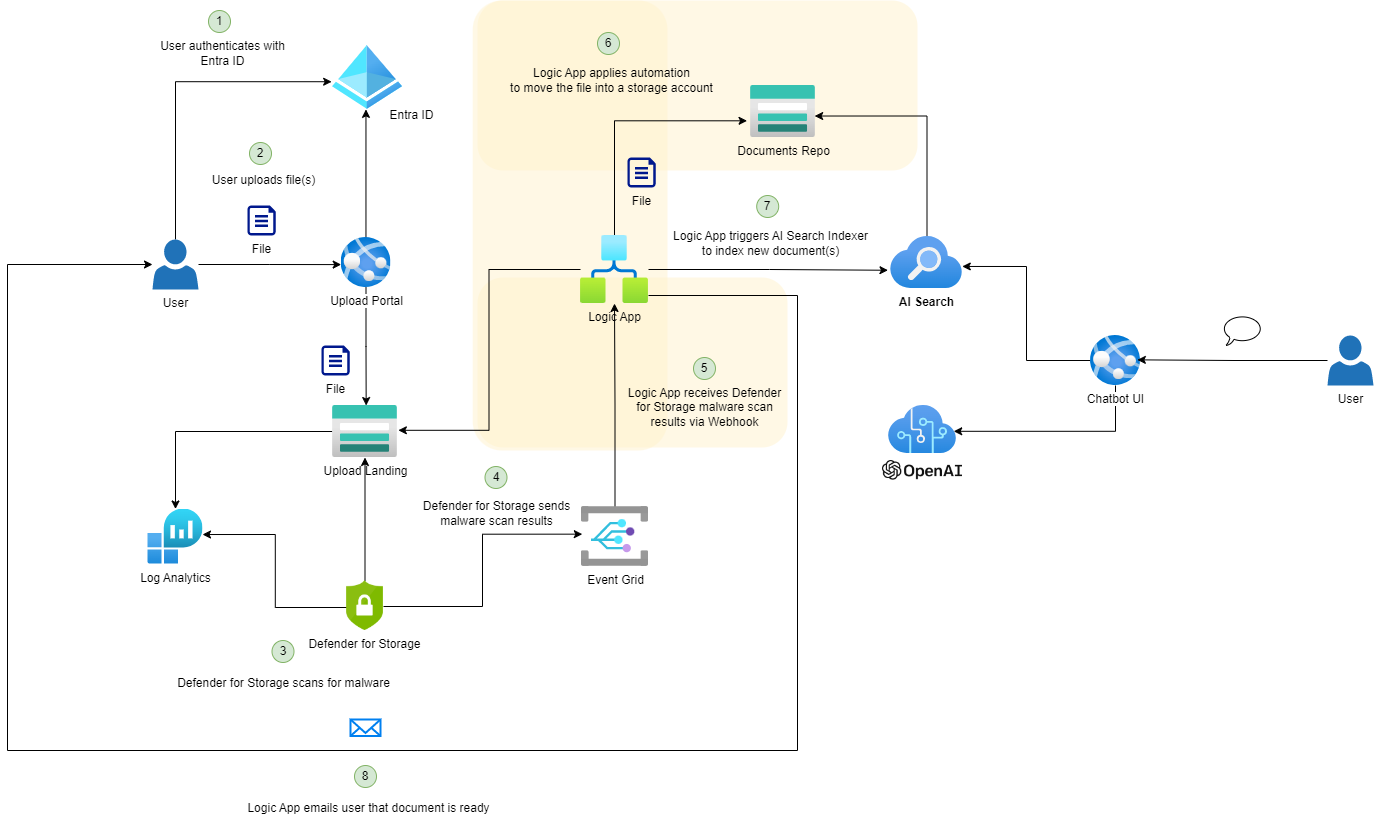
This post serves to continue demonstrated how a Logic App can be used to process Defender for Storage malware scan results published by an Event Grid for files uploaded to a Storage Account. The diagram below highlights the components this blog post will walkthrough.
The instructions provided in this post will be fairly long so I’ll be breaking it up into steps.
Step #1 – Turn on System Managed Identity for the Logic App
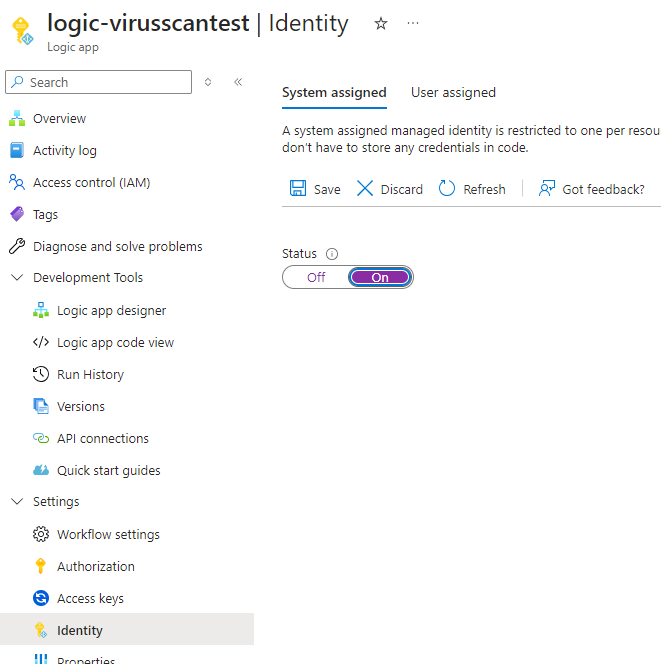
Having confirmed that the Logic App is triggered after the Defender for Storage has completed the scanning of the file, the next step is to build the flow to parse the body of the event details and action accordingly. Begin by turning on the System assigned identity so we can use the Logic App’s identity to access other resources:
Step #2 – Retrieve Defender for Storage scan results
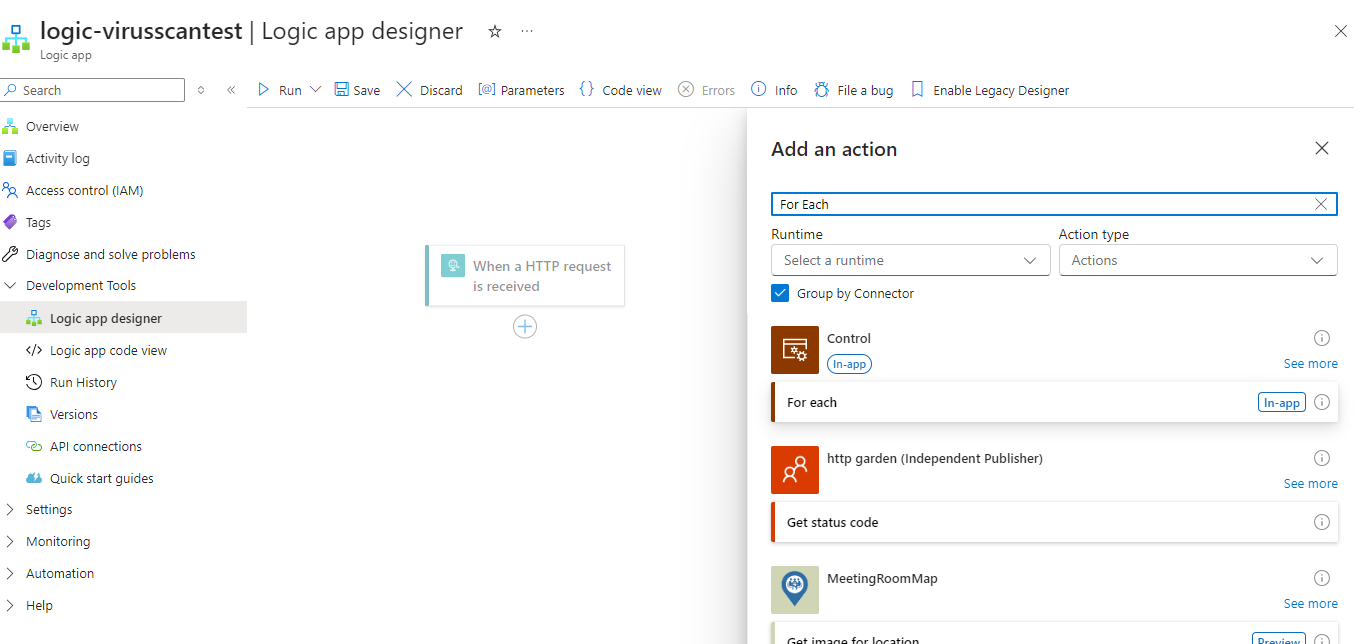
Being building out the flow by adding a For each action after the When a HTTP request is received trigger:
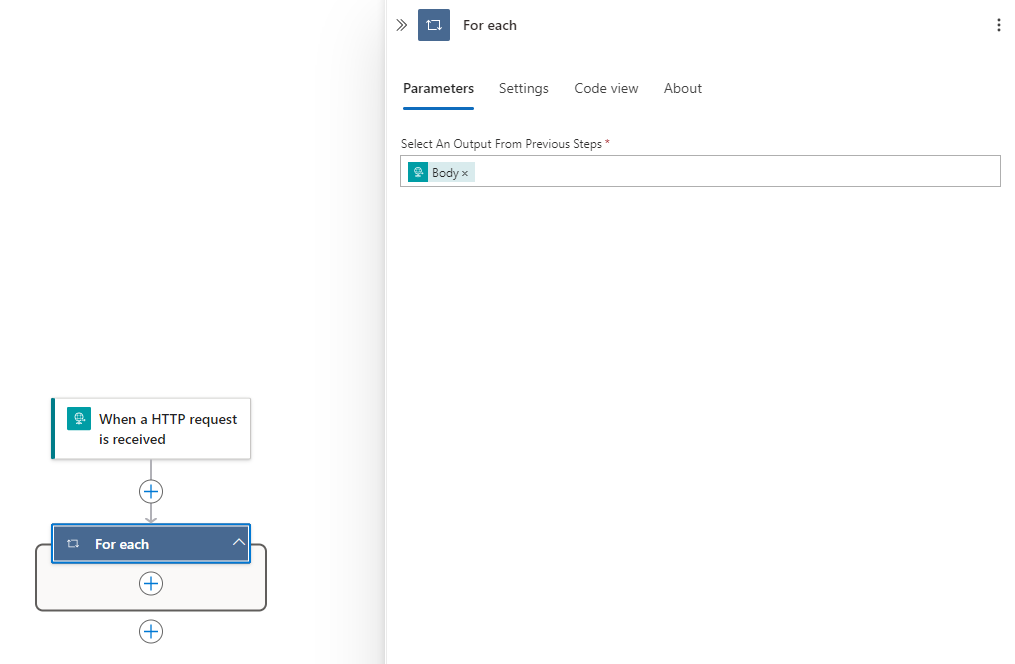
Then specify the Body of the trigger in the Select An Output From Previous Steps field:
To recap, here is a body of a file that was found to contain malicious content:
[
{
“id”: “ec667a90-0000-4948-accd-6b237adceb3a”,
“subject”: “storageAccounts/contosotest001/containers/uploads/blobs/Test-Defender03.txt”,
“data”: {
“correlationId”: “ec667a90-0359-4948-accd-6b237adceb3a”,
“blobUri”: “https://contosotest001.blob.core.windows.net/uploads/Test-Defender03.txt”,
“eTag”: “0x8DCE730957D80DE”,
“scanFinishedTimeUtc”: “2024-10-08T00:31:46.0127867Z”,
“scanResultType”: “Malicious”,
“scanResultDetails”: {
“malwareNamesFound”: [
“Virus:DOS/EICAR_Test_File”
],
“sha256”: “275A021BBFB6489E54D471899F7DB9D1663FC695EC2FE2A2C4538AABF651FD0F”
}
},
“eventType”: “Microsoft.Security.MalwareScanningResult”,
“dataVersion”: “1.0”,
“metadataVersion”: “1”,
“eventTime”: “2024-10-08T00:31:46.0143056Z”,
“topic”: “/subscriptions/5be8ba9b-0000-49d3-000-c0a99632cdc3/resourceGroups/rg-dev-test/providers/Microsoft.EventGrid/topics/test-eventgrid-topic”
}
]
Here is the body of a file that was scanned and determined there were no threats:
[
{
“id”: “0b582354-8626-459b-92c0-58bc84aacf9d”,
“subject”: “storageAccounts/contosotest001/containers/uploads/blobs/Test-Defender02.txt”,
“data”: {
“correlationId”: “0b582354-8626-459b-92c0-58bc84aacf9d”,
“blobUri”: “https://contosotest001.blob.core.windows.net/uploads/Test-Defender02.txt”,
“eTag”: “0x8DCE73009331803”,
“scanFinishedTimeUtc”: “2024-10-08T00:27:48.6998418Z”,
“scanResultType”: “No threats found”,
“scanResultDetails”: null
},
“eventType”: “Microsoft.Security.MalwareScanningResult”,
“dataVersion”: “1.0”,
“metadataVersion”: “1”,
“eventTime”: “2024-10-08T00:27:48.7003571Z”,
“topic”: “/subscriptions/5be8ba9b-000-49d3-806f-c0a99632cdc3/resourceGroups/rg-dev-test/providers/Microsoft.EventGrid/topics/test-eventgrid-topic”
}
]
The key value pair that allows us to identify whether the file had malicious content or not is stored in:
scanResultType: <Result>
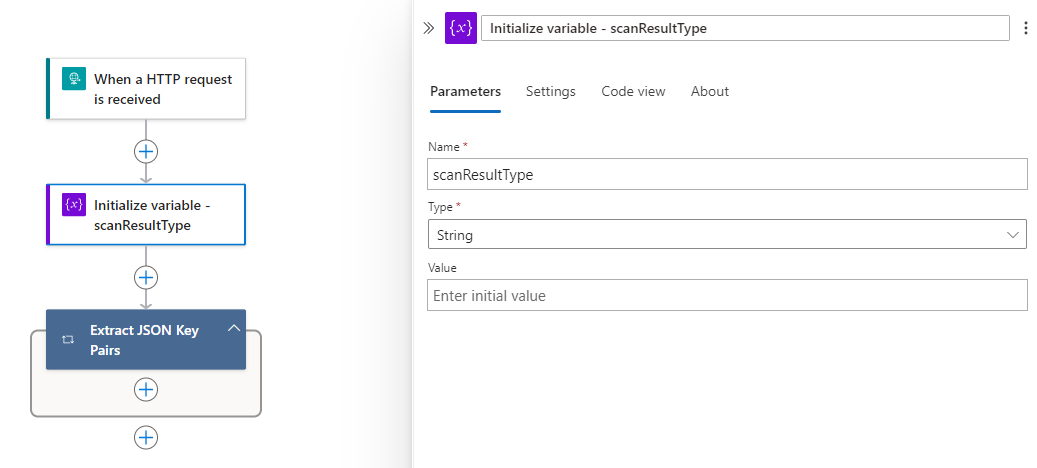
We want to extract this value and store it in a variable so we can use an Condition to handle files that are clean or malicious. To do this, proceed by creating a variable to store the result just before the For Each:
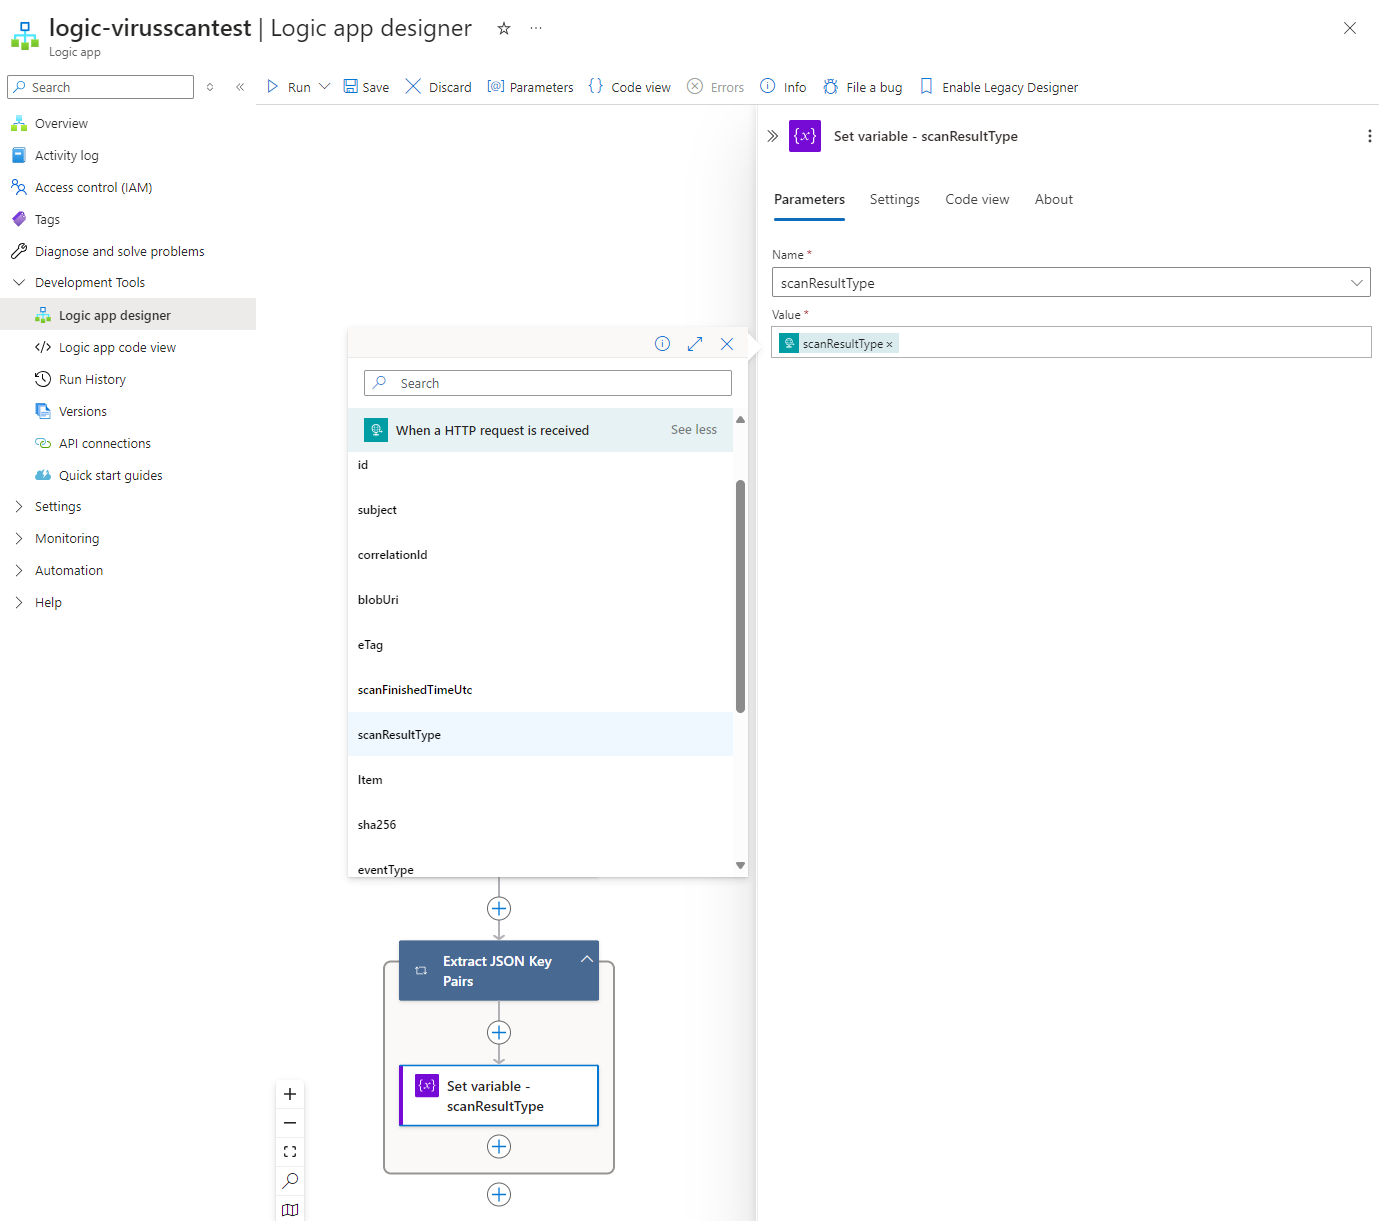
Then set the variable with the scanResultType from the When a HTTP request is received trigger (make sure you click on See more (14)) after the For Each condition:
The other values in the body that we could use and will capture are:
- scanFnishedTimeUtc – when the scan of the file finished
- subject – the storage account path
- blobUri – the FQDN path of the blob scanned
- malwareNamesFound – the malware type found
- sha265 – the hash of the scanned file
- eventTime – the time of the generated event (this timestamp is after the scanFinishedTimeUtc)
The full description of each can be found here in the Microsoft document: https://learn.microsoft.com/en-us/azure/defender-for-cloud/defender-for-storage-configure-malware-scan#event-message-structure
Here is a copy and paste:
- id: A unique identifier for the event.
- subject: A string that describes the resource path of the scanned blob (file) in the storage account.
- data: A JSON object that contains additional information about the event:
- correlationId: A unique identifier that can be used to correlate multiple events related to the same scan.
- blobUri: The URI of the scanned blob (file) in the storage account.
- eTag: The ETag of the scanned blob (file).
- scanFinishedTimeUtc: The UTC timestamp when the scan was completed.
- scanResultType: The result of the scan, for example, “Malicious” or “No threats found”.
- scanResultDetails: A JSON object containing details about the scan result:
- malwareNamesFound: An array of malware names found in the scanned file.
- sha256: The SHA-256 hash of the scanned file.
- eventType: A string that indicates the type of event, in this case, “Microsoft.Security.MalwareScanningResult”.
- dataVersion: The version number of the data schema.
- metadataVersion: The version number of the metadata schema.
- eventTime: The UTC timestamp when the event was generated.
- topic: The resource path of the Event Grid topic that the event belongs to.
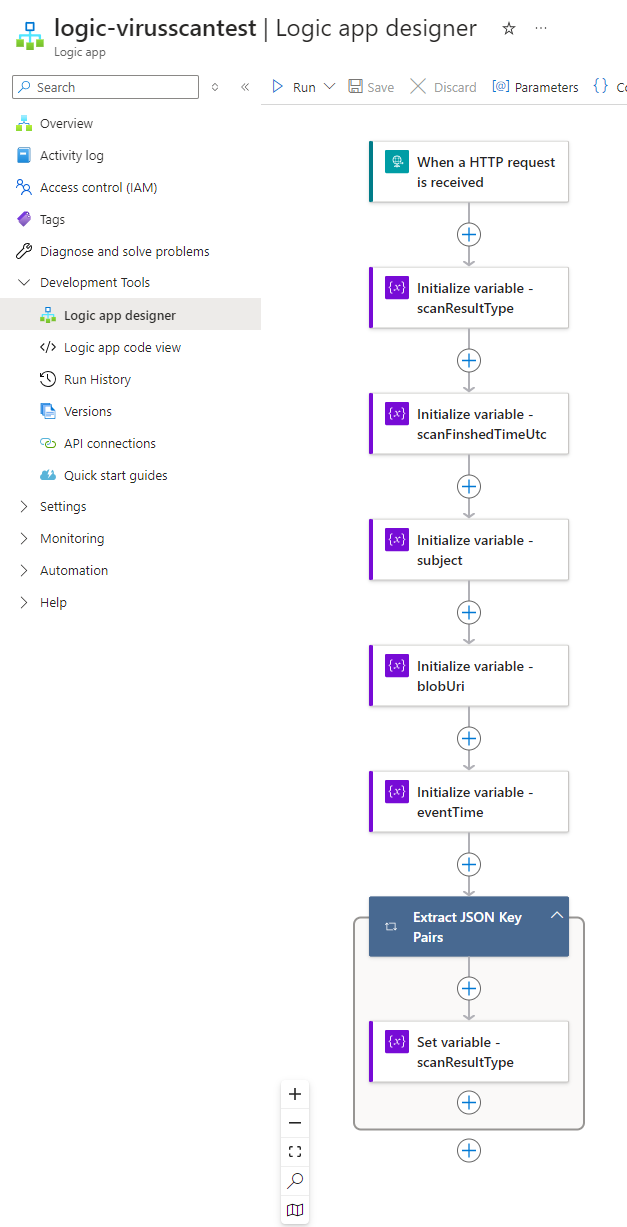
There are values that we’ll be using whether or not the scanned file is malicious and non-malicious so let’s initialize the variables to store the values before the For Each:
- scanFinishedTimeUtc – when the scan of the file finished
- subject – the storage account path
- blobUri – the FQDN path of the blob scanned
- eventTime – the time of the generated event (this timestamp is after the scanFinishedTimeUtc)
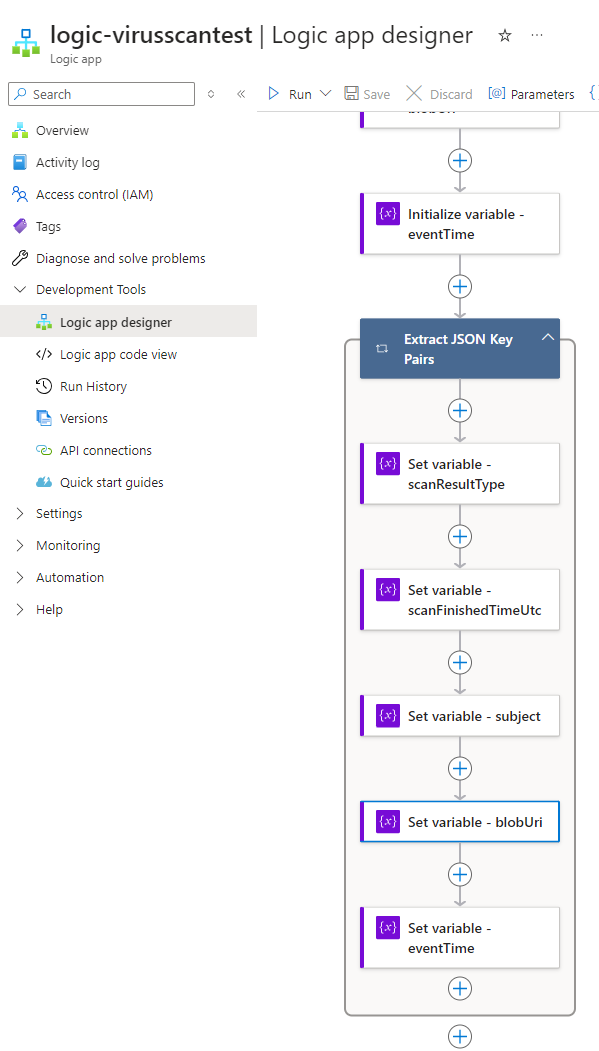
We’ll then set these variables in the For Each condition:
Step #3 – Forking the tree to handle non-malicious and malicious files
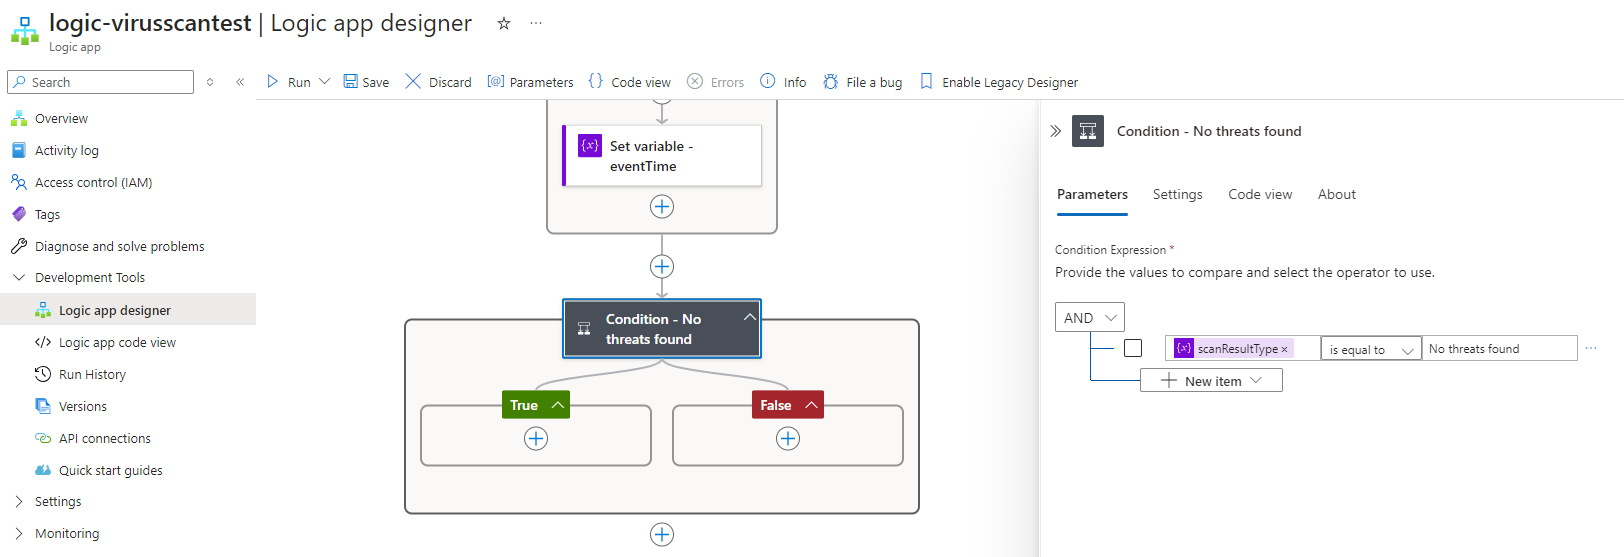
Now that we have the values stored, we’ll proceed to use a Condition action to handle malicious and non-malicious files. Create a condition and use the scanResultType variable with is equal to set to No threats found so if the file is clean, then it would land on the true branch, any other result will land on the false branch:
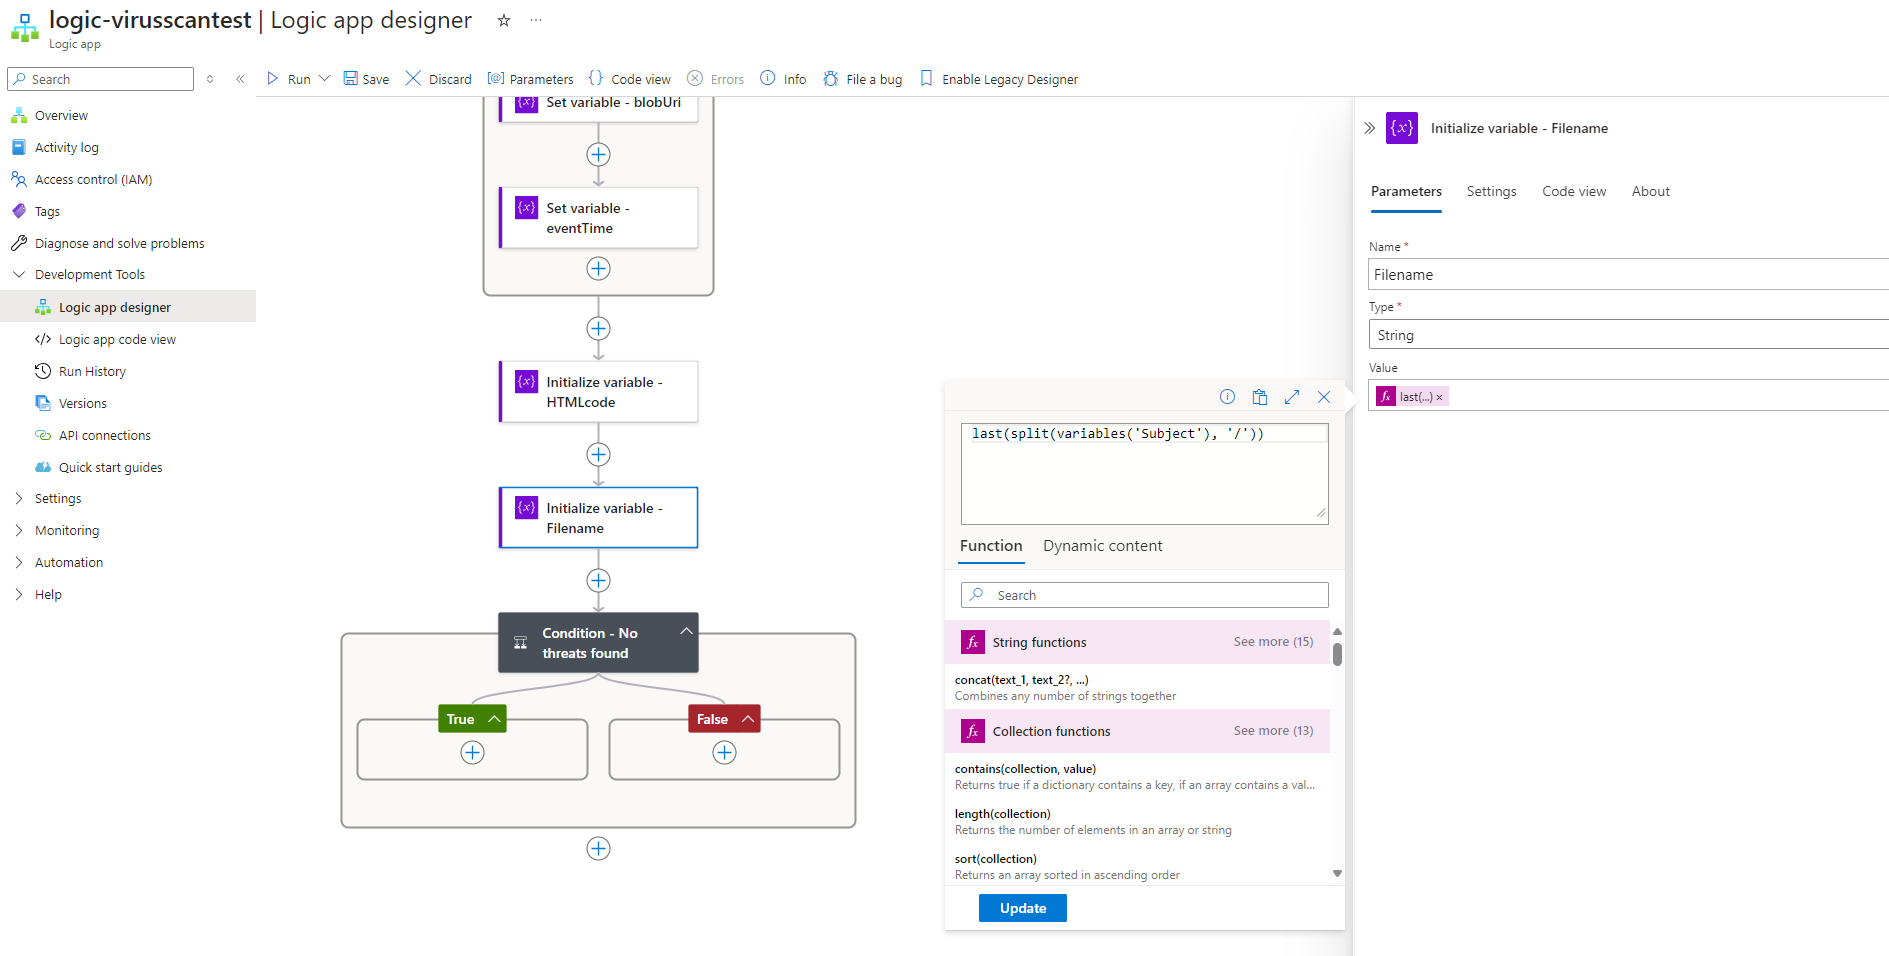
Before proceeding to the true/false branch, we’ll also need to extract the file name from the data. Whether we use the subject or blobUri would be the same as the function we’ll be using is to extract the text after the last “/”:
I will also be using HTML code to format the email notification to be sent out so there is an additional variable named HTMLcode string initialized without a value as we’ll be populating it later. These are also placed outside of the Condition action because we would need to use them for both true and false branches.
Step #4 – True Branch – No threats found
In the event where there are no threats found, we’ll proceed to:
- Check whether the file that was uploaded exists in the destination Storage Account (we’ll overwrite the file but if it we are overwriting the file then we will include a note in the report)
- Copy (there is no move) the file to the storage account that is index by AI Search so the new content can be RAG-ed with the OpenAI model
- Trigger the AI Search indexer
- Wait until the indexing has completed
- Then send a report out to the user who uploaded the file.
Before we proceed to add actions to the Logic App, we’ll first need to grant the Logic App’s managed identity Storage Blob Data Contributor (Allows for read, write and delete access to Azure Storage blob containers and data) to the storage account storing the file uploads and the target storage account that AI Search is indexing. This will allow the Logic App the access it needs to copy, delete, and write data to both Storage Accounts. Navigate to the Access Control (IAM) blade for both accounts and grant the managed identity access.
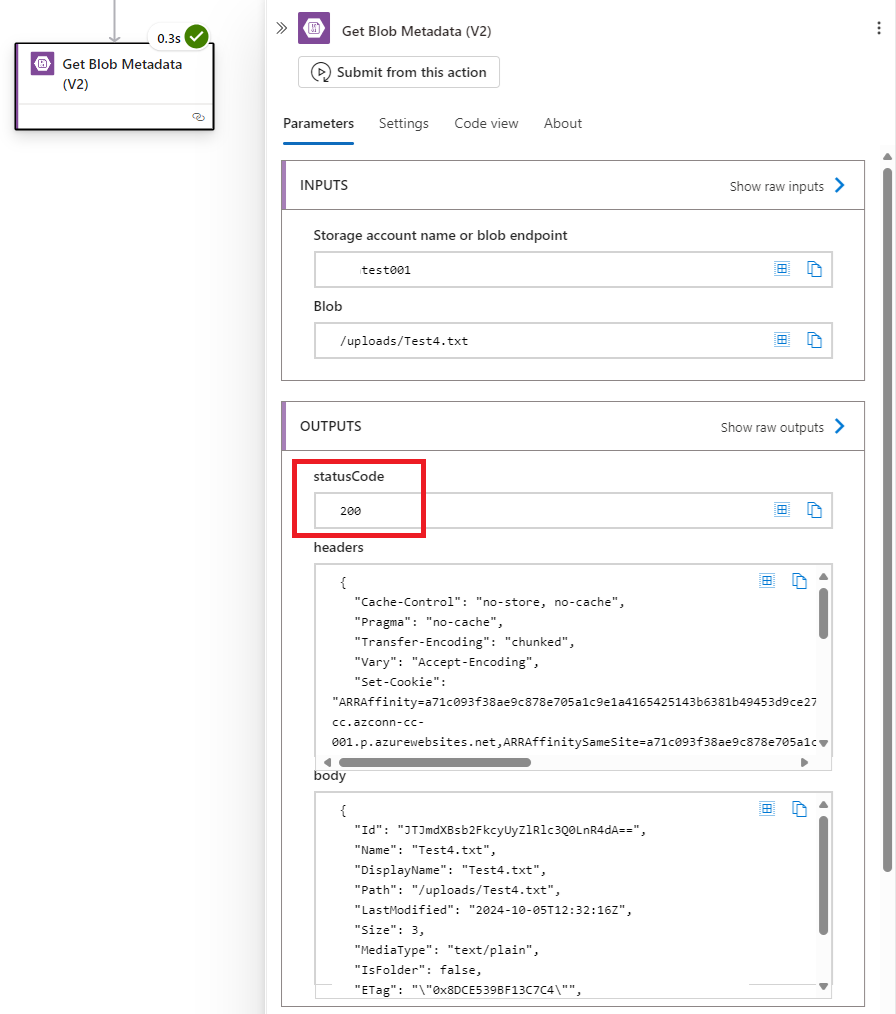
With the permissions configured, let’s set up the action to test whether the file exists in the target Storage Account. There are many ways to do this and one of the ways I do not suggest is loop through the files looking for the name as it won’t scale well. The way I typically do this is use the Get Blob Metadata (V2) to look for the file and use the statusCode from the Outputs to determine whether the file exists. If the file exists, it will return a statusCode of 200:
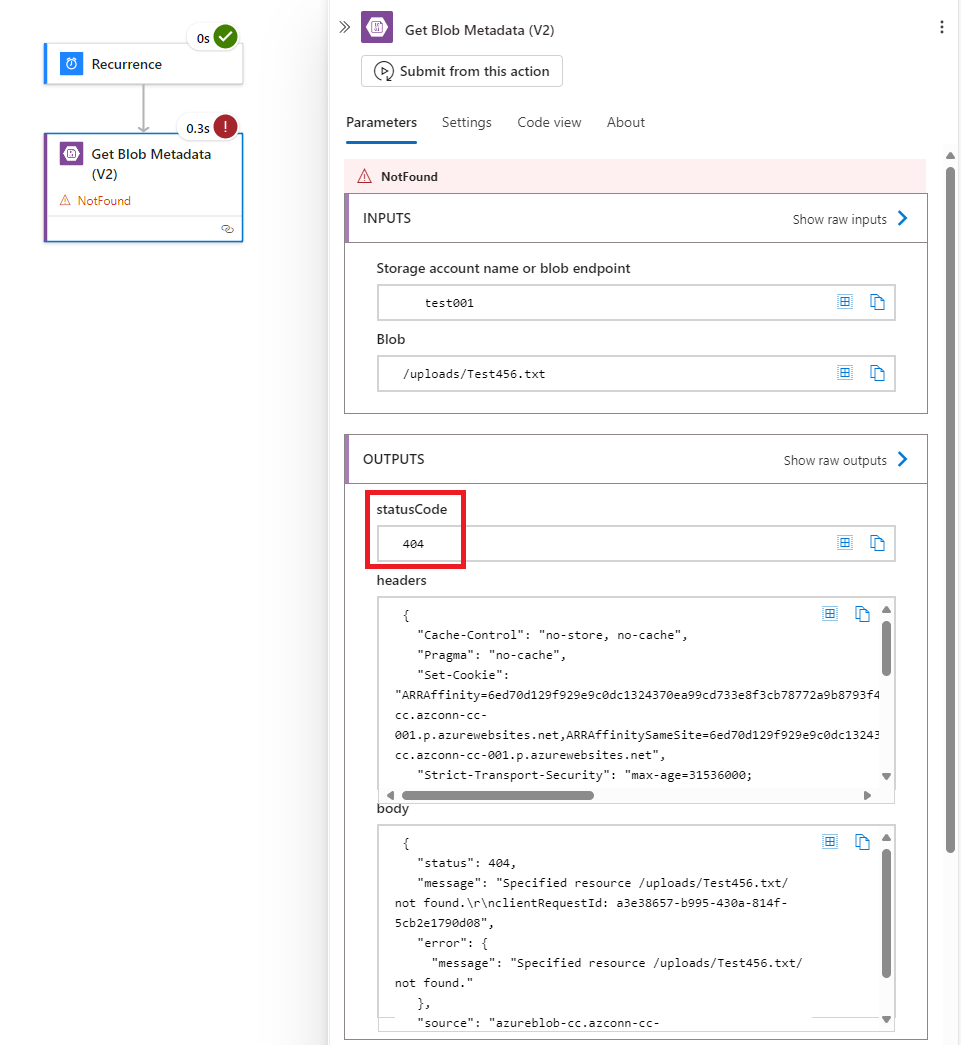
…. if it doesn’t, it will be 404:
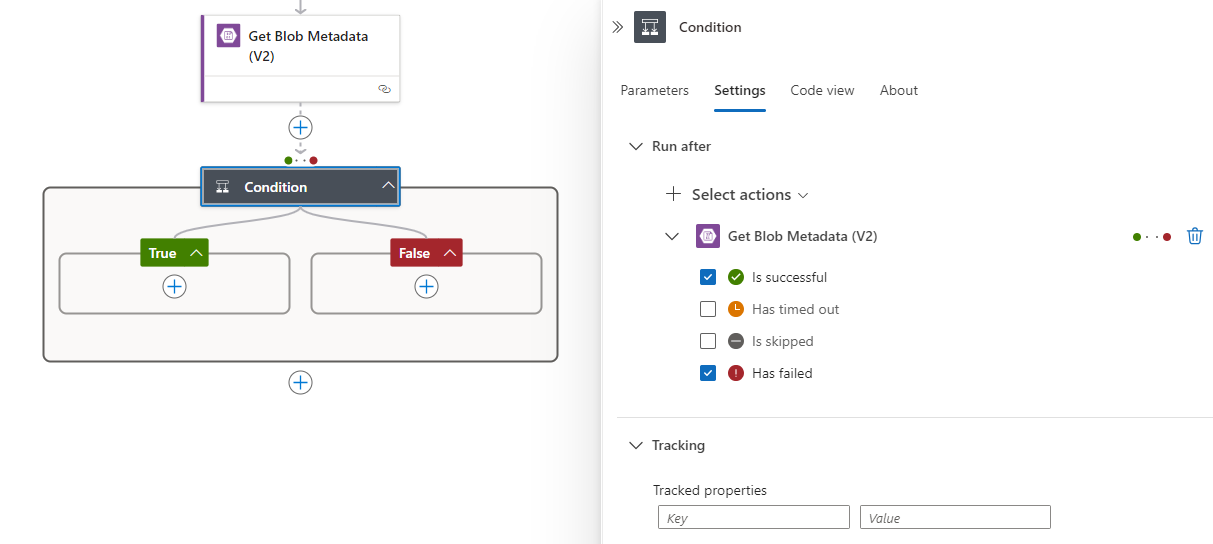
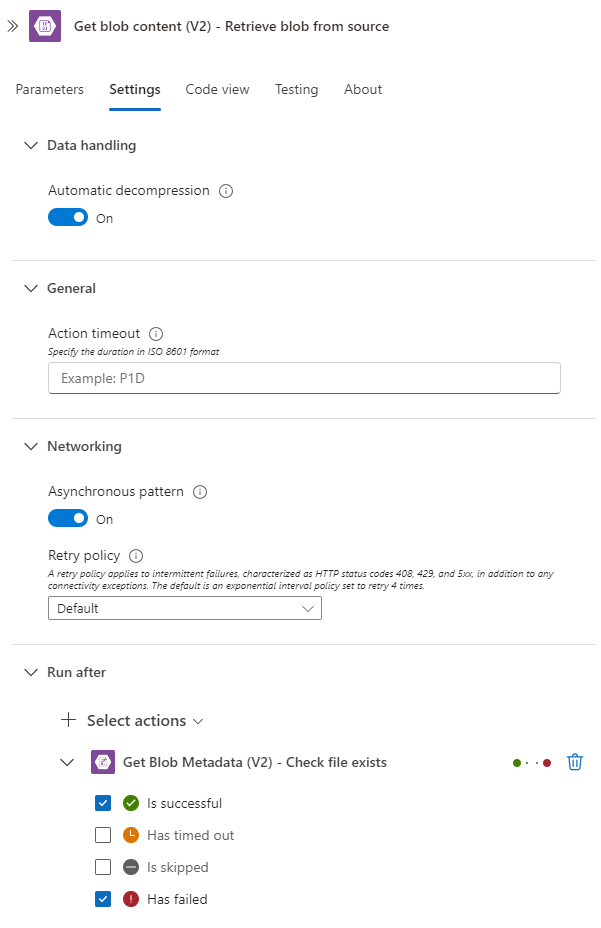
Note that a 200 will allow the automation flow to continue but 404 would stop so the following action, using a Condition action as an example, it would need to be configured to Run after with Is Successful (default) as well as Has failed:
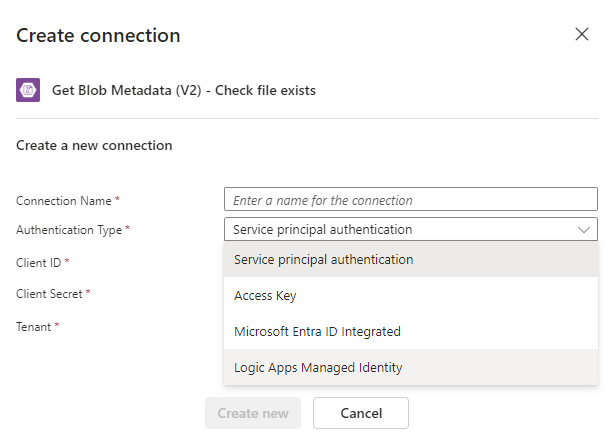
Let’s proceed to create this action by adding a Get Blob Metadata (V2) action. You will be prompted to create a new Connection representing the Logic App out to blob resources. Select Logic Apps Managed Identity and provide a name:
This connection can be found under API Connection after its creation:
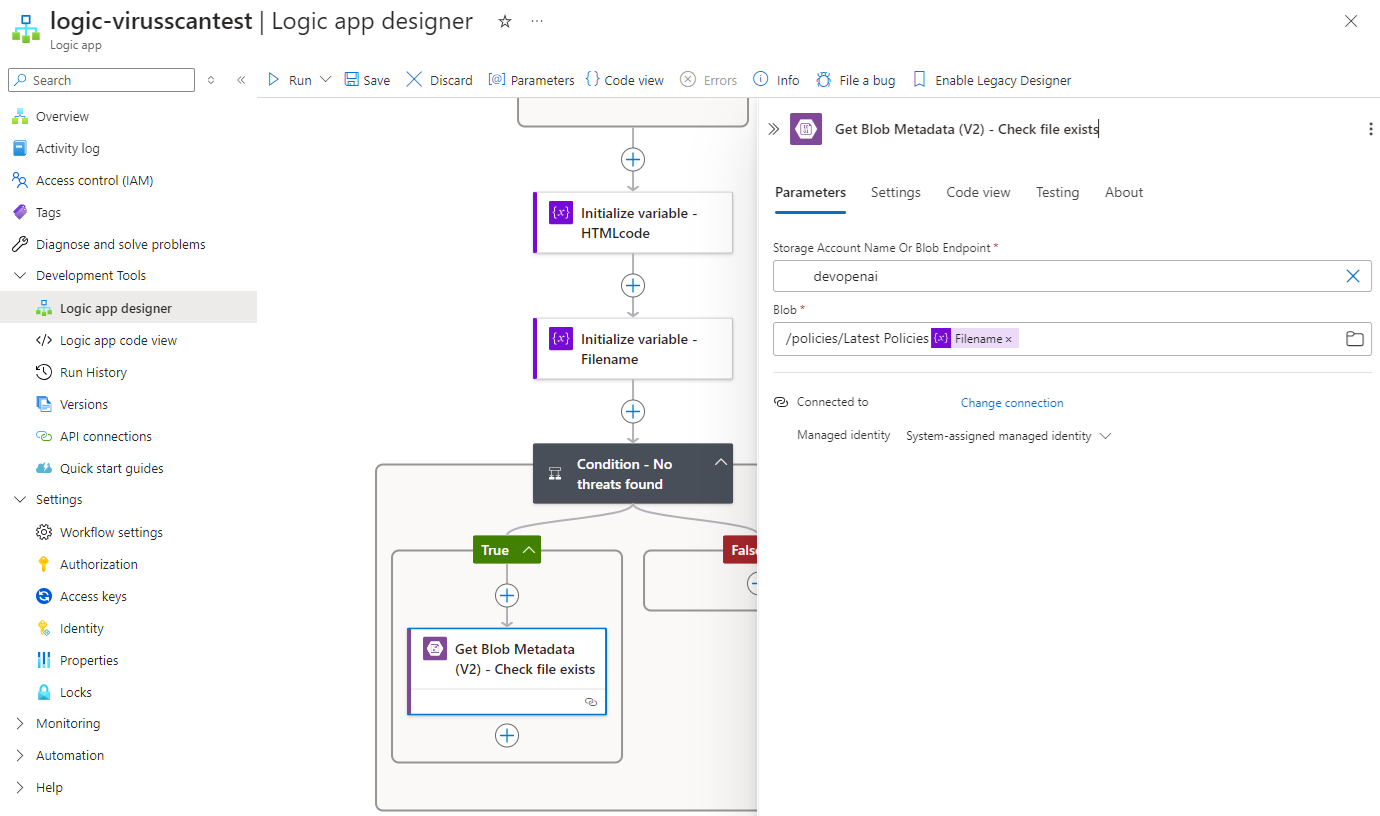
Proceed to configure the target Storage Account properties to test whether the file exists:
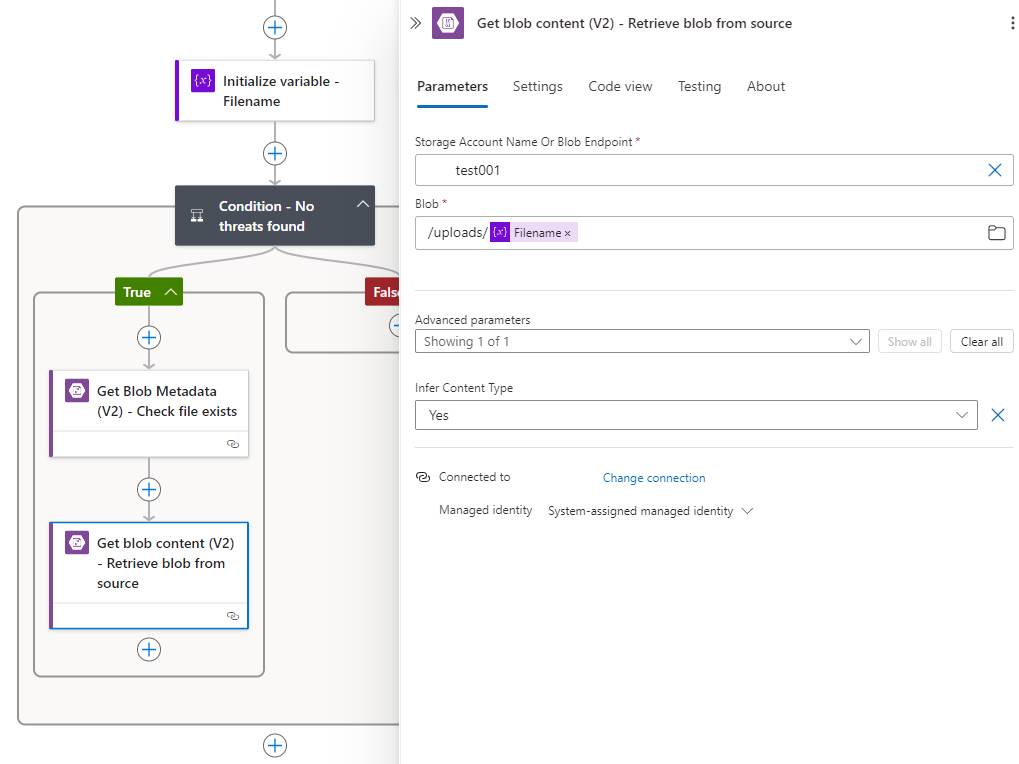
Now that we’ve attempted to retrieve the file properties in the destination storage account, we can proceed to copy the file over to the destination. Note that Azure Blob Storage – Copy blob (V2) only allows the copying of the blob from a accessible Url to the storage account so the way to copy the blob to another storage account is to use the Get blob content (V2):
Configure Get blob content (V2) to run even if Get Blob Metadata (V2) fails to find the file (Has failed):
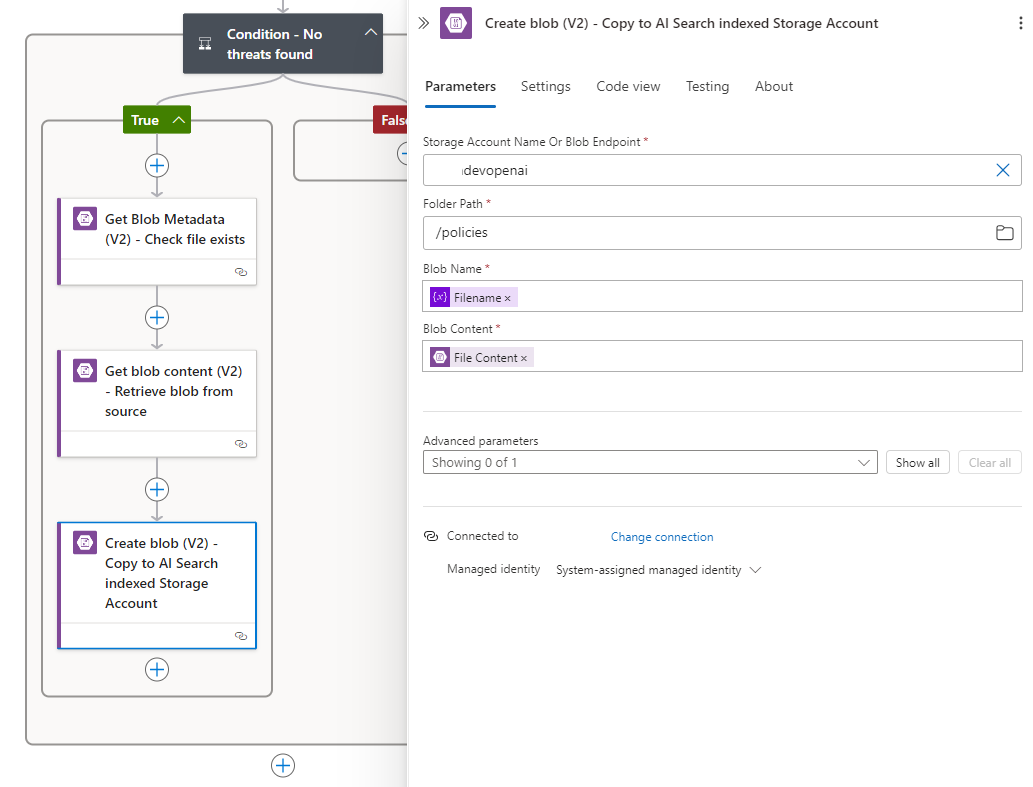
… and the Create blob (V2) to create it in the destination storage account:
Blob Content: This is file content from the Get blob content (V2):
My next post will demonstrate how to add the actions to trigger the AI Search Indexer to run.
Step #4 – False Branch – Threats found
Let’s now move to branch that handles files that have a threat detected by Defender for Storage. The flow of this branch will be the following:
- Copy the file to a quarantine container on the storage account for further investigation
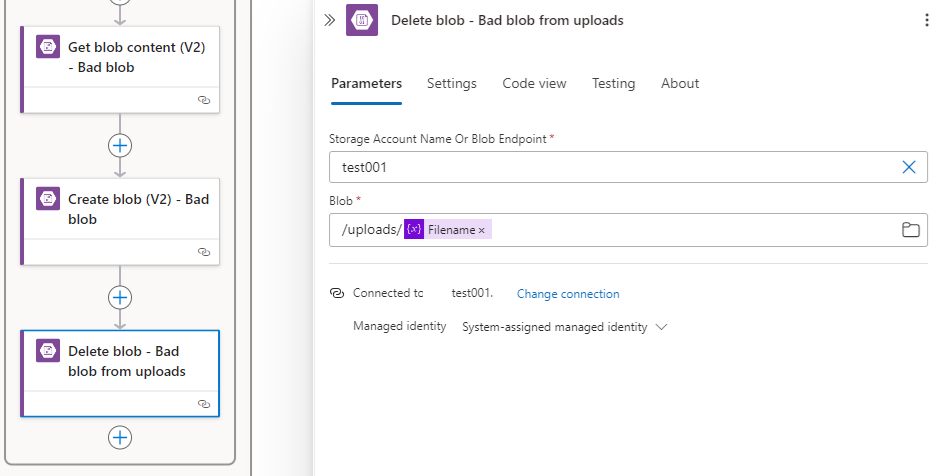
- Delete the file from the uploads folder
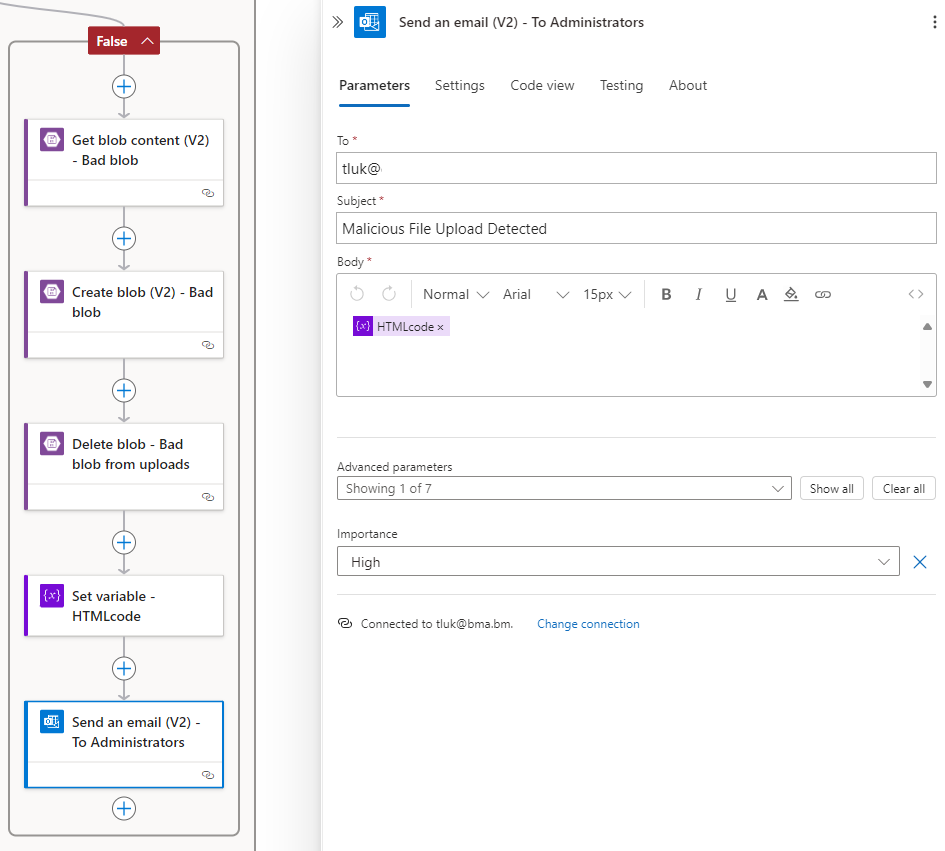
- A report will be sent out to the user who uploaded the file and the administration team.
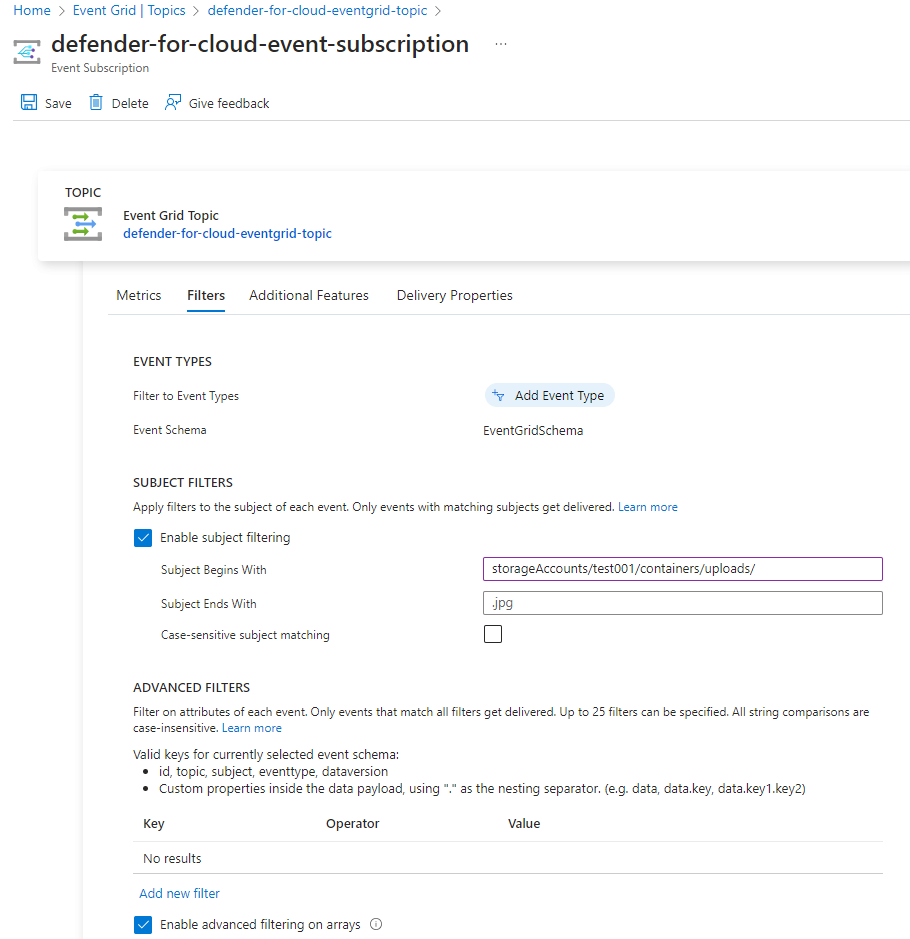
The first item that I need to address is that if we simply add logic to copy the malicious blob to another container then the Logic App automation would trigger again. To correct this, we can use the Subject Begins With filter to only capture events for the specific uploads container:
Note that I’ve tried but unable to use the filter described here:
Filtering events
https://learn.microsoft.com/en-us/azure/storage/blobs/storage-blob-event-overview#filtering-events
The document suggests to use the format: /blobServices/default/containers/containername/ but it did not work for me.
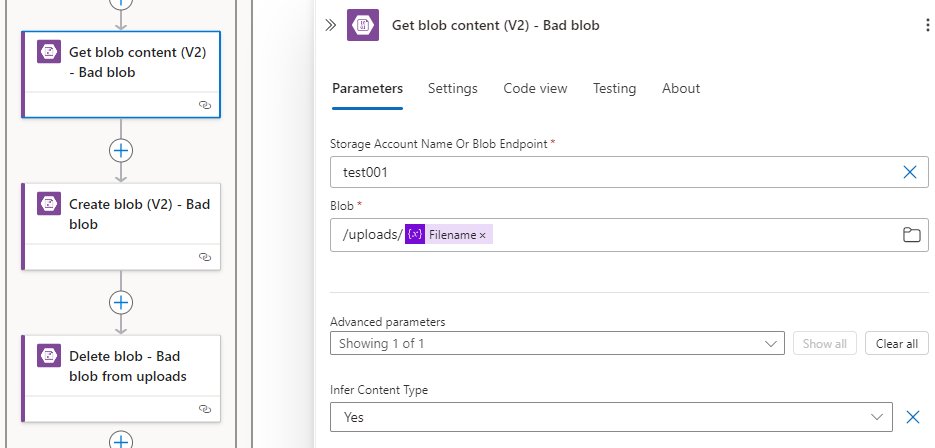
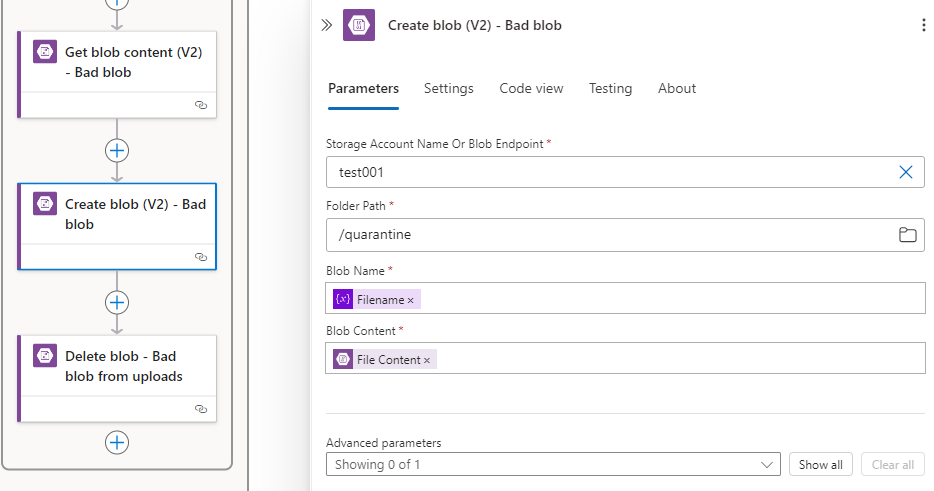
Now that we’ve filtered out events outside of the uploads container, we can proceed to configure the same Get blob content (V2) and then the Create blob (V2) to create it in the destination container:
Get blob content (V2)
Create blob (V2)
Delete blob
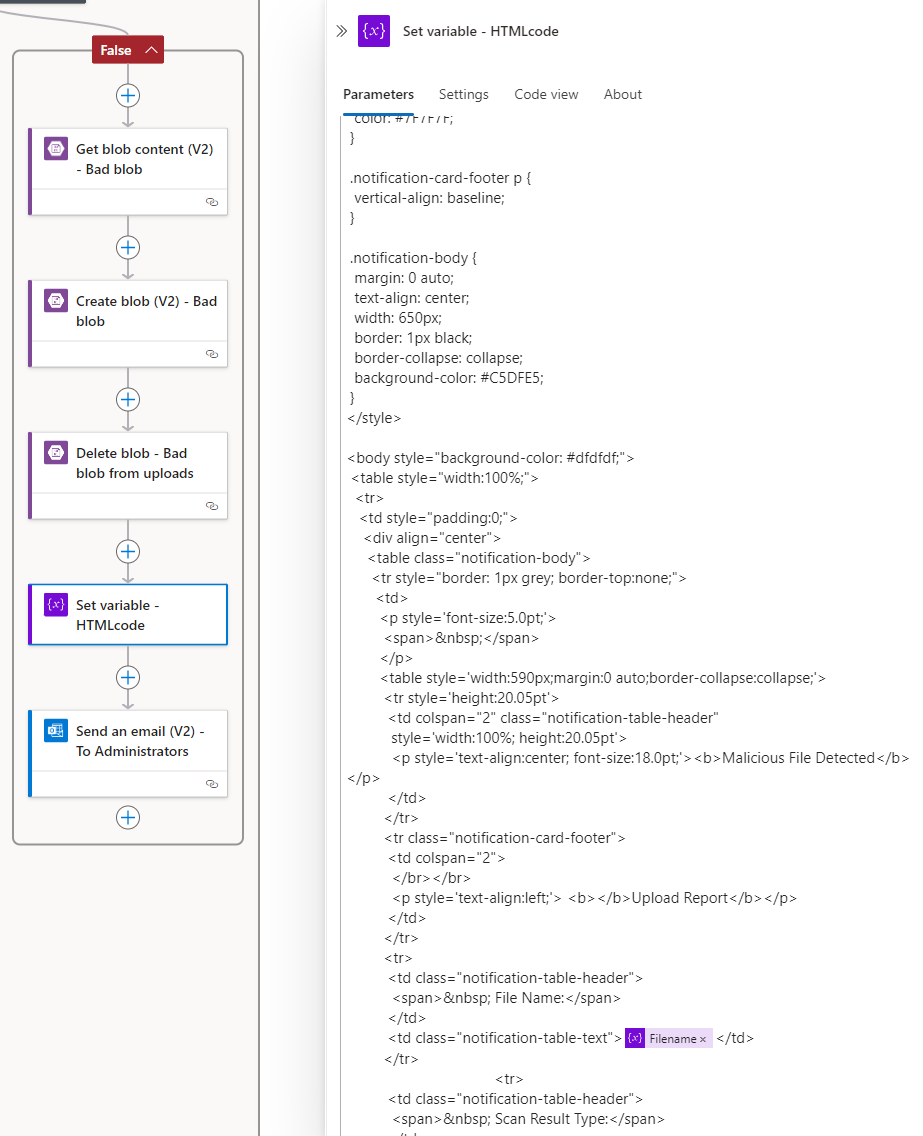
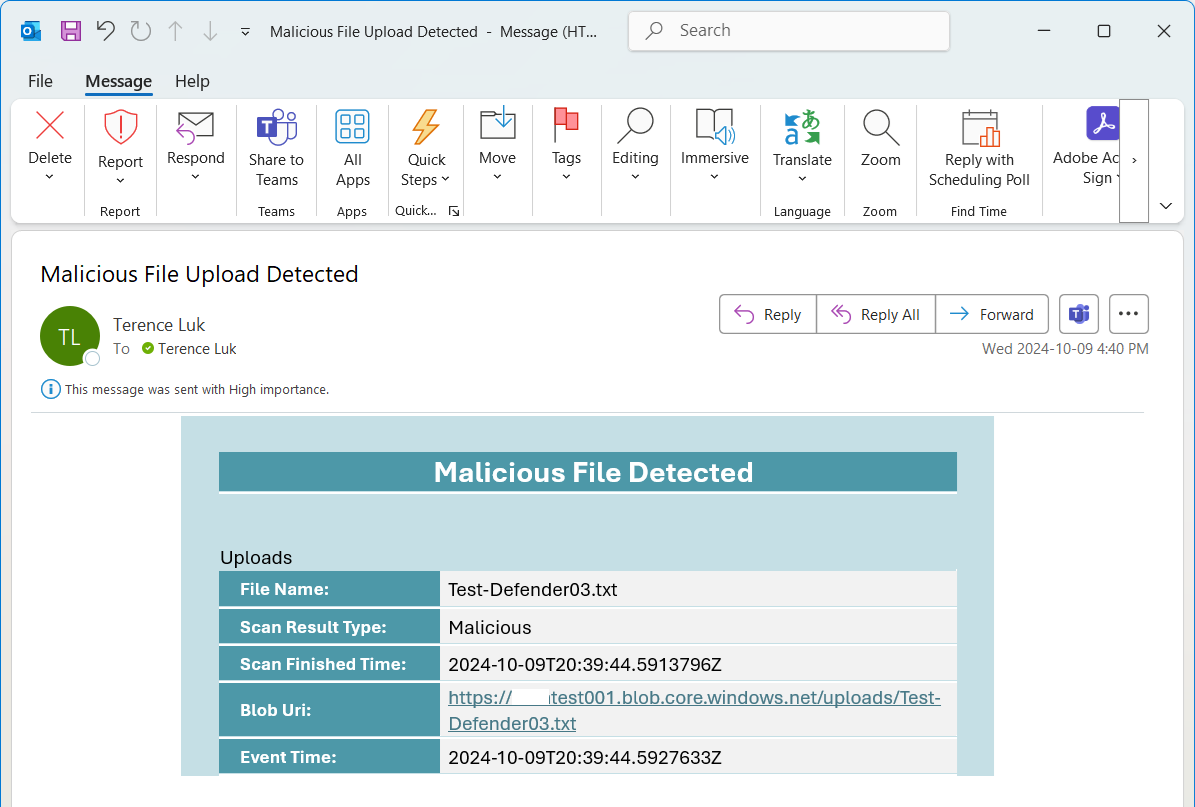
The last step is to create the HTML body for the email notification to be sent out, then send create an action to send the email out. We’ll be using the following template: https://github.com/terenceluk/Microsoft-365/blob/main/HTML/Malicious-File-Upload-Email-Notification.html
Action to send the email out.
Email notification sample:
I will be following up with the last post where I will trigger the Azure AI Search Indexer to index files that are uploaded to the storage account.

