I’ve been spending most of my weekends playing around with Azure’s OpenAI service and two of the personal projects I’ve been working on are:
- How can I secure access to OpenAI’s API access so control can be applied to what and who can make API calls to it
- How can I capture identity details for the application or user making the API call if we are to secure access with OAuth
This post will focus on item #1 while I get the notes I’ve captured for #2 organized and written as a blog post.
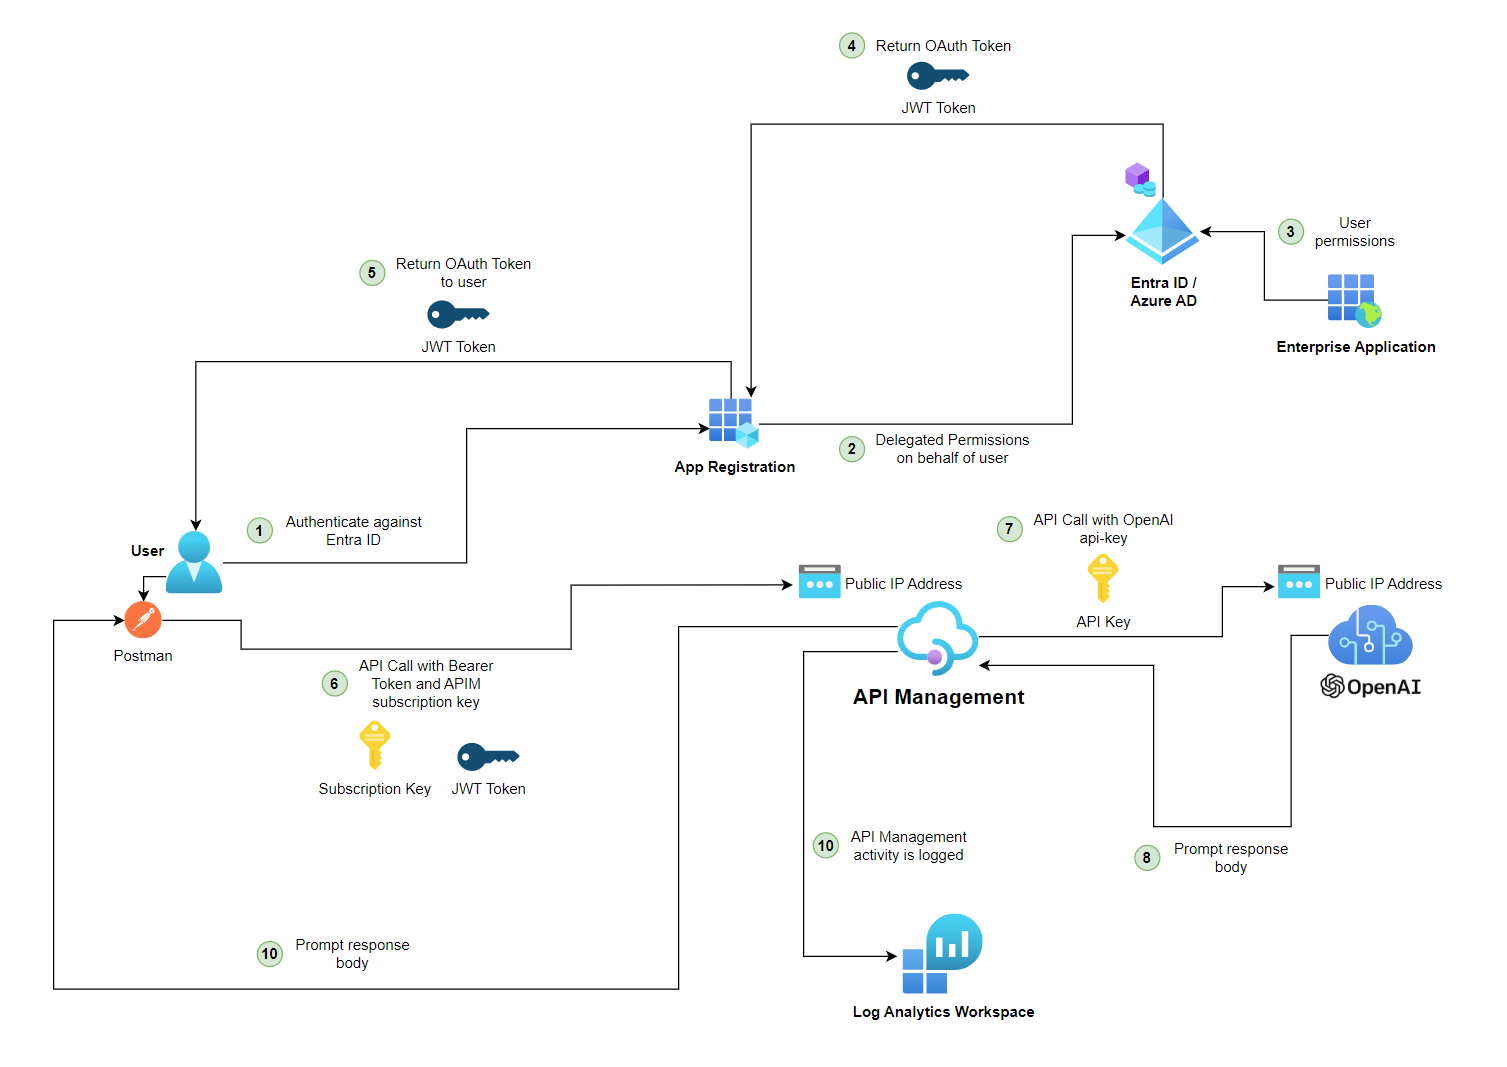
A common method I’ve found to provide the type of security for #1 is through leveraging the API Management service so I gave this pattern a shot over the weekend to test using an Azure API Management to only allow specified Azure AD users to call the Azure OpenAI API. The following is a high level architecture diagram and the flow of the traffic:
Setup Azure API Management to publish Azure OpenAI
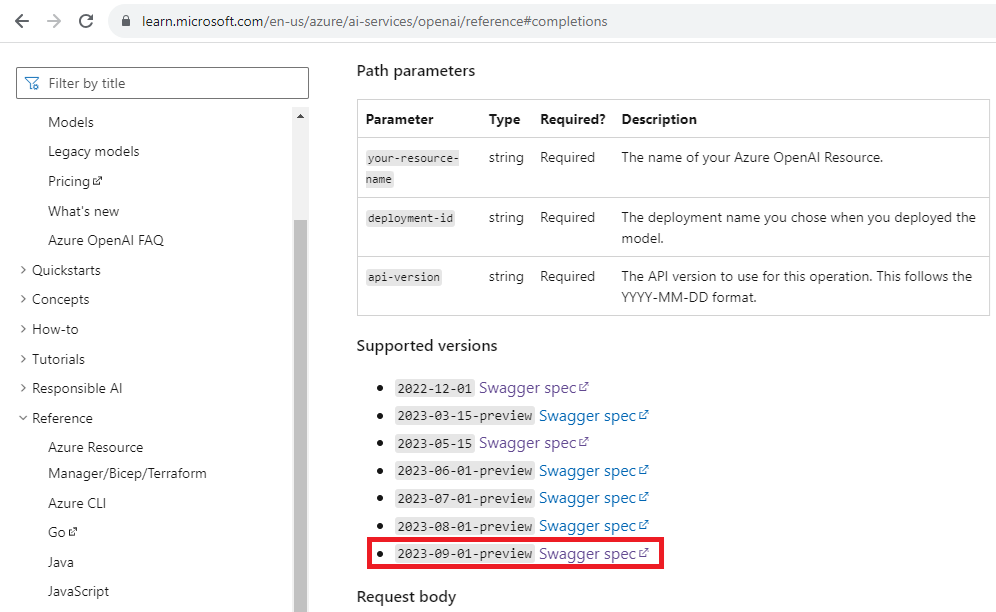
Begin by downloading the latest Azure OpenAI inference.json from the following Microsoft documentation: https://learn.microsoft.com/en-us/azure/ai-services/openai/reference#completions
For the purpose of this example, I will use the latest 2023-09-01-preview: https://github.com/Azure/azure-rest-api-specs/blob/main/specification/cognitiveservices/data-plane/AzureOpenAI/inference/preview/2023-09-01-preview/inference.json
Once downloaded, open the JSON file and edit the following two lines:
Use the name of the OpenAI instance to replace {endpoint}:
“url”: “dev-openai/openai”,
Use the full endpoint value:
“default”: https://dev-openai.openai.azure.com/
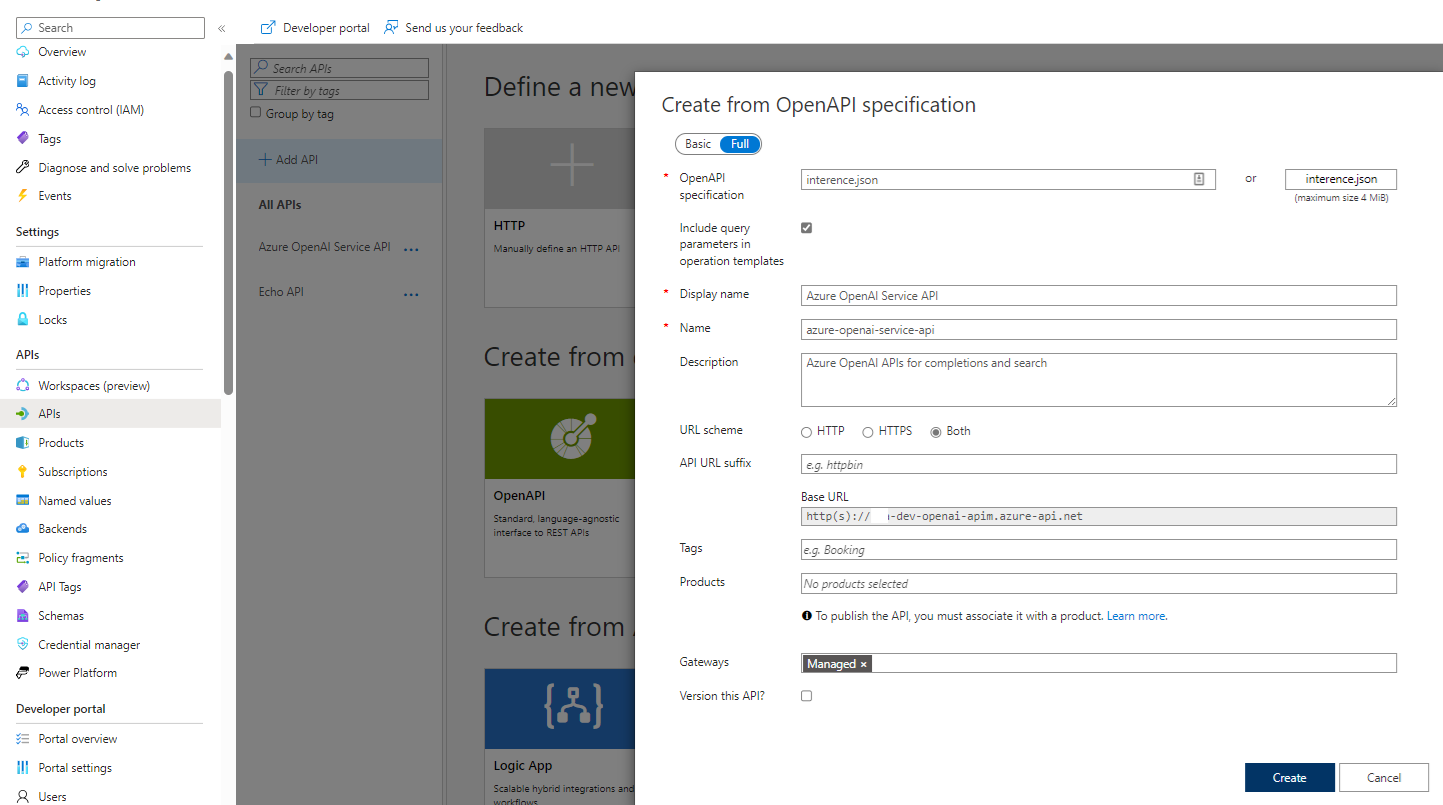
With the JSON file prepared, proceed to deploy an Azure API Management resource with the SKU of choice, select the APIs blade, Add API and select OpenAPI:
Select Full and import the inference.json file that will automatically populate the fields, proceed to create the API:
Turn on the System Assigned Managed for the APIM:
We’ll need to allow the APIM to call Azure OpenAI with the API key:
… and the best way to store the key is through a KeyVault so I’ve created a secret with the API key in a KeyVault:
As well as granted the APIM managed system identity Key Vault Secrets User permissions to access the key:
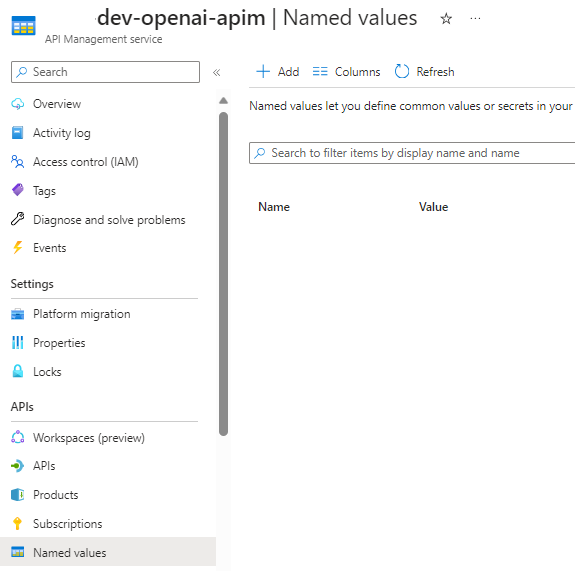
With the KeyVault and OpenAI secret configured proceed to navigate to the APIM Named values blade and Add a new value:
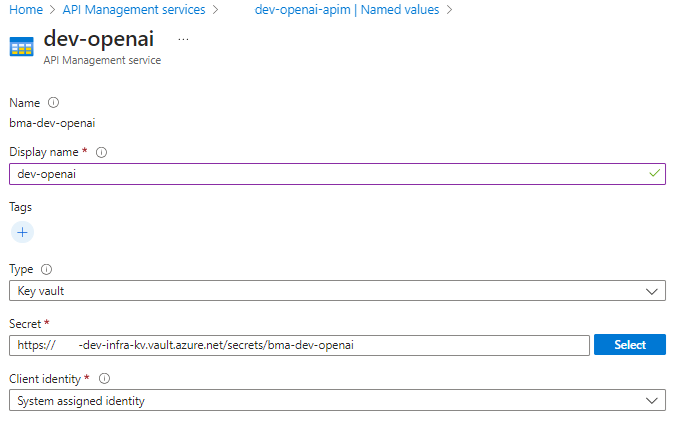
Configure a named value to reference the secret in the KeyVault:
Note the name that you’ve used for the named value as you’ll be using it later on.
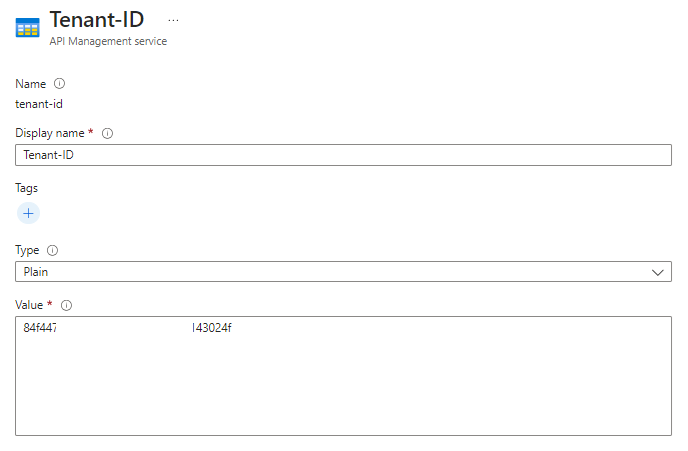
We’ll also be using the tenant ID for another configuration so repeat the same procedure and create a plain value with the tenant ID:
The following named values should be listed:
Proceed by navigating to the APIs blade, Azure OpenAI Service API, All operations, Design tab, and then click on the </> icon under the Inbound processing heading:
We’ll be configuring the following policy for the APIM to send a header with the name api-key and value of the secret we configured in the KeyVault:
GitHub repository: https://github.com/terenceluk/Azure/blob/main/API%20Management/XML/Set-Header-API-Key.xml
<!–
IMPORTANT:
– Policy elements can appear only within the <inbound>, <outbound>, <backend> section elements.
– To apply a policy to the incoming request (before it is forwarded to the backend service), place a corresponding policy element within the <inbound> section element.
– To apply a policy to the outgoing response (before it is sent back to the caller), place a corresponding policy element within the <outbound> section element.
– To add a policy, place the cursor at the desired insertion point and select a policy from the sidebar.
– To remove a policy, delete the corresponding policy statement from the policy document.
– Position the <base> element within a section element to inherit all policies from the corresponding section element in the enclosing scope.
– Remove the <base> element to prevent inheriting policies from the corresponding section element in the enclosing scope.
– Policies are applied in the order of their appearance, from the top down.
– Comments within policy elements are not supported and may disappear. Place your comments between policy elements or at a higher level scope.
–>
<policies>
<inbound>
<base />
<set-header name=”api-key” exists-action=”append”>
<value>{{dev-openai}}</value>
</set-header>
</inbound>
<backend>
<base />
</backend>
<outbound>
<base />
</outbound>
<on-error>
<base />
</on-error>
</policies>
**Note that we use the {{ }} brackets reference the named value as a variable.
Proceed to save the settings.
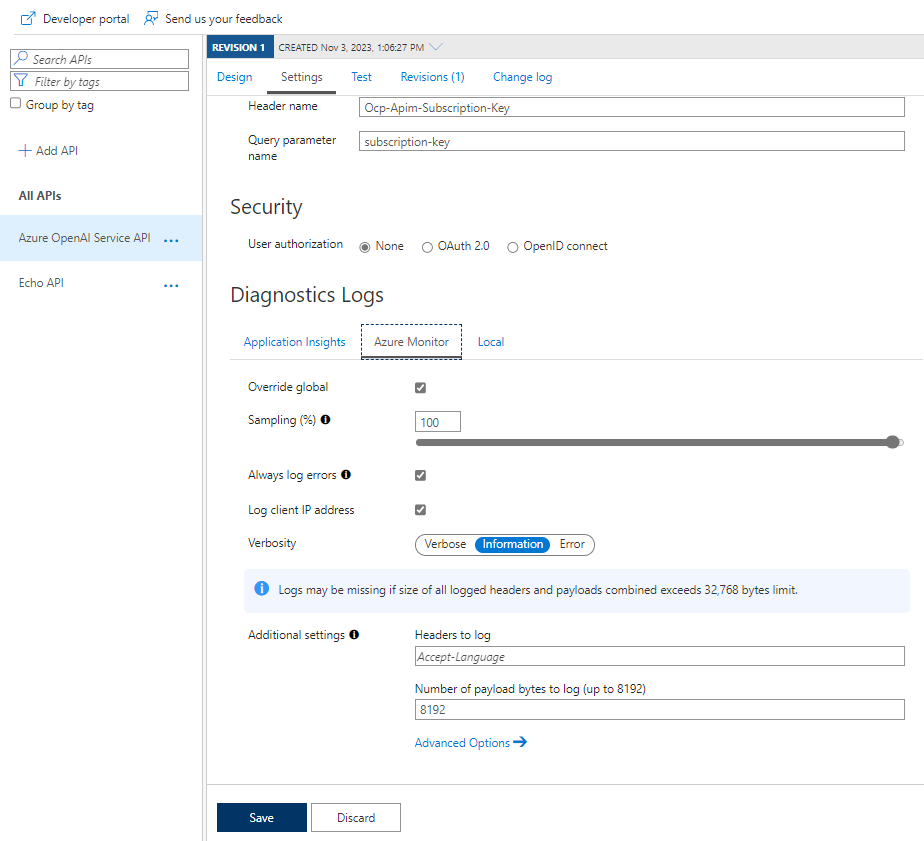
The APIM is now set up for receiving OpenAI API calls but not with the Azure OpenAI api-key, but rather a subscription key for the APIM instance. To retrieve this key, navigate to the APIs blade, Azure OpenAI Service API, Settings tab, and then scroll down to the Subscription heading. Notice that Subscription required is enabled with the Header name and Query parameter name defined. The subscription key can be found in the Subscriptions blade:
API Management Logging Configuration
One last configuration that is important is the Application Insights:
… and Azure Monitor logging:
Ensure that these are enabled so APIM data plane access logs and reports can be created. A few sample reports generated with KQL can be found here: https://github.com/Azure-Samples/openai-python-enterprise-logging
Here are a few sample outputs from 2 KQL queries:
Query to identify token usage by ip and mode
ApiManagementGatewayLogs
| where tolower(OperationId) in (‘completions_create’,’chatcompletions_create’)
| where ResponseCode == ‘200’
| extend modelkey = substring(parse_json(BackendResponseBody)[‘model’], 0, indexof(parse_json(BackendResponseBody)[‘model’], ‘-‘, 0, -1, 2))
| extend model = tostring(parse_json(BackendResponseBody)[‘model’])
| extend prompttokens = parse_json(parse_json(BackendResponseBody)[‘usage’])[‘prompt_tokens’]
| extend completiontokens = parse_json(parse_json(BackendResponseBody)[‘usage’])[‘completion_tokens’]
| extend totaltokens = parse_json(parse_json(BackendResponseBody)[‘usage’])[‘total_tokens’]
| extend ip = CallerIpAddress
| where model != ”
| summarize
sum(todecimal(prompttokens)),
sum(todecimal(completiontokens)),
sum(todecimal(totaltokens)),
avg(todecimal(totaltokens))
by ip, model
GitHub repository: https://github.com/terenceluk/Azure/blob/main/Kusto%20KQL/Identify-token-usage-by-ip-and-mode.kusto
Query to monitor prompt completions
ApiManagementGatewayLogs
| where tolower(OperationId) in (‘completions_create’,’chatcompletions_create’)
| where ResponseCode == ‘200’
| extend model = tostring(parse_json(BackendResponseBody)[‘model’])
| extend prompttokens = parse_json(parse_json(BackendResponseBody)[‘usage’])[‘prompt_tokens’]
| extend prompttext = substring(parse_json(parse_json(BackendResponseBody)[‘choices’])[0], 0, 100)
GitHub repository: https://github.com/terenceluk/Azure/blob/main/Kusto%20KQL/Monitor-prompt-completions.kusto
If you have experience setting API Management up to capture requests to Azure OpenAI then you will already know that the only information representing the calling user the Log Analytics provide is the IP address. This isn’t very useful so I have written another post to demonstrate how to capture the OAuth token details used to make the call:
How to log the identity of a user using an Azure OpenAI service with API Management logging (Part 1 of 2)
https://blog.terenceluk.com/how-to-log-identity-of-user-using-azure/
Testing OpenAI API calls through API Management with Postman
With the API Management configuration completed, we should now be able to use Postman to test querying the APIM. I won’t go into the details of the configuration but will provide the screenshots:
https://dev-openai-apim.azure-api.net/deployments/{{gpt_mode_4}}/chat/completions?api-version={{api_env_latest}}
{
“messages”: [
{
“role”: “user”,
“content”: “how many faces does a dice have?”
}
],
“temperature”: 0.7,
“top_p”: 0.95,
“frequency_penalty”: 0,
“presence_penalty”: 0,
“max_tokens”: 800,
“stop”: null
}
I’ll write another post in the future to properly secure Azure OpenAI now that we APIM publishing the APIs.
Create an App Registration for securing APIM API access
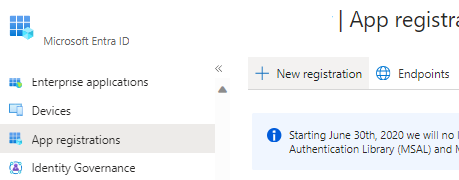
With the Azure API Management configured to publish the Azure OpenAI APIs, we will now proceed to create an App Registration that will allow us to lockdown APIM access for select Entra ID / Azure AD users.
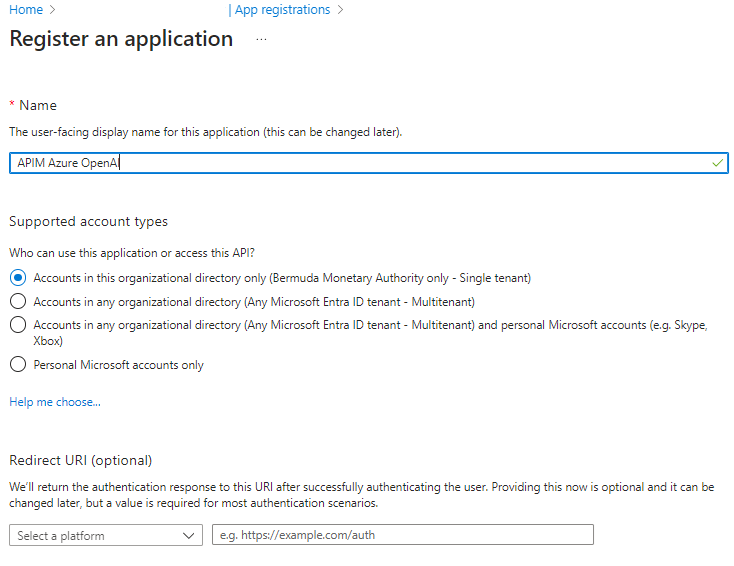
Provide a name for the App Registration and create the object:
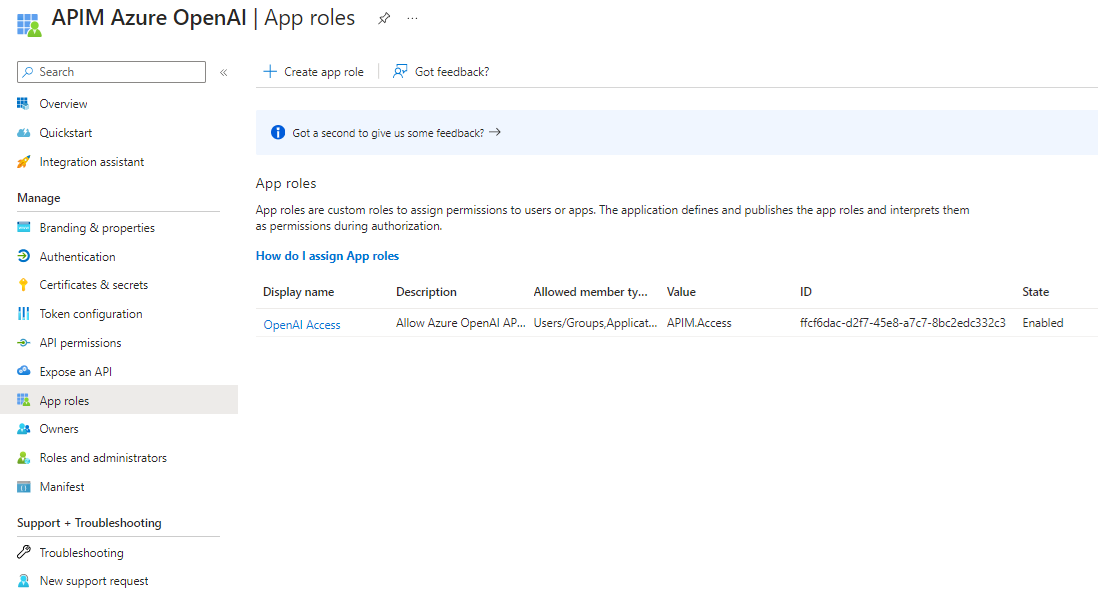
Select the App roles blade, click on Create app role and fill out the following:
Display name: <Provide a display name>
Allowed member types: Select Users/Groups or Both (Users/Groups + Applications)
Value: APIM.Access
Description: Allow Azure OpenAI API access.
Create the app role.
Select the Expose an API blade, and click on the Add link beside Application ID URI:
Leave the Application ID URI as the default and click on the Save button:
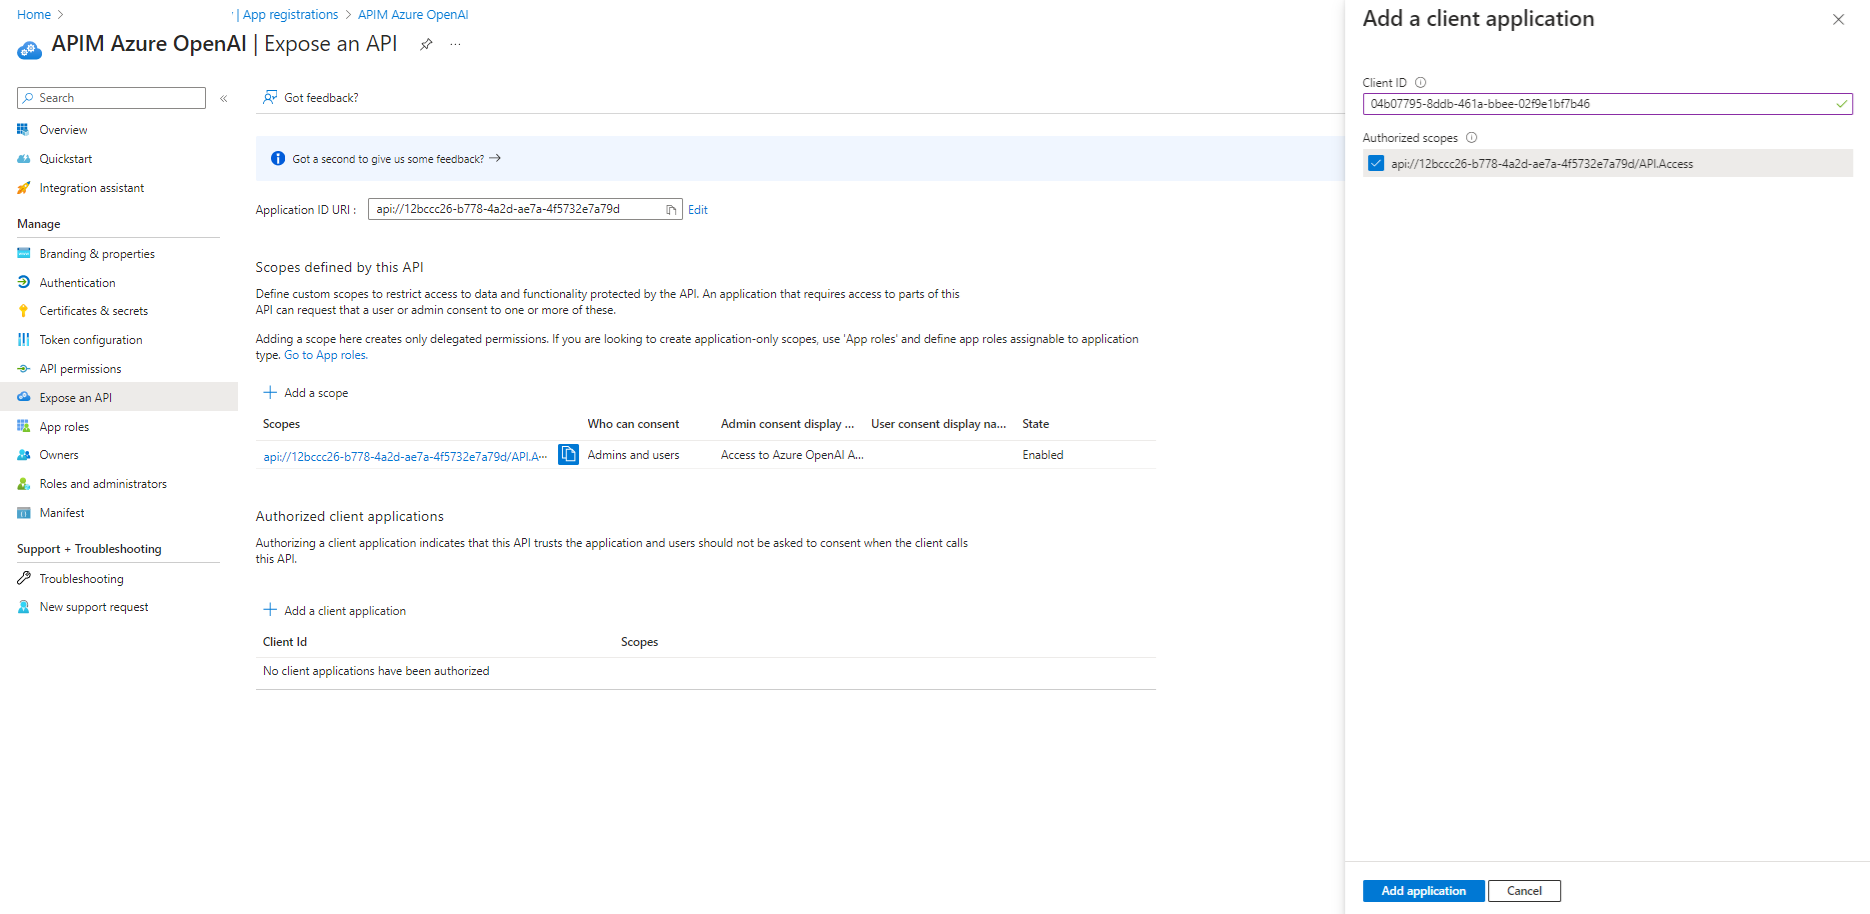
We’ll be using Azure CLI to quickly test the retrieval of the token so we’ll need to create a scope and add Azure CLI as an authorized client application.
Proceed to click on Add a scope and fill in the following properties:
Scope name: API.Access
Who can consent: Admins and users
Admin consent display name: Access to Azure OpenAI API
Admin consent description: Allows users to access the Azure OpenAI API
State: Enabled

Click on Add a client application to add the Client ID of Azure CLI 04b07795-8ddb-461a-bbee-02f9e1bf7b46 as an authorized application to retrieve a delegated access token:

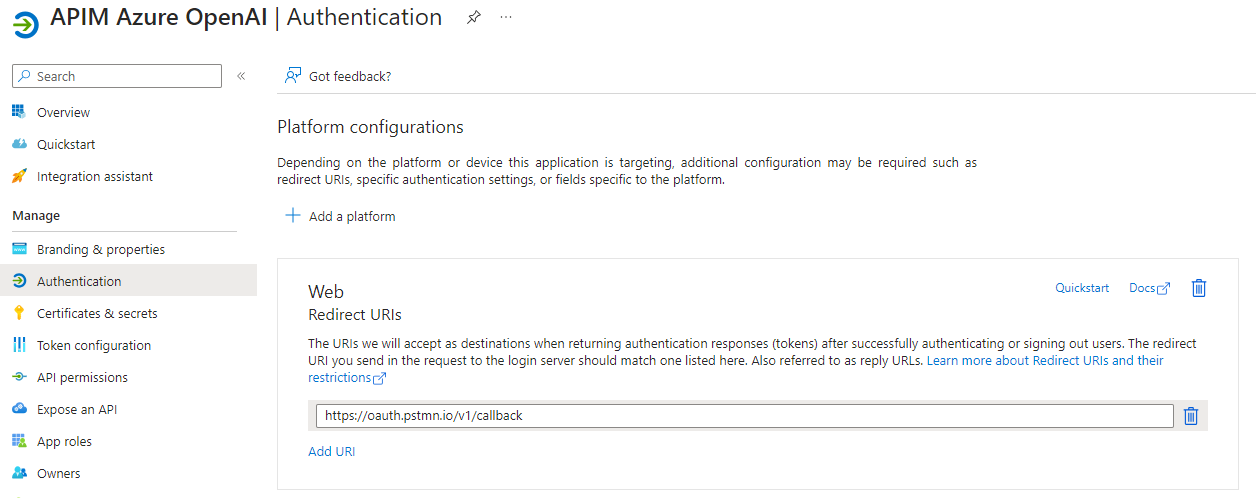
I will also be demonstrating how to set up Postman to test the retrieval of the token so we’ll need to add the Redirect URI for the call back to Postman for the App Registration by navigating to the Authentication blade, click on Add a platform, and add the following URI: https://oauth.pstmn.io/v1/callback
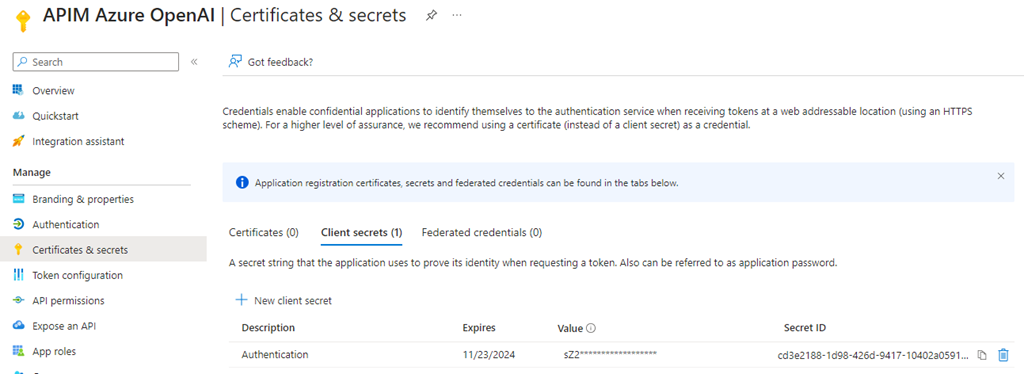
We will also need to create a secret for the App Registration so Postman is able to securely authenticate and retrieve a delegated token on behalf of the user. Navigate to the Certificates & secrets blade, create a Client secret then save the secret:
With the App Registration created, we’ll need to grant a user with the role to test calling the APIM’s OpenAI publish API. Copy the client ID of the App Registration, navigate to the Enterprise Application blade and search for the Applicaiton ID:
Open the Enterprise Application object, navigate to the Users and groups blade, and click on Add user/group:
Select the user who we’ll be testing with and assign the user:
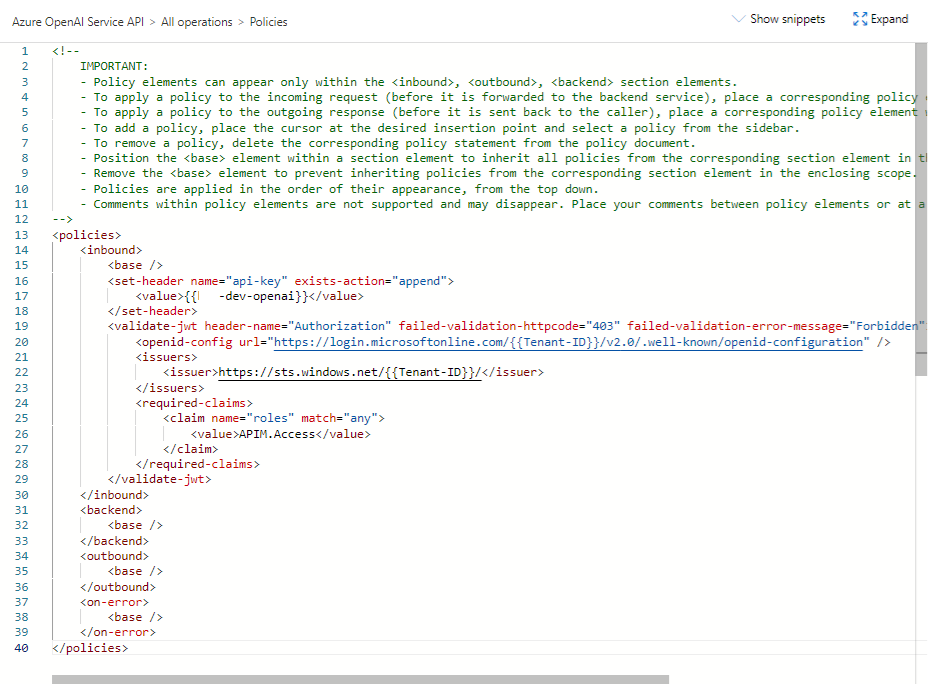
With the Enterprise Application configured with the user assigned, we will now proceed to lockdown the APIM inbound processing policy. Open the APIM resource in the portal, navigate to the APIs blade, Azure OpenAI Service API, Design tab, and click on the </> button under Inbound processing:
Proceed to add the <vadlidate-jwt> tag content and note that we use the {{Tenant-ID}} named value variable we created earlier:
GitHub Repository: https://github.com/terenceluk/Azure/blob/main/API%20Management/XML/Validate-JWT-Access-Claim.xml
<!–
IMPORTANT:
– Policy elements can appear only within the <inbound>, <outbound>, <backend> section elements.
– To apply a policy to the incoming request (before it is forwarded to the backend service), place a corresponding policy element within the <inbound> section element.
– To apply a policy to the outgoing response (before it is sent back to the caller), place a corresponding policy element within the <outbound> section element.
– To add a policy, place the cursor at the desired insertion point and select a policy from the sidebar.
– To remove a policy, delete the corresponding policy statement from the policy document.
– Position the <base> element within a section element to inherit all policies from the corresponding section element in the enclosing scope.
– Remove the <base> element to prevent inheriting policies from the corresponding section element in the enclosing scope.
– Policies are applied in the order of their appearance, from the top down.
– Comments within policy elements are not supported and may disappear. Place your comments between policy elements or at a higher level scope.
–>
<policies>
<inbound>
<base />
<set-header name=”api-key” exists-action=”append”>
<value>{{bma-dev-openai}}</value>
</set-header>
<validate-jwt header-name=”Authorization” failed-validation-httpcode=”403″ failed-validation-error-message=”Forbidden”>
<openid-config url=https://login.microsoftonline.com/{{Tenant-ID}}/v2.0/.well-known/openid-configuration />
<issuers>
<issuer>https://sts.windows.net/{{Tenant-ID}}/</issuer>
</issuers>
<required-claims>
<claim name=”roles” match=”any”>
<value>APIM.Access</value>
</claim>
</required-claims>
</validate-jwt>
</inbound>
<backend>
<base />
</backend>
<outbound>
<base />
</outbound>
<on-error>
<base />
</on-error>
</policies>
Proceed to save and we are now ready to test with Azure CLI.
Testing Token Retrieval with Azure CLI and API Management API calls with Postman
Launch a prompt with Azure CLI available and execute:
Az login
Complete the login with the test account:
Next, we’ll need to copy the Application ID URI:
… and execute:
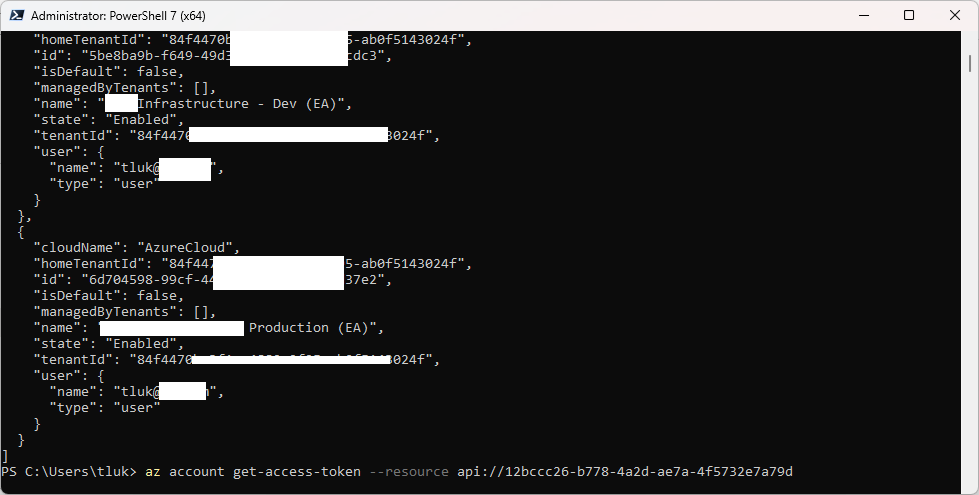
az account get-access-token –resource api://12bccc26-b778-4a2d-ae7a-4f5732e7a79d
A token should be returned:
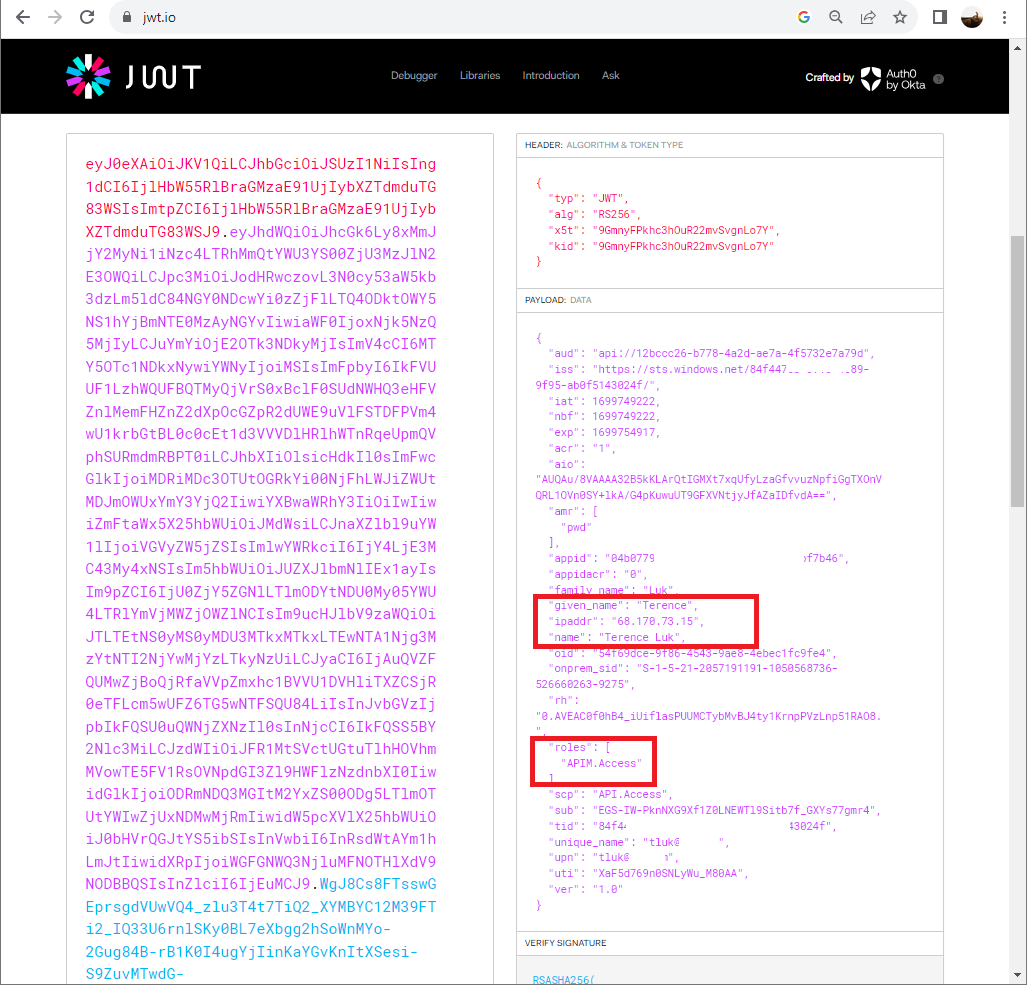
Copying the token and pasting it into https://jwt.io/ should confirm that the token has the role APIM.Access:
You should now be able use the token to call APIM with delegated access with a 200 OK status:
Trying to call APIM without a token passed in the header as Authorization will fail with:
{
“statusCode”: 403,
“message”: “Forbidden”
}
Removing the user from the Enterprise Application and attempting to call APIM will also result in the same failure message:
{
“statusCode”: 403,
“message”: “Forbidden”
}
Testing Token Retrieval and API Management API calls with Postman
Proceed to launch Postman, navigate to the Environments are and create the following variables.
tenant_id: <The App Registration’s Directory (tenant) ID>
client_id_APIM: <The App Registration’s Application (client) ID>
client_secret_APIM: <The secret we created earlier>
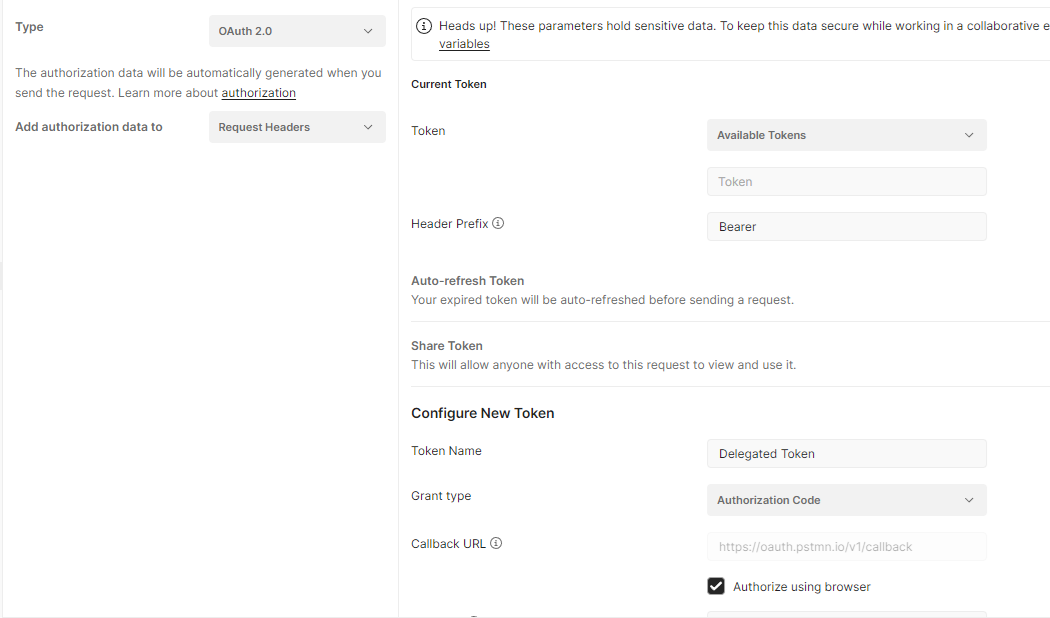
Next, create a new request, navigate to the Authorization tab and fill in the following:
Type: OAuth 2.0
Add authorization data to: Request Headers
Token: Available Tokens
Header Prefix: Bearer
Token Name: <Name of preference>
Grant type: Authorization Code
Callback URL: https://oauth.pstmn.io/v1/callback
Authorize using browser: Enabled
Auth URL: https://login.microsoftonline.com/{{tenant_id}}/oauth2/v2.0/authorize
Access Token URL: https://login.microsoftonline.com/{{tenant_id}}/oauth2/v2.0/token
Client ID: {{client_id_APIM}}
Client Secret: {{client_secret_APIM}}
Scope: api://12bccc26-b778-4a2d-ae7a-4f5732e7a79d/API.Access
Client Authentication: Send as Basic Auth header
**Note the default Callback URL is set as https://oauth.pstmn.io/v1/callback, which is the URL we configured earlier for the App Registration’s Redirect URI.
Leave the rest as default and click on Get New Access Token:
A window with Get new access token prompt will be displayed with a browser directing you to the login.microsoftonline.com to log into Entra. Proceed to log into Entra ID to retrieve the token.
Repeat the steps for Postman as demonstrated in the Azure CLI instructions to call the OpenAI endpoints through the APIM management with the token.
—————————————————————————————————————————-
I hope this helps anyone who may be looking for a way to lock down APIM access when publishing Azure OpenAI APIs. There are other infrastructure components that will need to be secured to ensure no calls can reach the Azure OpenAI API and I will write another blog post for the design and configuration in the future.

