I spend a lot of time writing about Azure infrastructure and AI, but every once in a while I like to step back from architectural diagrams and Terraform, and try to build something fun. About a month ago I decided to try vibe coding an application by chatting with GitHub Copilot with a Pro license.
The result? A fully functional multi-stop travel planner that calculates exactly when you need to leave each location to arrive at the next one on time, complete with real-time traffic awareness, transit directions, parking buffers, and live address autocomplete. This blog post serves as a walk through of what I built, how the Google Maps API setup works, and how I used Copilot to do the heavy lifting.
The Problem (a.k.a. Most Trips I’ve Taken With My Wife)
If you travel with someone who is an enthusiastic planner, you know the feeling. The itinerary looks great on paper: museum at 10, lunch at 12:30, walking tour at 2, dinner reservation at 7, but somewhere around stop three you realize the schedule was built with the optimism of someone who has never experienced a parking garage on a Saturday afternoon.
My wife’s trip itineraries are legendary in our household for being ambitious. I say that with nothing but love but after one too many “we need to leave right now” moments in an unfamiliar city, I started thinking: what if there was a tool that actually worked backwards from each arrival time, factored in real traffic, and told you exactly when to leave each stop?
Google Maps is great for point-to-point navigation, but it doesn’t chain stops together or reason about “I need to be at this restaurant by 12:30 and given when my museum visit ends, when do I need to walk out the door?” That’s the gap this app fills.
What Does the App Actually Do?
You enter:
- A starting address (your home, hotel, office or wherever you’re beginning the day)
- A date for the trip
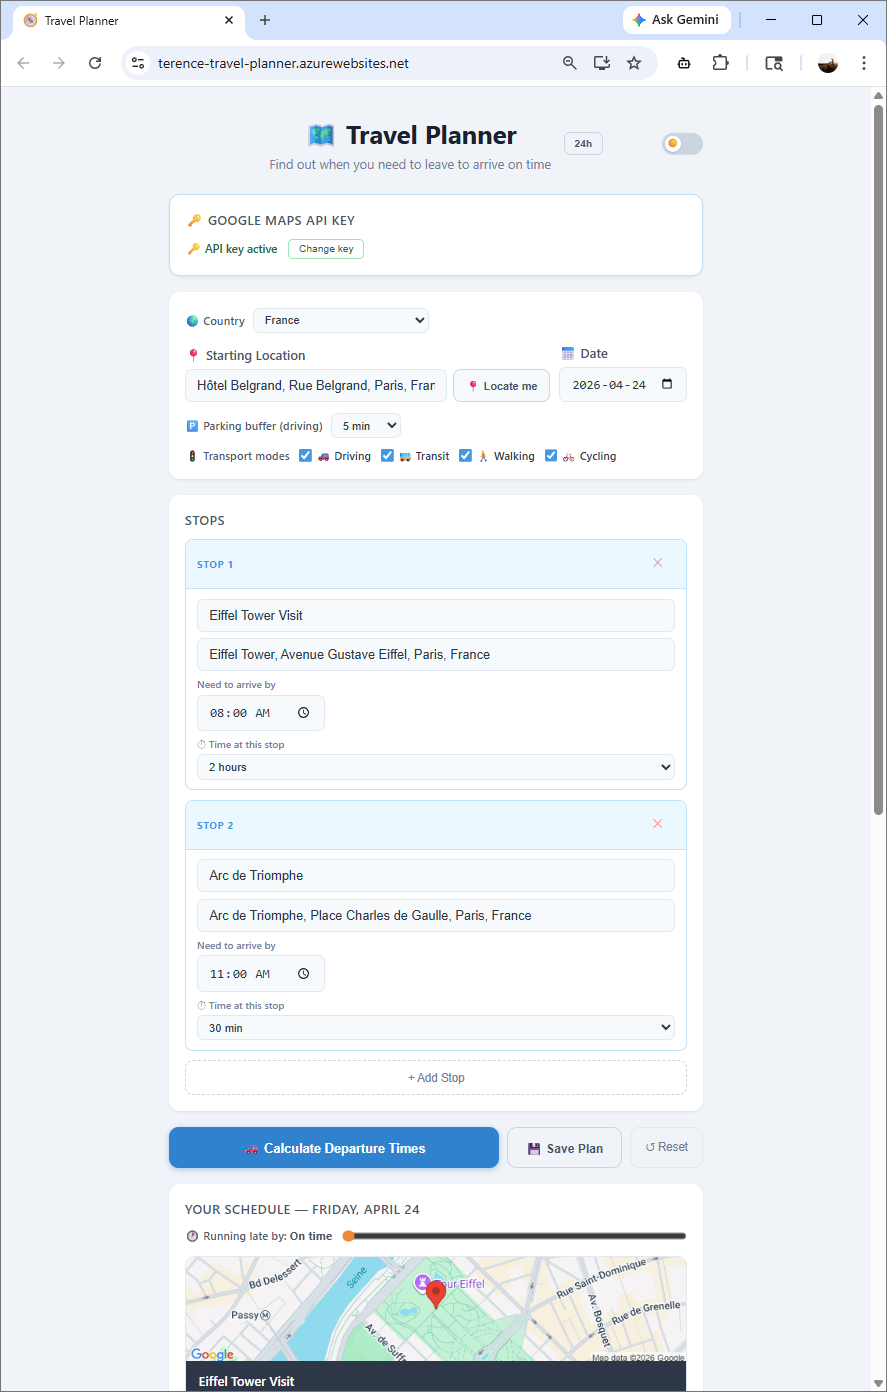
- A list of stops, each with a required arrival time
The app then chains the legs together from start to stop 1 to stop 2, and so on.
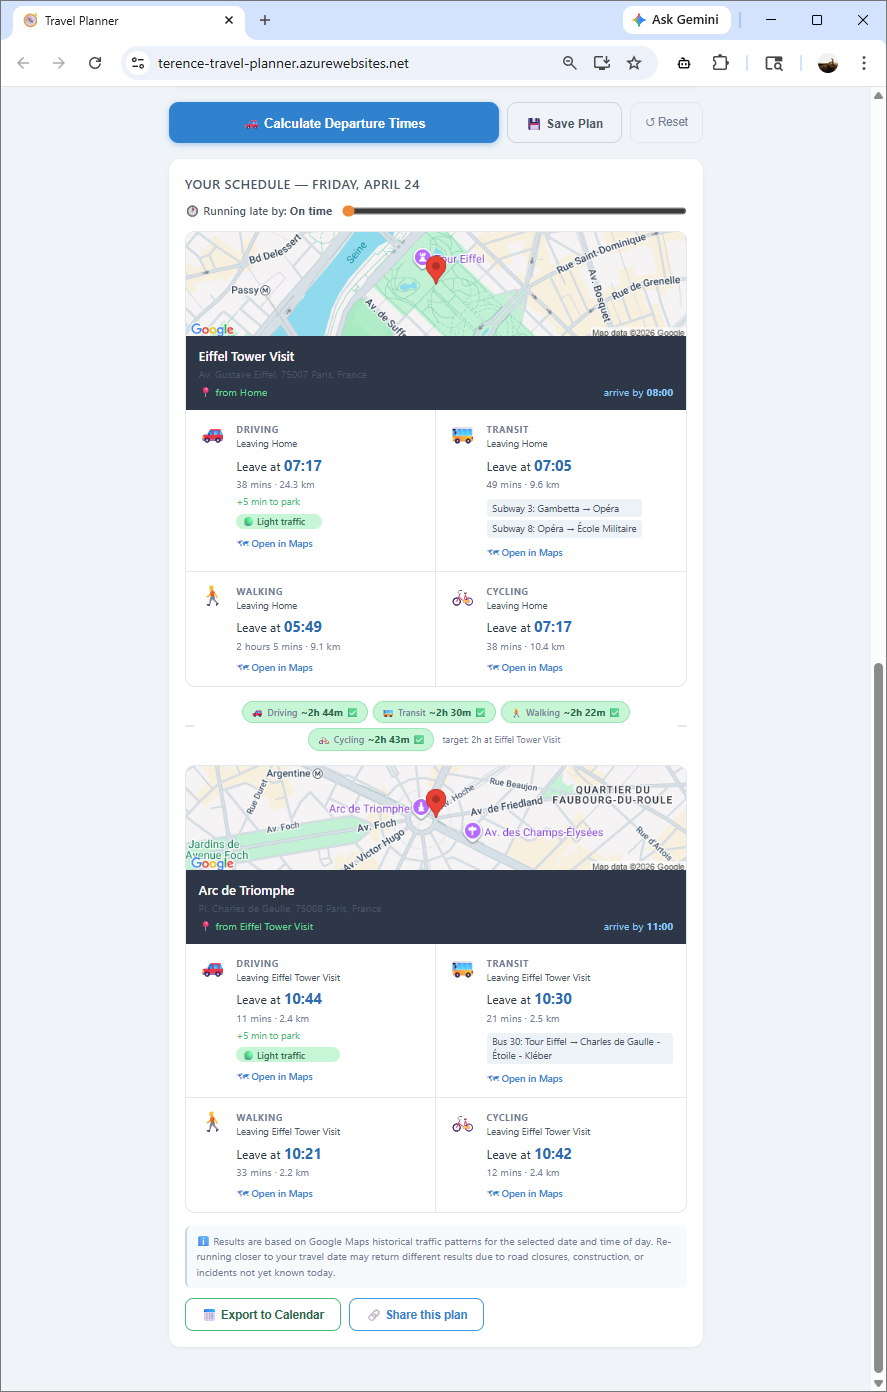
For each leg it returns:
- When to leave for both driving and transit
- Traffic severity categorized as 🟢 Light / 🟡 Moderate / 🔴 Heavy with exact delay minutes baked in
- Step-by-step transit directions with departure times
- Static map thumbnails for each leg so you can visually confirm the route
- “Open in Maps” deep links that jump straight to the Google Maps app
- Impossible timing detection where if the previous stop’s arrival conflicts with the next departure, the app flags it and suggests an earlier departure time
- A parking buffer you can configure (0–20 minutes) so that “arrive by 9:00 AM” actually means you’re in your seat at 9:00 AM, not still hunting for a parking spot
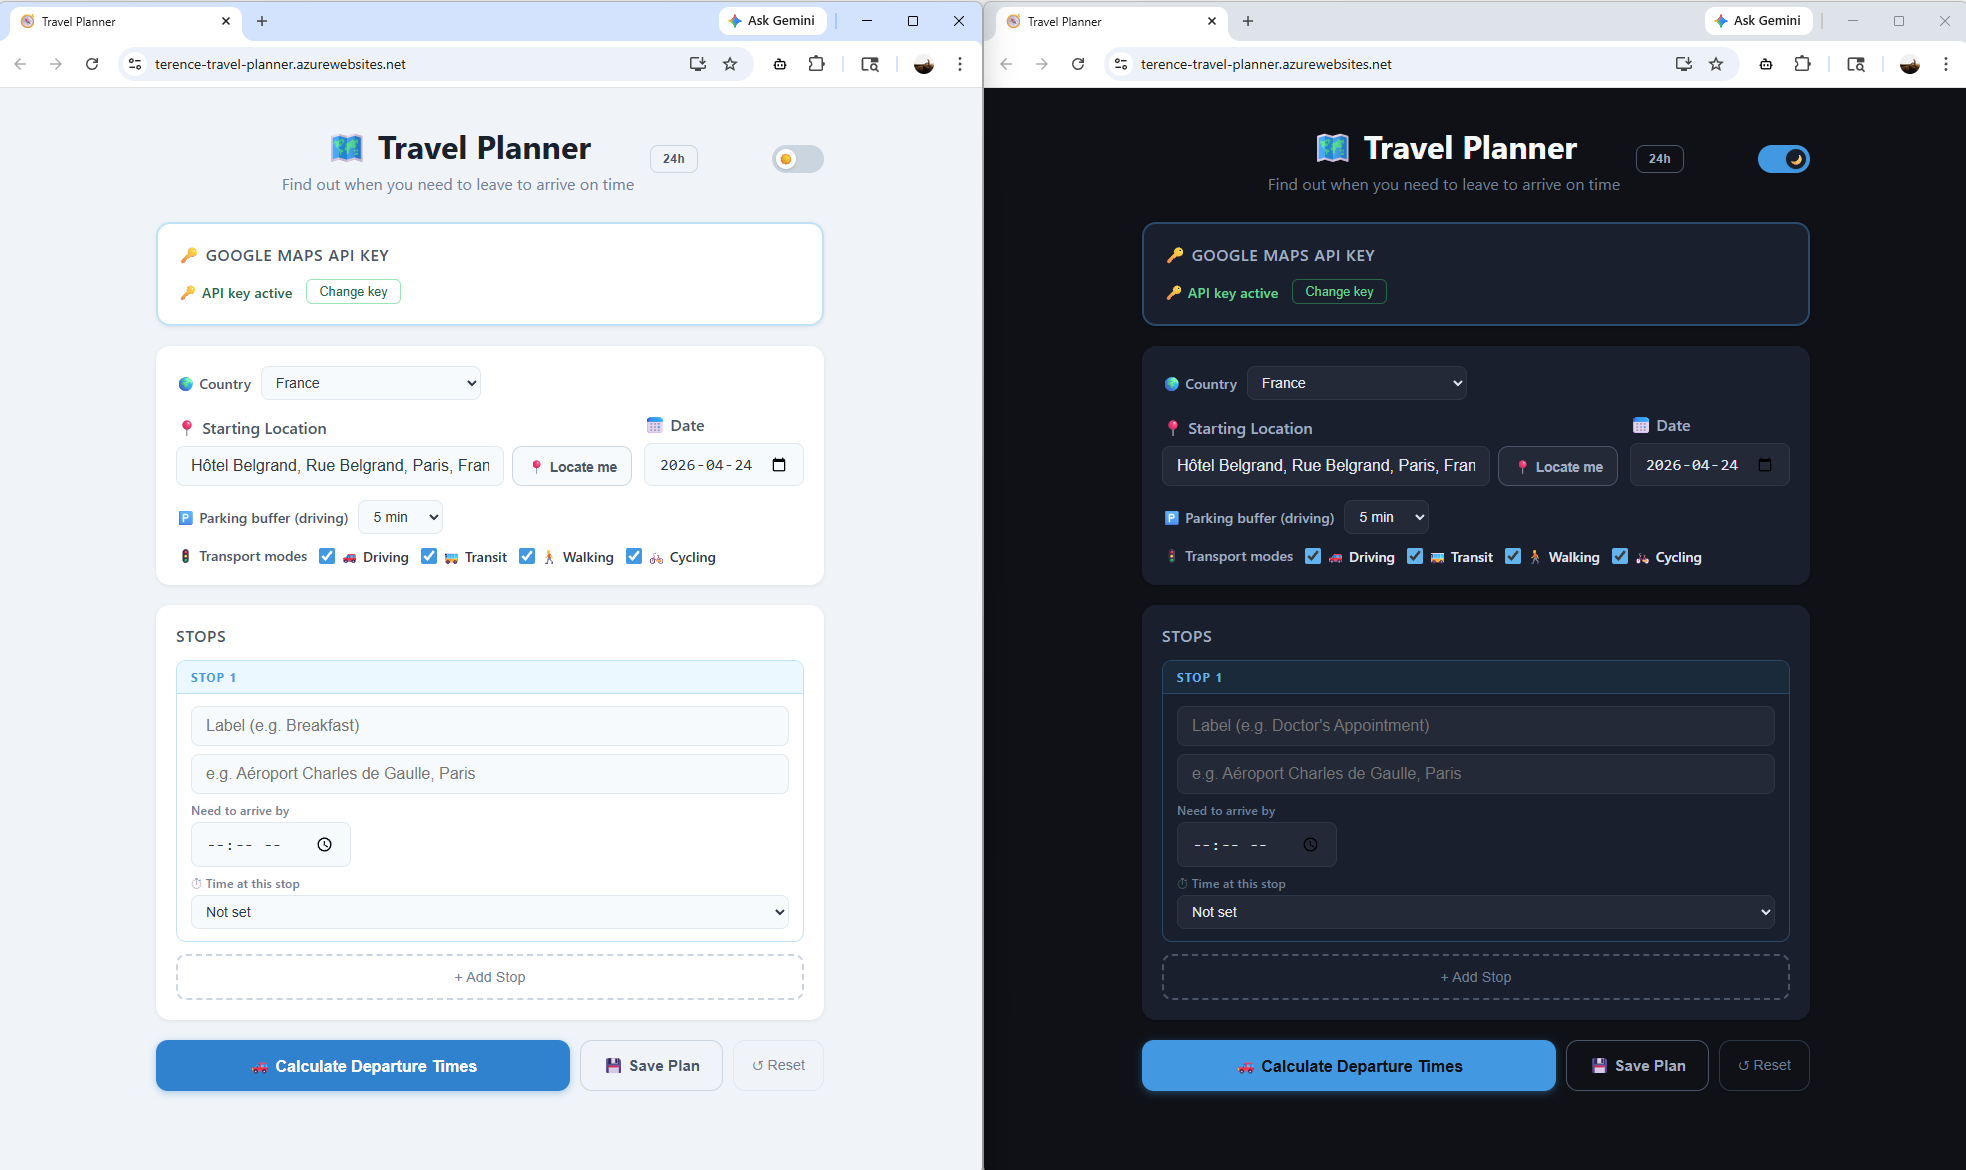
The form state persists across page refreshes via localStorage, there’s a dark mode toggle, a 12-hour/24-hour time format switch, saved trips, and shareable URLs so you can send the full itinerary to whoever you’re travelling with.
Here are a few sample screenshots of the application:
Try It Yourself
I’ve hosted the app publicly here: https://terence-travel-planner.azurewebsites.net/
**Note that I’m using the F1 free tier app service plan to host the app in Azure so there could be a cold start delay when loading the page.
One thing to note is that the app will ask you for your own Google Maps API key when you first open it to avoid my Google Maps API Key racking up a large bill. Your key is validated client-side, used only for your session, and never stored on my server. Getting a key is straightforward and I’ll provide a walkthrough it in the next section.
Another way to run this app is locally and for those interested in the code, you can retrieve it here: https://github.com/terenceluk/travel-planner
The Tech Stack
The app is a clean, modern full-stack TypeScript project:
| Layer | Technology |
|---|---|
| Frontend | React 18 + TypeScript, Vite 5 |
| Backend | Node.js + Express + TypeScript |
| Maps & Data | Google Directions API, Places API, Maps Static API |
| Styling | Plain CSS with no UI framework needed |
The backend acts as a secure proxy where API keys live server-side and are never exposed to the browser. The frontend calls Express endpoints (/api/directions, /api/autocomplete, /api/place-image, etc.) which in turn call Google’s APIs. When running in “Bring Your Own Key” mode (as the hosted version does), the key you enter in the UI is forwarded through the proxy for that request only and never persisted.
Setting Up Your Google Maps API Key
This is the piece that trips most people up the first time, so let’s walk through it clearly.
Step 1 — Create a Google Cloud Project
- Go to the Google Cloud Console
- Create a new project (or use an existing one)
- Make sure billing is enabled as Google requires a billing account even for free-tier usage. New accounts get a $300 credit, and Maps API usage at personal/hobby scale typically stays well within the free monthly quota.
Step 2 — Enable the Required APIs
Navigate to APIs & Services → Library and enable each of the following:
| API | Purpose |
|---|---|
| Directions API | Calculates driving and transit routes between stops |
| Places API | Powers the address autocomplete as you type |
| Maps Static API | Generates the inline map thumbnail images (optional) |
| Geocoding API | Resolves typed addresses to full postal addresses and coordinates |
Step 3 — Create an API Key
- Go to APIs & Services → Credentials
- Click Create Credentials → API Key
- Copy the key
Step 4 — Restrict the Key (Important!)
Never leave an API key unrestricted. Under the key’s settings:
- Set Application restrictions → HTTP referrers (for browser-facing keys) or IP addresses (for server-side keys)
- Set API restrictions → restrict to only the four APIs listed above
This prevents the key from being abused if it ever leaks. It takes 30 seconds and can save you from a nasty surprise on your bill.
Step 5 — Paste the Key into the App
When you open the hosted app, you’ll see a prompt for your API key. Paste it in, hit Validate, and the app will confirm the key works before letting you proceed. You’re ready to plan.
How I Built This with GitHub Copilot
Here’s the part I’m excited to share. I didn’t architect this project upfront and then use Copilot to fill in boilerplate. I described what I wanted conversationally and iteratively shaped the app through natural language prompts. This is what we call “vibe coding”.
My Approach — Prompt, Review, Refine
Here’s a rough outline of the prompting journey I went through:
1. Describe the core idea
Start with a clear, one-paragraph description of what you want to build and why existing tools don’t cut it. Don’t worry about technical details yet.
“I want a web app where I enter a starting address, a date, and a list of stops each with a required arrival time. The app should figure out when I need to leave each stop to make it to the next one on time, accounting for real-time traffic. Each leg should start from the previous stop’s address, not always from home.”
2. Ask for a tech stack recommendation
“What’s a good tech stack for this? I want a Node.js backend to keep the API key secure.”
Copilot recommended React + TypeScript + Vite for the frontend and Express + TypeScript for the backend which is a solid, modern choice.
3. Scaffold the project structure
“Set up a monorepo with a
client/folder for React and aserver/folder for Express. The server should proxy all Google Maps API calls.”
Within minutes I had a working project skeleton with a root package.json that boots both servers with a single npm run dev command.
4. Build features incrementally
Rather than trying to build everything at once, I added one feature at a time:
- “Add address autocomplete using the Places API”
- “Show traffic severity as a badge with light, moderate, heavy based on the ratio of traffic duration to baseline duration”
- “Add a parking buffer setting from 0–20 minutes and subtract it from the arrival time when calculating departure”
- “Detect when a stop’s departure time is before the previous stop’s arrival and flag it with a suggested earlier departure”
- “Add a static map thumbnail for each leg using the Maps Static API”
- “Persist the form state in localStorage so it survives a page refresh”
- “Add a shareable URL that encodes the current form state as a base64 query parameter”
5. Polish and edge cases
Once the core was working, I pushed into UX territory:
- “Add a dark mode toggle”
- “Add 12-hour vs 24-hour time format option”
- “Add the ability to save and name trips locally”
- “Show how long the user has at each stop between arrival and the next departure”
Tips That Made the Experience Better
- Be specific about constraints. “Never expose the API key to the browser and always proxy through the Express backend” got me a secure architecture from the start.
- Ask Copilot to explain what it’s generating. This helped me catch a few places where it was making assumptions I didn’t want.
- Iterate on UI with descriptions of what you see, not component names. “The results cards look cramped on mobile, can you add a bit more breathing room and stack the driving/transit columns vertically below tablet width?” is more effective than “fix the responsive layout.”
- Let Copilot write the README too. It produced a thorough, accurate README with setup instructions, a feature list, and a tech stack table.
Final Thoughts
Trying to find time to finally do this was challenging due to my work schedule but I’m glad I managed to squeeze it into a weekend this year where I wasn’t working an overnight shift. LLMs, whether its OpenAI or Anthropic seemingly makes leaps and bounds every other week and the way it empowers people with an idea to realize it is extremely impressive. Is the generated code perfect? No, we would still need to review it, test edge cases, and apply our own judgment. But the velocity is remarkable. What might have taken me a weekend of focused effort came together in an afternoon. Most importantly, the next time my wife hands me a five-stop itinerary with 25 minutes between each location, I’ll just pull up the app and let the traffic data do the negotiating.
If you haven’t tried vibe coding, pick a real problem you have, describe it clearly, and see how far you get. You might surprise yourself.