One of the most common questions I tend to be asked by colleagues is how would they be able to connect multiple Azure virtual networks together and allow them to utilize a single VPN gateway to connect back to an on-premise network so that traffic can flow in between the virtual networks and across the site-to-site VPN. As most Azure administrators will already know, a virtual network is the traffic isolation boundary on the Azure platform. Virtual networks in Azure does not allow any ingress traffic by default (https://docs.microsoft.com/en-us/azure/security/fundamentals/isolation-choices#networking-isolation). There are two choices available to connect virtual networks together and they are:
- Site-to-site VPN
- VNet Peering
I won’t go into too much detail as there are many articles and documentation outlining the advantages and disadvantages between the two. In addition to this article that outline the differences: https://azure.microsoft.com/en-us/blog/vnet-peering-and-vpn-gateways/ also be aware of the bandwidth limitations, traffic traversing through the internet and overhead when using a VPN. VNet Peering uses the Azure backbone and therefore provides more bandwidth and less latency. So assuming if features such as encryption isn’t necessary, using VNet Peering is typically a much better option.
This blog post will serve to demonstrate the configuration of a hub and spoke topology where virtual networks are connected with VNet Peering and the spoke connecting to an on-premise network via VPN Gateway.
Environment
The following is the topology we will begin with:

The virtual networks are configured with the following parameters:
Name: vnet-prod-eastus
Address Space: 10.248.0.0/16
Subnet Name: 10.248.1.0-24
Subnet: 10.248.1.0/24
Gateway Subnet: 10.248.255.0/27
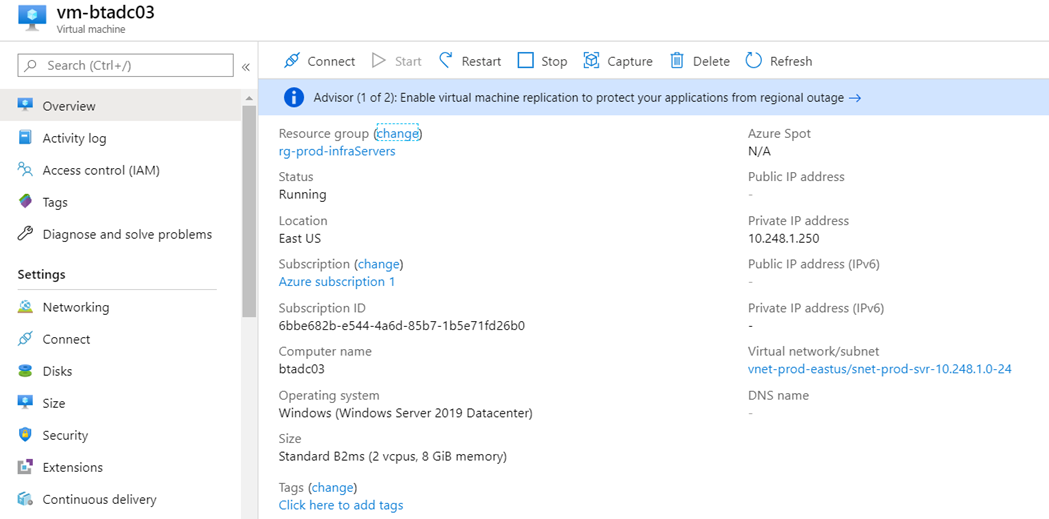
Virtual Machine Name: btadc03
Virtual Machine IP: 10.248.1.250
Name: vnet-dev-eastus
Address Space: 10.249.0.0/16
Subnet Name: 10.249.1.0-24
Subnet: 10.249.1.0/24
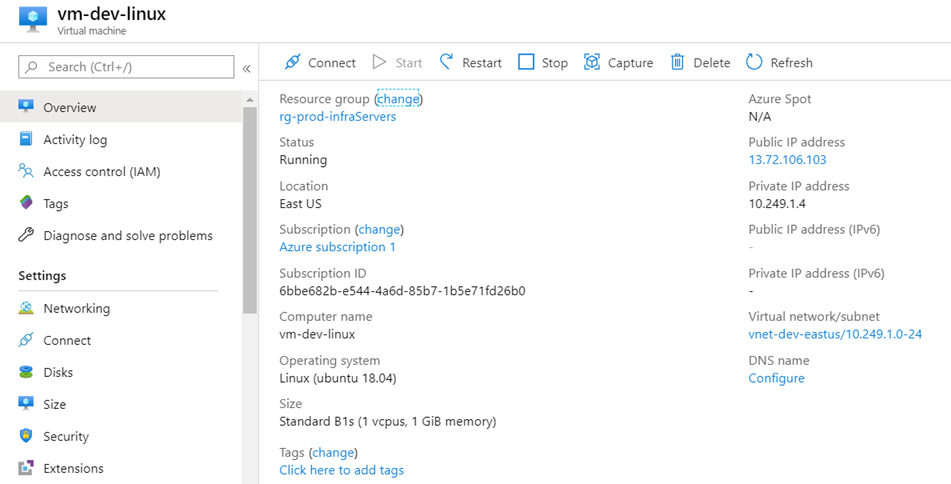
Virtual Machine Name: vm-dev-linux
Virtual Machine IP: 10.249.1.4
Name: vnet-uat-eastus
Address Space: 10.250.0.0/16
Subnet Name: 10.250.1.0-24
Subnet: 10.250.1.0/24
Virtual Machine Name: vm-uat-linux
Virtual Machine IP: 10.250.1.4
Objective
The goal of the configuration is to establish a bidirectional connection between:
- vnet-dev-eastus and vnet-prod-eastus
- vnet-uat-eastus and vnet-prod-eastus
- vnet-dev-eastus and on-premise datacentre
- vnet-uat-eastus and on-premise datacentre
Note that there will be not bidirectional communication between:
- vnet-dev-eastus and vnet-uat-eastus
Being able to achieve this will require an NVA appliance deployed in vnet-prod-easus, which I will cover in a different post or you can refer to the following article: https://docs.microsoft.com/en-us/azure/architecture/reference-architectures/hybrid-networking/hub-spoke
VNet Peering Topology
The bidirectional VNet Peering will be configured between the following VNets:
- vnet-dev-eastus and vnet-prod-eastus
- vnet-uat-eastus and vnet-prod-eastus
Topology with Configuration
The topology with VNet Peering configuration will look as such:
VNet Configuration
The three virtual networks are configured as shown in the following screenshots:
vnet-prod-eastus
vnet-dev-eastus
vnet-uat-eastus
Configuring VNet Peering between vnet-dev-eastus (spoke) and vnet-prod-eastus (hub)
Configure the VNet Peering between vnet-dev-eastus peer to vnet-prod-eastus by navigating into the spoke virtual network, click on Peerings under Settings and then the Add button:
Provide a meaningful name for the peering between the two VNets and for this example, I will use the following:
vnet-dev-eastus-to-vnet-prod-eastus
vnet-prod-eastus-to-vnet-dev-eastus
Allow virtual network access from vnet-dev-eastus to vnet-prod-eastus: Enabled
Allow virtual network access from vnet-prod-eastus to vnet-dev-eastus: Enabled
Allow forwarded traffic from vnet-prod-eastus to vnet-dev-eastus: Disabled
Allow forwarded traffic from vnet-dev-eastus to vnet-prod-eastus: Disabled
Allow gateway transit: Enabled
Note that hoovering over the Allow gateway transit checkbox will add a checkmark into it but clicking into it would grey out the option as such:
It appears a bit odd but this is normal.
A bidirectional VNet Peering between the two VNets will now be created. Note that the peering from the spoke to hub will have Gateway transit disabled:
Clicking into the hub’s VNet Peering will show that Use remote gateways is checked:
Configuring VNet Peering between vnet-uat-eastus (spoke) and vnet-prod-eastus (hub)
The procedure for the other spoke will be the same as above.
Configure the VNet Peering between vnet-uat-eastus peer to vnet-prod-eastus by navigating into the spoke virtual network, click on Peerings under Settings and then the Add button:
Provide a meaningful name for the peering between the two VNets and for this example, I will use the following:
vnet-uat-eastus-to-vnet-prod-eastus
vnet-prod-eastus-to-vnet-uat-eastus
Allow virtual network access from vnet-uat-eastus to vnet-prod-eastus: Enabled
Allow virtual network access from vnet-prod-eastus to vnet-uat-eastus: Enabled
Allow forwarded traffic from vnet-prod-eastus to vnet-uat-eastus: Disabled
Allow forwarded traffic from vnet-uat-eastus to vnet-prod-eastus: Disabled
Allow gateway transit: Enabled
As with the previous spoke virtual network configuration, the Allow gateway transit will be greyed out when you enable it.
A bidirectional VNet Peering between the two VNets will now be created. Note that the peering from the spoke to hub will have Gateway transit disabled:
Clicking into the hub’s VNet Peering will show that Use remote gateways is checked:
vnet-prod-eastus (hub) VNet Peering configuration
The VNet Peering for the hub network to the other two spokes would have already been created and configured and look similar to the following:
Clicking into the properties of the peering will show that Allow gateway transit is enabled and Use remote gateways greyed out:
Virtual Machines for Testing
As show in the diagrams earlier this post, there are VMs in each network that will be used for testing.
The virtual machine vm-dev-linux resides in the vnet-dev-eastus virtual network:
The virtual machine vm-uat-linux resides in the vnet-uat-eastus virtual network:
The virtual machine vm-btadc03 resides in the vnet-prod-eastus virtual network:
The IP addresses for these virtual machines are as follows:
vm-btadc03
Private IP: 10.248.1.250
vm-dev-linux
Public IP: 13.72.106.103
Private IP: 10.249.1.4
vm-uat-linux
Public IP: 13.72.109.104
Private IP: 10.250.1.4
A SSH connection will be established with the two Linux VMs:
A ping test confirms that connectivity between vnet-dev-eastus (spoke to hub) is functional:
A ping test confirms that connectivity between vnet-uat-eastus (spoke to hub) is functional:
If your on-premise VPN gateway appliance is configured with the routes to send traffic from the on-premise network to the spoke networks then you should also be able to ping from the spoke networks through the hub network, over the site-to-site VPN and to the on-premise VM. In the even that you are not able to, verify that you have the routes on the on-premise VPN gateway. The following is a screenshot of a WatchGuard firewall providing VPN gateway services for the on-premise network:
Note that the 10.249.0.0/16 and 10.250.0.0/16 routes for the two hub networks are configured.
————————————————————————————————————————
Extra – VNet Peering configuration
For reference, the following are information notes available for each configuration parameter during the VNet Peering configuration.


One Response
Thanks for your work, but spoke to spoke communication will work ?